TP-Link TL-WA5110G User Guide - Page 30
Use the IP Address specified by ISP
 |
UPC - 845973051327
View all TP-Link TL-WA5110G manuals
Add to My Manuals
Save this manual to your list of manuals |
Page 30 highlights
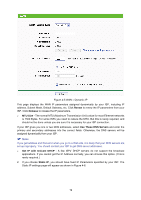
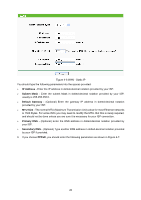
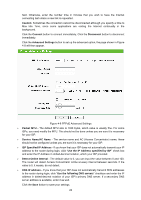
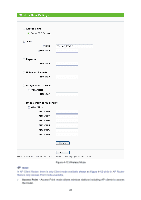
field. Otherwise, enter the number time in minutes that you wish to have the Internet connecting last unless a new link is requested. Caution: Sometimes the connection cannot be disconnected although you specify a time to Max Idle Time, since some applications are visiting the Internet continually in the background. Click the Connect button to connect immediately, Click the Disconnect button to disconnect immediately. Click the Advanced Settings button to set up the advanced option, the page shown in Figure 4-8 will then appear. Figure 4-8 PPPoE Advanced Settings ¾ Packet MTU - The default MTU size is 1480 bytes, which value is usually fine. For some ISPs, you need modify the MTU. This should not be done unless you are sure it is necessary for your ISP. ¾ Service Name/AC Name - The service name and AC (Access Concentrator) name, these should not be configured unless you are sure it is necessary for your ISP. ¾ ISP Specified IP Address - If you know that your ISP does not automatically transmit your IP address to the router during login, click "Use the IP Address specified by ISP" check box and enter the IP Address in dotted-decimal notation, which your ISP provided. ¾ Detect Online Interval - The default value is 0, you can input the value between 0 and 120. The router will detect Access Concentrator online at every interval between seconds. If the value is 0, it means, do not detect. ¾ DNS IP address - If you know that your ISP does not automatically transmit DNS addresses to the router during login, click "Use the following DNS servers" checkbox and enter the IP address in dotted-decimal notation of your ISP's primary DNS server. If a secondary DNS server address is available, enter it as well. Click the Save button to save your settings. 22
-
 1
1 -
2
-
3
-
4
-
5
-
6
-
7
-
8
-
9
-
10
-
11
-
12
-
13
-
14
-
15
-
16
-
17
-
18
-
19
-
20
-
21
-
22
-
23
-
24
-
 25
25 -
 26
26 -
 27
27 -
 28
28 -
 29
29 -
 30
30 -
 31
31 -
 32
32 -
 33
33 -
 34
34 -
 35
35 -
36
-
37
-
38
-
39
-
40
-
41
-
42
-
43
-
44
-
45
-
46
-
47
-
48
-
49
-
50
-
51
-
52
-
53
-
54
-
55
-
56
-
57
-
58
-
59
-
60
-
61
-
62
-
63
-
64
-
65
-
66
-
67
-
68
-
69
-
70
-
71
-
72
-
73
-
74
-
75
-
76
-
77
-
78
-
79
-
80
-
81
-
82
-
83
-
84
-
85
-
86
-
87
-
88
-
89
-
90
-
91
-
92
-
93
-
94
-
95
-
96
-
97
-
98
-
99
-
100
-
101
-
102
-
103
-
104
-
105
-
106
-
107
-
108
-
109
 |
 |
