Western Digital WDBVHT0080JCH User Manual - Page 138
Storage, Locate the drive label that corresponds with the one on the dashboard
 |
View all Western Digital WDBVHT0080JCH manuals
Add to My Manuals
Save this manual to your list of manuals |
Page 138 highlights
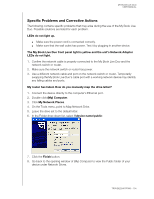
MY BOOK LIVE DUO USER MANUAL 3. Using your thumb, firmly push down on the top front panel of the unit to release the latch and open the cover. 2 3 1 4. Loosen the thumbscrew that secures the drive cover plate. Remove the drive cover plate and set aside. Note: Each drive is designated 1 or 2 by a color coded decal. 5. Locate the drive label that corresponds with the one on the dashboard Storage tab. 6. Using the pull tab, carefully and slowly pull the drive out of the enclosure and set aside. REPLACING A DRIVE - 130
-
 1
1 -
2
-
3
-
4
-
5
-
6
-
7
-
8
-
9
-
10
-
11
-
12
-
13
-
14
-
15
-
16
-
17
-
18
-
19
-
20
-
21
-
22
-
23
-
24
-
25
-
26
-
27
-
28
-
29
-
30
-
31
-
32
-
33
-
34
-
35
-
36
-
37
-
38
-
39
-
40
-
41
-
42
-
43
-
44
-
45
-
46
-
47
-
48
-
49
-
50
-
51
-
52
-
53
-
54
-
55
-
56
-
57
-
58
-
59
-
60
-
61
-
62
-
63
-
64
-
65
-
66
-
67
-
68
-
69
-
70
-
71
-
72
-
73
-
74
-
75
-
76
-
77
-
78
-
79
-
80
-
81
-
82
-
83
-
84
-
85
-
86
-
87
-
88
-
89
-
90
-
91
-
92
-
93
-
94
-
95
-
96
-
97
-
98
-
99
-
100
-
101
-
102
-
103
-
104
-
105
-
106
-
107
-
108
-
109
-
110
-
111
-
112
-
113
-
114
-
115
-
116
-
117
-
118
-
119
-
120
-
121
-
122
-
123
-
124
-
125
-
126
-
127
-
128
-
129
-
130
-
131
-
132
-
 133
133 -
 134
134 -
 135
135 -
 136
136 -
 137
137 -
 138
138 -
 139
139 -
 140
140 -
 141
141 -
 142
142 -
 143
143 -
144
-
145
-
146
-
147
-
148
-
149
-
150
-
151
-
152
-
153
-
154
-
155
 |
 |

MY BOOK LIVE DUO
USER MANUAL
REPLACING A DRIVE – 130
3.
Using your thumb, firmly push down on the top front panel of the unit to release the latch
and open the cover.
4.
Loosen the thumbscrew that secures the drive cover plate. Remove the drive cover
plate and set aside.
Note: Each drive is designated 1 or 2 by a color coded decal.
5.
Locate the drive label that corresponds with the one on the dashboard
Storage
tab.
6.
Using the pull tab, carefully and slowly pull the drive out of the enclosure and set aside.
1
2
3