Western Digital WDBVHT0080JCH User Manual - Page 20
Support, Details, Close, Continue, name, IP address, and MAC address. Click
 |
View all Western Digital WDBVHT0080JCH manuals
Add to My Manuals
Save this manual to your list of manuals |
Page 20 highlights
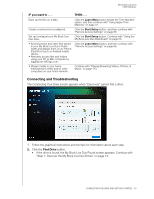
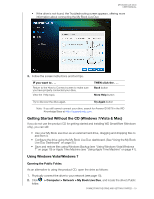
MY BOOK LIVE DUO USER MANUAL - Placing the mouse over a tool tip icon displays details about an option or term. - The Support link at the top right of the screen connects to a Help file on your CD. - To exit the screen, click the Exit link at the bottom-left of any page, or press the ESC key on the keyboard. • If the process does not find a My Book Live Duo on the network, the How to Connect screen appears. Proceed to "Connecting and Troubleshooting" on page 18. Note: The CD enables UPnP Framework in the Windows XP firewall if it has not been enabled previously. UPnP Framework must be enabled for the discovery process to detect your drive. For more information about enabling UPnP Framework, see http://support.microsoft.com/kb/886257#8. • If more than one drive was discovered, select your My Book Live Duo from the Drive Name drop-down list. The screen displays a default description in Drive Description. Note: You can change the name and description later when you configure the drive using the My Book Live Duo dashboard (see "General" on page 58). 2. To display drive properties, click the Details link. A pop-up window lists the model name, IP address, and MAC address. Click the Close link. 3. Drive Letter displays the next available drive letter on your network that you can map the drive to. If you do not want to map the drive to that letter, you have the following options: • If you do not want to map the drive automatically, clear the Map network drive check box near the bottom of the screen. The drive will not be mapped after you click the Continue button in step 5. CONNECTING THE DRIVE AND GETTING STARTED - 14
-
 1
1 -
2
-
3
-
4
-
5
-
6
-
7
-
8
-
9
-
10
-
11
-
12
-
13
-
14
-
 15
15 -
 16
16 -
 17
17 -
 18
18 -
 19
19 -
 20
20 -
 21
21 -
 22
22 -
 23
23 -
 24
24 -
 25
25 -
26
-
27
-
28
-
29
-
30
-
31
-
32
-
33
-
34
-
35
-
36
-
37
-
38
-
39
-
40
-
41
-
42
-
43
-
44
-
45
-
46
-
47
-
48
-
49
-
50
-
51
-
52
-
53
-
54
-
55
-
56
-
57
-
58
-
59
-
60
-
61
-
62
-
63
-
64
-
65
-
66
-
67
-
68
-
69
-
70
-
71
-
72
-
73
-
74
-
75
-
76
-
77
-
78
-
79
-
80
-
81
-
82
-
83
-
84
-
85
-
86
-
87
-
88
-
89
-
90
-
91
-
92
-
93
-
94
-
95
-
96
-
97
-
98
-
99
-
100
-
101
-
102
-
103
-
104
-
105
-
106
-
107
-
108
-
109
-
110
-
111
-
112
-
113
-
114
-
115
-
116
-
117
-
118
-
119
-
120
-
121
-
122
-
123
-
124
-
125
-
126
-
127
-
128
-
129
-
130
-
131
-
132
-
133
-
134
-
135
-
136
-
137
-
138
-
139
-
140
-
141
-
142
-
143
-
144
-
145
-
146
-
147
-
148
-
149
-
150
-
151
-
152
-
153
-
154
-
155
 |
 |
