Xerox 7500DX Phaser 7500 User Guide - Page 131
Print-Quality Problems, Using Built-in Troubleshooting Tools
 |
UPC - 095205706048
View all Xerox 7500DX manuals
Add to My Manuals
Save this manual to your list of manuals |
Page 131 highlights
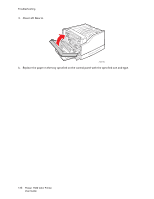
Print-Quality Problems Troubleshooting This section includes: • Using Built-in Troubleshooting Tools on page 131 • Troubleshooting Print-Quality Problems on page 133 Your Phaser 7500 printer is designed to produce consistently high quality prints. If you observe print-quality problems, use the information on these pages to troubleshoot the problem. For more information, go online to Xerox Support & Drivers at www.xerox.com/office/7500support. Caution: The Xerox warranty, service agreement, or Total Satisfaction Guarantee does not cover damage caused by using unsupported paper, transparencies, or other specialty media. The Total Satisfaction Guarantee is available in the United States and Canada. Coverage may vary outside these areas; please contact your local representative for details. Note: To enhance print quality, toner cartridge(s) for many equipment models have been designed to cease functioning at a predetermined point. Using Built-in Troubleshooting Tools Your printer contains the following built-in tools to help you diagnose print quality problems as well as adjust your printer's image quality. • Printing the Troubleshooting Print Quality Page on page 131 • Setting Color Calibration on page 131 • Calibrating the Paper Type on page 132 • Adjusting the Print Margins on page 132 • Selecting Paper Type on page 132 Printing the Troubleshooting Print Quality Page Print this Information Page for more help. 1. Press the Down Arrow button. 2. Select Troubleshooting > Print Quality Problems > Troubleshooting Print Quality Page. 3. Press the OK button to print. Setting Color Calibration 1. Press the Down Arrow button. 2. Select Troubleshooting > Print Quality Problems > Calibrate Colors. 3. Press the OK button to print. Phaser 7500 Color Printer 131 User Guide
-
 1
1 -
2
-
3
-
4
-
5
-
6
-
7
-
8
-
9
-
10
-
11
-
12
-
13
-
14
-
15
-
16
-
17
-
18
-
19
-
20
-
21
-
22
-
23
-
24
-
25
-
26
-
27
-
28
-
29
-
30
-
31
-
32
-
33
-
34
-
35
-
36
-
37
-
38
-
39
-
40
-
41
-
42
-
43
-
44
-
45
-
46
-
47
-
48
-
49
-
50
-
51
-
52
-
53
-
54
-
55
-
56
-
57
-
58
-
59
-
60
-
61
-
62
-
63
-
64
-
65
-
66
-
67
-
68
-
69
-
70
-
71
-
72
-
73
-
74
-
75
-
76
-
77
-
78
-
79
-
80
-
81
-
82
-
83
-
84
-
85
-
86
-
87
-
88
-
89
-
90
-
91
-
92
-
93
-
94
-
95
-
96
-
97
-
98
-
99
-
100
-
101
-
102
-
103
-
104
-
105
-
106
-
107
-
108
-
109
-
110
-
111
-
112
-
113
-
114
-
115
-
116
-
117
-
118
-
119
-
120
-
121
-
122
-
123
-
124
-
125
-
 126
126 -
 127
127 -
 128
128 -
 129
129 -
 130
130 -
 131
131 -
 132
132 -
 133
133 -
 134
134 -
 135
135 -
 136
136 -
137
-
138
-
139
-
140
-
141
-
142
-
143
-
144
-
145
-
146
-
147
-
148
-
149
-
150
-
151
-
152
-
153
-
154
-
155
-
156
-
157
-
158
-
159
-
160
-
161
-
162
-
163
-
164
 |
 |
