Xerox 7500DX Phaser 7500 User Guide - Page 133
Troubleshooting Print-Quality Problems, Nothing Prints or Black Spots Print
 |
UPC - 095205706048
View all Xerox 7500DX manuals
Add to My Manuals
Save this manual to your list of manuals |
Page 133 highlights
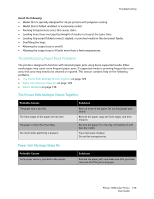
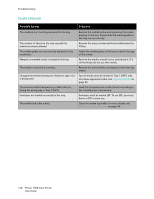
Troubleshooting Print-Quality Problems • Nothing Prints or Black Spots Print on Page on page 133 • Entire Page Prints Black or Color on page 134 • Image Prints Too Light on page 134 • Image Prints Too Dark on page 135 • Image is Blurred or Stained on page 135 • Print Density is Uneven on page 136 • Print is Irregular or Mottled on page 137 • Ink Rubs Off After Printing on page 138 • Toner Smudges and Residual Images Print on page 138 • Toner Smudges Appear on the Back of the Page on page 139 • White or Black Areas Print in Regular Pattern on page 140 • Image Prints with Defects on page 140 • Lateral Lines or Bands Print on Image on page 141 • Colors Look Wrong on page 141 • Colors Do Not Register Properly on page 141 • Colors Reproduce Poorly on page 142 Nothing Prints or Black Spots Print on Page Troubleshooting Probable Causes One or more of the imaging units may be defective. The printer driver is not set correctly. The media is moist from humidity. The media set in the printer driver mismatches the media loaded in the printer. Several sheets are being fed at the same time. Media is not set properly in the tray(s). Solutions Remove the imaging units one at a time, and check for damage. If it is damaged, replace it. Select the proper setting in the printer driver to switch from transparencies to plain paper. Adjust the humidity for media storage. Remove the moist media and replace it with new, dry media. Load the correct media in the printer. Remove the media from the tray and check for static electricity. Fan plain paper or other media (but not transparencies), and replace it in the tray. Remove the media, tap it to straighten it out, return it into the tray, and realign the media guides. Phaser 7500 Color Printer 133 User Guide
-
 1
1 -
2
-
3
-
4
-
5
-
6
-
7
-
8
-
9
-
10
-
11
-
12
-
13
-
14
-
15
-
16
-
17
-
18
-
19
-
20
-
21
-
22
-
23
-
24
-
25
-
26
-
27
-
28
-
29
-
30
-
31
-
32
-
33
-
34
-
35
-
36
-
37
-
38
-
39
-
40
-
41
-
42
-
43
-
44
-
45
-
46
-
47
-
48
-
49
-
50
-
51
-
52
-
53
-
54
-
55
-
56
-
57
-
58
-
59
-
60
-
61
-
62
-
63
-
64
-
65
-
66
-
67
-
68
-
69
-
70
-
71
-
72
-
73
-
74
-
75
-
76
-
77
-
78
-
79
-
80
-
81
-
82
-
83
-
84
-
85
-
86
-
87
-
88
-
89
-
90
-
91
-
92
-
93
-
94
-
95
-
96
-
97
-
98
-
99
-
100
-
101
-
102
-
103
-
104
-
105
-
106
-
107
-
108
-
109
-
110
-
111
-
112
-
113
-
114
-
115
-
116
-
117
-
118
-
119
-
120
-
121
-
122
-
123
-
124
-
125
-
126
-
127
-
 128
128 -
 129
129 -
 130
130 -
 131
131 -
 132
132 -
 133
133 -
 134
134 -
 135
135 -
 136
136 -
 137
137 -
 138
138 -
139
-
140
-
141
-
142
-
143
-
144
-
145
-
146
-
147
-
148
-
149
-
150
-
151
-
152
-
153
-
154
-
155
-
156
-
157
-
158
-
159
-
160
-
161
-
162
-
163
-
164
 |
 |