Xerox M118i User Guide - Page 173
Paper Jams in Cover A, Green Lever A1
 |
UPC - 095205219265
View all Xerox M118i manuals
Add to My Manuals
Save this manual to your list of manuals |
Page 173 highlights
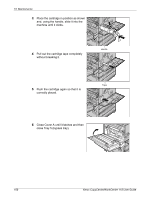
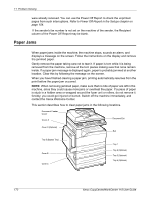
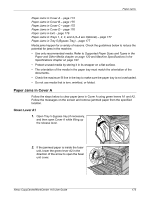
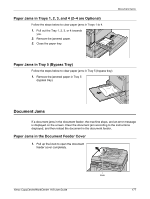
Paper Jams Paper Jams in Cover A - page 173 Paper Jams in Cover B - page 175 Paper Jams in Cover C - page 175 Paper Jams in Cover D - page 176 Paper Jams in Exit - page 176 Paper Jams in Trays 1, 2, 3, and 4 (2-4 are Optional) - page 177 Paper Jams in Tray 5 (Bypass Tray) - page 177 Media jams happen for a variety of reasons. Check the guidelines below to reduce the potential for jams in the machine. • Use only recommended media. Refer to Supported Paper Sizes and Types in the Paper and Other Media chapter on page 120 and Machine Specifications in the Specifications chapter on page 197. • Protect unused media by storing it in its wrapper on a flat surface. • The orientation of the media in the paper tray must match the orientation of the documents. • Check the maximum fill line in the tray to make sure the paper tray is not overloaded. • Do not use media that is torn, wrinkled, or folded. Paper Jams in Cover A Follow the steps below to clear paper jams in Cover A using green levers A1 and A2. Follow the messages on the screen and remove jammed paper from the specified location. Green Lever A1 1. Open Tray 5 (bypass tray) if necessary, and then open Cover A while lifting up the release lever. 2. If the jammed paper is inside the fuser unit, lower the green lever A2 in the direction of the arrow to open the fuser unit cover. Xerox CopyCentre/WorkCentre 118 User Guide 173
-
 1
1 -
2
-
3
-
4
-
5
-
6
-
7
-
8
-
9
-
10
-
11
-
12
-
13
-
14
-
15
-
16
-
17
-
18
-
19
-
20
-
21
-
22
-
23
-
24
-
25
-
26
-
27
-
28
-
29
-
30
-
31
-
32
-
33
-
34
-
35
-
36
-
37
-
38
-
39
-
40
-
41
-
42
-
43
-
44
-
45
-
46
-
47
-
48
-
49
-
50
-
51
-
52
-
53
-
54
-
55
-
56
-
57
-
58
-
59
-
60
-
61
-
62
-
63
-
64
-
65
-
66
-
67
-
68
-
69
-
70
-
71
-
72
-
73
-
74
-
75
-
76
-
77
-
78
-
79
-
80
-
81
-
82
-
83
-
84
-
85
-
86
-
87
-
88
-
89
-
90
-
91
-
92
-
93
-
94
-
95
-
96
-
97
-
98
-
99
-
100
-
101
-
102
-
103
-
104
-
105
-
106
-
107
-
108
-
109
-
110
-
111
-
112
-
113
-
114
-
115
-
116
-
117
-
118
-
119
-
120
-
121
-
122
-
123
-
124
-
125
-
126
-
127
-
128
-
129
-
130
-
131
-
132
-
133
-
134
-
135
-
136
-
137
-
138
-
139
-
140
-
141
-
142
-
143
-
144
-
145
-
146
-
147
-
148
-
149
-
150
-
151
-
152
-
153
-
154
-
155
-
156
-
157
-
158
-
159
-
160
-
161
-
162
-
163
-
164
-
165
-
166
-
167
-
 168
168 -
 169
169 -
 170
170 -
 171
171 -
 172
172 -
 173
173 -
 174
174 -
 175
175 -
 176
176 -
 177
177 -
 178
178 -
179
-
180
-
181
-
182
-
183
-
184
-
185
-
186
-
187
-
188
-
189
-
190
-
191
-
192
-
193
-
194
-
195
-
196
-
197
-
198
-
199
-
200
-
201
-
202
-
203
-
204
-
205
-
206
-
207
-
208
-
209
-
210
-
211
-
212
-
213
-
214
-
215
-
216
-
217
-
218
-
219
-
220
-
221
-
222
-
223
-
224
-
225
-
226
-
227
-
228
-
229
-
230
 |
 |
