Canon Color imageCLASS 8180c imageCLASS MF8180c Software Guide - Page 120
External program (Mail Program)
 |
View all Canon Color imageCLASS 8180c manuals
Add to My Manuals
Save this manual to your list of manuals |
Page 120 highlights
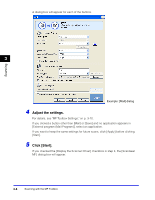
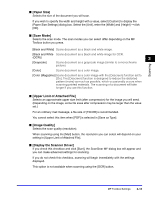
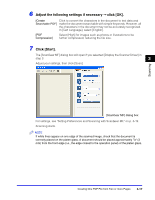
Scanning To change the location to save the scanned images, click [Browse] ➞ select a folder ➞ click [OK]. When you scan for the first time, a folder with the scanning date will be created in the [My Pictures] folder in the [My Documents] folder, and your document will be saved in this folder. If there is no [My Pictures] folder, a folder with the scanning date will be created in the [My Documents] folder and your document saved in this folder. ■ [Save Pictures to a Subfolder with Current Date] Check this checkbox to create a folder with current date (e.g. 2005-12-31) in the specified location and save the scanned images in this folder. External program (Mail Program) 3 You can specify an application to be used to display the scanned image. If no name is displayed or you wish to change the application, click [Set] ➞ select the application you wish to use ➞ click [OK]. If the name of the application you wish to use does not appear for the [Mail] button, select [None (Attach Manually)]. In this case, you must open the image file in the application and attach the file manually. The software is compatible with the e-mail software such as Outlook Express, Microsoft Outlook, EUDORA and Netscape Messenger. If you do not want to select an application, click [Set] ➞ Select [None] on the [Setting for E-mail Program] dialog box. Confirmation of the Scanned Image and Exif Settings (Confirm Scanned Image) You can preview the scanned images as thumbnail images, and specify the file type and location to save them. You cannot use this function when scanning with the [OCR] button, and for the [PDF] button, only the confirmation of the scanned image is available. Check the [Confirmation of the Scanned Image and Exif Settings] checkbox (for the [PDF] button, [Confirm the Scanned Image] checkbox) ➞ click [Start]. When the scanning is complete, the thumbnail of the scanned image will be displayed. Confirm the thumbnail image ➞ specify the file type and location ➞ press [Save] or [Forward]. MF Toolbox Settings 3-13
-
 1
1 -
2
-
3
-
4
-
5
-
6
-
7
-
8
-
9
-
10
-
11
-
12
-
13
-
14
-
15
-
16
-
17
-
18
-
19
-
20
-
21
-
22
-
23
-
24
-
25
-
26
-
27
-
28
-
29
-
30
-
31
-
32
-
33
-
34
-
35
-
36
-
37
-
38
-
39
-
40
-
41
-
42
-
43
-
44
-
45
-
46
-
47
-
48
-
49
-
50
-
51
-
52
-
53
-
54
-
55
-
56
-
57
-
58
-
59
-
60
-
61
-
62
-
63
-
64
-
65
-
66
-
67
-
68
-
69
-
70
-
71
-
72
-
73
-
74
-
75
-
76
-
77
-
78
-
79
-
80
-
81
-
82
-
83
-
84
-
85
-
86
-
87
-
88
-
89
-
90
-
91
-
92
-
93
-
94
-
95
-
96
-
97
-
98
-
99
-
100
-
101
-
102
-
103
-
104
-
105
-
106
-
107
-
108
-
109
-
110
-
111
-
112
-
113
-
114
-
 115
115 -
 116
116 -
 117
117 -
 118
118 -
 119
119 -
 120
120 -
 121
121 -
 122
122 -
 123
123 -
 124
124 -
 125
125 -
126
-
127
-
128
-
129
-
130
-
131
-
132
-
133
-
134
-
135
-
136
-
137
-
138
-
139
-
140
-
141
-
142
-
143
-
144
-
145
-
146
-
147
-
148
-
149
-
150
-
151
-
152
-
153
-
154
-
155
-
156
-
157
-
158
-
159
-
160
-
161
-
162
-
163
-
164
-
165
-
166
-
167
-
168
-
169
-
170
-
171
-
172
-
173
-
174
-
175
-
176
-
177
-
178
-
179
-
180
-
181
-
182
-
183
-
184
-
185
-
186
-
187
-
188
-
189
-
190
-
191
-
192
-
193
-
194
-
195
-
196
-
197
-
198
-
199
-
200
-
201
-
202
-
203
-
204
-
205
-
206
-
207
-
208
-
209
-
210
-
211
-
212
-
213
-
214
-
215
-
216
-
217
-
218
-
219
-
220
-
221
-
222
-
223
-
224
-
225
-
226
-
227
-
228
-
229
-
230
-
231
-
232
-
233
-
234
-
235
-
236
-
237
-
238
-
239
-
240
-
241
-
242
-
243
-
244
-
245
-
246
-
247
-
248
-
249
-
250
-
251
-
252
-
253
-
254
-
255
-
256
-
257
-
258
-
259
-
260
-
261
-
262
-
263
 |
 |
