Canon Color imageCLASS 8180c imageCLASS MF8180c Software Guide - Page 221
Arranging Objects, Changing the Order of Display
 |
View all Canon Color imageCLASS 8180c manuals
Add to My Manuals
Save this manual to your list of manuals |
Page 221 highlights
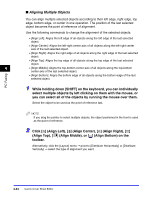
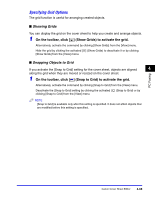
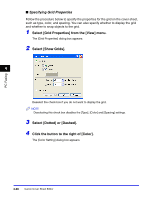
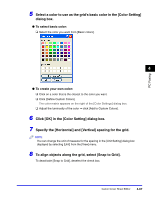
PC Faxing 5 Select the desired line color for the object from [Color]. 6 Select the desired background color for the object from [Fill in]. NOTE [Fill in] cannot be specified if the selected object is either a line or an image. 7 Click [OK]. Arranging Objects You can rearrange the order and appearance of objects such as lines, rectangles, rounded rectangles, ovals, images, and text boxes on the cover sheet. 4 ■ Changing the Order of Display If multiple objects overlap, you can specify the order in which they overlap. Use the following four commands to change the order of display of overlapping objects. • [Bring to Front]: Moves the selected object to the front. • [Send to Back]: Moves the selected object to the back. • [Bring Forward]: Moves the selected object one level higher. • [Send Backward]: Moves the selected object one level lower. 1 Select the object whose display order you want to change. NOTE • You can select multiple objects and change the order of display for all of them at the same time. • If the object you want to select lies behind other objects and thus is hidden from view, press [TAB] on the keyboard repeatedly until the object you want is selected. You can also select in reverse order by holding down [SHIFT] on the keyboard while pressing [TAB] on the keyboard. 2 Click [ ] (Bring to Front), [ ] (Send to Back), [ ] (Bring Forward), or [ ] (Send Backward) on the toolbar. NOTE Alternatively, select [Bring to Front], [Send to Back], [Bring Forward], or [Send Backward] from the [Layout] menu. Canon Cover Sheet Editor 4-63
-
 1
1 -
2
-
3
-
4
-
5
-
6
-
7
-
8
-
9
-
10
-
11
-
12
-
13
-
14
-
15
-
16
-
17
-
18
-
19
-
20
-
21
-
22
-
23
-
24
-
25
-
26
-
27
-
28
-
29
-
30
-
31
-
32
-
33
-
34
-
35
-
36
-
37
-
38
-
39
-
40
-
41
-
42
-
43
-
44
-
45
-
46
-
47
-
48
-
49
-
50
-
51
-
52
-
53
-
54
-
55
-
56
-
57
-
58
-
59
-
60
-
61
-
62
-
63
-
64
-
65
-
66
-
67
-
68
-
69
-
70
-
71
-
72
-
73
-
74
-
75
-
76
-
77
-
78
-
79
-
80
-
81
-
82
-
83
-
84
-
85
-
86
-
87
-
88
-
89
-
90
-
91
-
92
-
93
-
94
-
95
-
96
-
97
-
98
-
99
-
100
-
101
-
102
-
103
-
104
-
105
-
106
-
107
-
108
-
109
-
110
-
111
-
112
-
113
-
114
-
115
-
116
-
117
-
118
-
119
-
120
-
121
-
122
-
123
-
124
-
125
-
126
-
127
-
128
-
129
-
130
-
131
-
132
-
133
-
134
-
135
-
136
-
137
-
138
-
139
-
140
-
141
-
142
-
143
-
144
-
145
-
146
-
147
-
148
-
149
-
150
-
151
-
152
-
153
-
154
-
155
-
156
-
157
-
158
-
159
-
160
-
161
-
162
-
163
-
164
-
165
-
166
-
167
-
168
-
169
-
170
-
171
-
172
-
173
-
174
-
175
-
176
-
177
-
178
-
179
-
180
-
181
-
182
-
183
-
184
-
185
-
186
-
187
-
188
-
189
-
190
-
191
-
192
-
193
-
194
-
195
-
196
-
197
-
198
-
199
-
200
-
201
-
202
-
203
-
204
-
205
-
206
-
207
-
208
-
209
-
210
-
211
-
212
-
213
-
214
-
215
-
 216
216 -
 217
217 -
 218
218 -
 219
219 -
 220
220 -
 221
221 -
 222
222 -
 223
223 -
 224
224 -
 225
225 -
 226
226 -
227
-
228
-
229
-
230
-
231
-
232
-
233
-
234
-
235
-
236
-
237
-
238
-
239
-
240
-
241
-
242
-
243
-
244
-
245
-
246
-
247
-
248
-
249
-
250
-
251
-
252
-
253
-
254
-
255
-
256
-
257
-
258
-
259
-
260
-
261
-
262
-
263
 |
 |
