Canon EOS C300 Mark III EOS C300 Mark III EOS C500 Mark II Instruction Manual - Page 119
Using Anamorphic Lenses, Setup] > [Anamorphic: VIDEO Term.] LCD screen
 |
View all Canon EOS C300 Mark III manuals
Add to My Manuals
Save this manual to your list of manuals |
Page 119 highlights
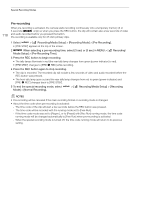
Using Anamorphic Lenses Using Anamorphic Lenses You can attach an anamorphic lens to the camera and set the anamorphic desqueeze ratio used to display the image from the camera on monitoring devices while shooting or during playback. 1 To apply the anamorphic desqueeze to individual video outputs, select > [¢ Monitoring Setup] > [Anamorphic: VIDEO Term.] (LCD screen), [Anamorphic: EVF-V50] (optional viewfinder) or [Anamorphic: MON./HDMI] (external monitors) > [On]. 2 Select or [x1.3]. > [¢ Monitoring Setup] > [Anamorphic Desqueeze] > [Lens Squeeze Factor], [x2.0] • You can select a fixed desqueeze factor of x2.0 or x1.3. If you selected [Lens Squeeze Factor], the anamorphic correction will be applied according to the factor specified with the > [Æ Recording/ Media Setup] > [Metadata] > [Lens Squeeze] setting. 3 If necessary, select [Off]. > [¢ Monitoring Setup] > [Desqueeze for S&F] > [Reduced Display] or • When slow & fast motion recording is activated, the desqueezed image can only be displayed windowboxed ([Reduced Display]). You can select [Off] to display the image without correction. 119 NOTES • You can record the lens's squeeze factor in the clip's metadata with the Setup] > [Metadata] > [Lens Squeeze] setting. > [Æ Recording/Media • In CAMERA mode during normal recording mode, if [Anamorphic: MON./HDMI] is set to [On] when the HDMI OUT terminal's resolution is set to [4096x2160 / 3840x2160] and the frame rate is set to 59.94P or 50.00P, the video output from the HDMI OUT terminal will be a 1920x1080 image. • The image displayed during photo playback and the camera's live view image in the Browser Remote application will not be desqueezed.
-
 1
1 -
2
-
3
-
4
-
5
-
6
-
7
-
8
-
9
-
10
-
11
-
12
-
13
-
14
-
15
-
16
-
17
-
18
-
19
-
20
-
21
-
22
-
23
-
24
-
25
-
26
-
27
-
28
-
29
-
30
-
31
-
32
-
33
-
34
-
35
-
36
-
37
-
38
-
39
-
40
-
41
-
42
-
43
-
44
-
45
-
46
-
47
-
48
-
49
-
50
-
51
-
52
-
53
-
54
-
55
-
56
-
57
-
58
-
59
-
60
-
61
-
62
-
63
-
64
-
65
-
66
-
67
-
68
-
69
-
70
-
71
-
72
-
73
-
74
-
75
-
76
-
77
-
78
-
79
-
80
-
81
-
82
-
83
-
84
-
85
-
86
-
87
-
88
-
89
-
90
-
91
-
92
-
93
-
94
-
95
-
96
-
97
-
98
-
99
-
100
-
101
-
102
-
103
-
104
-
105
-
106
-
107
-
108
-
109
-
110
-
111
-
112
-
113
-
 114
114 -
 115
115 -
 116
116 -
 117
117 -
 118
118 -
 119
119 -
 120
120 -
 121
121 -
 122
122 -
 123
123 -
 124
124 -
125
-
126
-
127
-
128
-
129
-
130
-
131
-
132
-
133
-
134
-
135
-
136
-
137
-
138
-
139
-
140
-
141
-
142
-
143
-
144
-
145
-
146
-
147
-
148
-
149
-
150
-
151
-
152
-
153
-
154
-
155
-
156
-
157
-
158
-
159
-
160
-
161
-
162
-
163
-
164
-
165
-
166
-
167
-
168
-
169
-
170
-
171
-
172
-
173
-
174
-
175
-
176
-
177
-
178
-
179
-
180
-
181
-
182
-
183
-
184
-
185
-
186
-
187
-
188
-
189
-
190
-
191
-
192
-
193
-
194
-
195
-
196
-
197
-
198
-
199
-
200
-
201
-
202
-
203
-
204
-
205
-
206
-
207
-
208
-
209
-
210
-
211
-
212
-
213
-
214
-
215
-
216
-
217
-
218
-
219
-
220
-
221
-
222
-
223
-
224
-
225
-
226
-
227
-
228
-
229
-
230
-
231
-
232
-
233
-
234
-
235
-
236
-
237
-
238
-
239
-
240
-
241
-
242
-
243
-
244
-
245
-
246
-
247
 |
 |
