Canon EOS C300 Mark III EOS C300 Mark III EOS C500 Mark II Instruction Manual - Page 138
Clip/Photo Operations
 |
View all Canon EOS C300 Mark III manuals
Add to My Manuals
Save this manual to your list of manuals |
Page 138 highlights
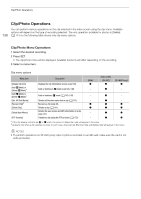
Clip/Photo Operations Clip/Photo Operations 138 You can perform various operations on the clip selected in the index screen using the clip menu. Available options will depend on the type of recording selected. The only operation available for photos is [Delete] (A 141) so the following table shows only clip menu options. Clip/Photo Menu Operations 1 Select the desired recording. 2 Press SET. • The clip/photo menu will be displayed. Available functions will differ depending on the recording. 3 Select a menu item. Clip menu options Menu item [Display Clip Info] [Add $ Mark] or [Delete $ Mark]1 [Add % Mark] or [Delete % Mark]1 [Del. All Shot Marks] [Recover Clip]2 [Delete Clip] [Delete User Memo] [FTP Transfer] Description Displays the clip information screen (A 139). Adds or deletes an $ mark (A 140, 140). Adds or deletes a % mark (A 140, 140). Deletes all the shot marks from a clip (A 141). Recovers a clip (A 48). Deletes a clip (A 141). Deletes the user memo and GPS information of a clip (A 141). Transfers a clip using the FTP protocol (A 172). [RAW] Ü - Index screen [XF-AVC] Ü Ü [XF-AVC Proxy] Ü - Ü - Ü - Ü Ü Ü Ü Ü Ü Ü Ü 1 If the clip already contains an $ or % mark, the option to delete the mark will appear in the menu. 2 Appears only when a clip requires recovery. In such case, only [Cancel], [Recover Clip] and [Delete Clip] will appear in the menu. NOTES • To perform operations on XF-AVC proxy clips or photos recorded on an SD card, make sure the card is not write-protected.
-
 1
1 -
2
-
3
-
4
-
5
-
6
-
7
-
8
-
9
-
10
-
11
-
12
-
13
-
14
-
15
-
16
-
17
-
18
-
19
-
20
-
21
-
22
-
23
-
24
-
25
-
26
-
27
-
28
-
29
-
30
-
31
-
32
-
33
-
34
-
35
-
36
-
37
-
38
-
39
-
40
-
41
-
42
-
43
-
44
-
45
-
46
-
47
-
48
-
49
-
50
-
51
-
52
-
53
-
54
-
55
-
56
-
57
-
58
-
59
-
60
-
61
-
62
-
63
-
64
-
65
-
66
-
67
-
68
-
69
-
70
-
71
-
72
-
73
-
74
-
75
-
76
-
77
-
78
-
79
-
80
-
81
-
82
-
83
-
84
-
85
-
86
-
87
-
88
-
89
-
90
-
91
-
92
-
93
-
94
-
95
-
96
-
97
-
98
-
99
-
100
-
101
-
102
-
103
-
104
-
105
-
106
-
107
-
108
-
109
-
110
-
111
-
112
-
113
-
114
-
115
-
116
-
117
-
118
-
119
-
120
-
121
-
122
-
123
-
124
-
125
-
126
-
127
-
128
-
129
-
130
-
131
-
132
-
 133
133 -
 134
134 -
 135
135 -
 136
136 -
 137
137 -
 138
138 -
 139
139 -
 140
140 -
 141
141 -
 142
142 -
 143
143 -
144
-
145
-
146
-
147
-
148
-
149
-
150
-
151
-
152
-
153
-
154
-
155
-
156
-
157
-
158
-
159
-
160
-
161
-
162
-
163
-
164
-
165
-
166
-
167
-
168
-
169
-
170
-
171
-
172
-
173
-
174
-
175
-
176
-
177
-
178
-
179
-
180
-
181
-
182
-
183
-
184
-
185
-
186
-
187
-
188
-
189
-
190
-
191
-
192
-
193
-
194
-
195
-
196
-
197
-
198
-
199
-
200
-
201
-
202
-
203
-
204
-
205
-
206
-
207
-
208
-
209
-
210
-
211
-
212
-
213
-
214
-
215
-
216
-
217
-
218
-
219
-
220
-
221
-
222
-
223
-
224
-
225
-
226
-
227
-
228
-
229
-
230
-
231
-
232
-
233
-
234
-
235
-
236
-
237
-
238
-
239
-
240
-
241
-
242
-
243
-
244
-
245
-
246
-
247
 |
 |
