Canon EOS C300 Mark III EOS C300 Mark III EOS C500 Mark II Instruction Manual - Page 27
Using the DC IN 12V Terminal, Checking the Remaining Battery Charge, Checking the Power Supply Levels
 |
View all Canon EOS C300 Mark III manuals
Add to My Manuals
Save this manual to your list of manuals |
Page 27 highlights
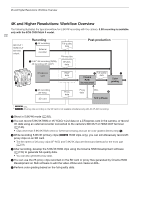
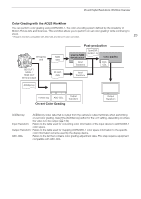
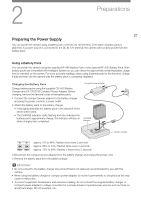
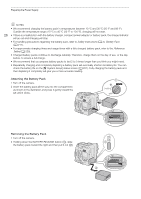
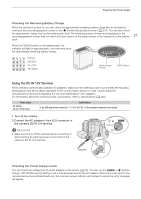
Preparing the Power Supply Checking the Remaining Battery Charge When the camera is turned on, you can check the approximate remaining battery usage time (in minutes) by looking at any recording/playback screen or the [B System Setup] status screen (A 201). You can also check the approximate charge level on the battery pack itself. The remaining battery charge level displayed on the recording/playback screen may not match the level shown on the status screen or the indicators on the battery 27 pack. Press the CHECK button on the battery pack. An indicator will light for approximately 3 seconds and show the approximate remaining battery charge. 0-25% 26-50% 51-75% 76-100% Battery charge indicator CHECK button Using the DC IN 12V Terminal When selecting commercially available AC adapters, make sure the external power source meets the following specifications and all the safety standards of the country/region where it is used. Closely follow the manufacturer's instructions regarding the use and maintenance of AC adapters. For information about the camera's power consumption, refer to Specifications (A 226). Power source AC adapter (DC IN 12V terminal) Specifications 4-pin XLR plug (female connector), 11.5 V to 20 V DC, 10 A (acceptable maximum load current) 1 Turn off the camera. 2 Connect the AC adapter's 4-pin XLR connector to the camera's DC IN 12V terminal. IMPORTANT • Make sure to turn off the camera before connecting or disconnecting an external power source to/from the camera's DC IN 12V terminal. ቢ ባ Checking the Power Supply Levels You can check the voltage level of an AC adapter on the screen (A 55). You can use the > [B System Setup] > [DC IN Warning (V)] setting to set a critical power level for the AC adapter. When the power input to the camera reaches the predetermined level, the onscreen power indicator will change to red and an error message will appear.
-
 1
1 -
2
-
3
-
4
-
5
-
6
-
7
-
8
-
9
-
10
-
11
-
12
-
13
-
14
-
15
-
16
-
17
-
18
-
19
-
20
-
21
-
 22
22 -
 23
23 -
 24
24 -
 25
25 -
 26
26 -
 27
27 -
 28
28 -
 29
29 -
 30
30 -
 31
31 -
 32
32 -
33
-
34
-
35
-
36
-
37
-
38
-
39
-
40
-
41
-
42
-
43
-
44
-
45
-
46
-
47
-
48
-
49
-
50
-
51
-
52
-
53
-
54
-
55
-
56
-
57
-
58
-
59
-
60
-
61
-
62
-
63
-
64
-
65
-
66
-
67
-
68
-
69
-
70
-
71
-
72
-
73
-
74
-
75
-
76
-
77
-
78
-
79
-
80
-
81
-
82
-
83
-
84
-
85
-
86
-
87
-
88
-
89
-
90
-
91
-
92
-
93
-
94
-
95
-
96
-
97
-
98
-
99
-
100
-
101
-
102
-
103
-
104
-
105
-
106
-
107
-
108
-
109
-
110
-
111
-
112
-
113
-
114
-
115
-
116
-
117
-
118
-
119
-
120
-
121
-
122
-
123
-
124
-
125
-
126
-
127
-
128
-
129
-
130
-
131
-
132
-
133
-
134
-
135
-
136
-
137
-
138
-
139
-
140
-
141
-
142
-
143
-
144
-
145
-
146
-
147
-
148
-
149
-
150
-
151
-
152
-
153
-
154
-
155
-
156
-
157
-
158
-
159
-
160
-
161
-
162
-
163
-
164
-
165
-
166
-
167
-
168
-
169
-
170
-
171
-
172
-
173
-
174
-
175
-
176
-
177
-
178
-
179
-
180
-
181
-
182
-
183
-
184
-
185
-
186
-
187
-
188
-
189
-
190
-
191
-
192
-
193
-
194
-
195
-
196
-
197
-
198
-
199
-
200
-
201
-
202
-
203
-
204
-
205
-
206
-
207
-
208
-
209
-
210
-
211
-
212
-
213
-
214
-
215
-
216
-
217
-
218
-
219
-
220
-
221
-
222
-
223
-
224
-
225
-
226
-
227
-
228
-
229
-
230
-
231
-
232
-
233
-
234
-
235
-
236
-
237
-
238
-
239
-
240
-
241
-
242
-
243
-
244
-
245
-
246
-
247
 |
 |
