Canon EOS C300 Mark III EOS C300 Mark III EOS C500 Mark II Instruction Manual - Page 32
Removing the LCD Monitor and LCD Attachment Unit
 |
View all Canon EOS C300 Mark III manuals
Add to My Manuals
Save this manual to your list of manuals |
Page 32 highlights
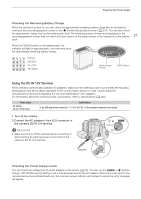
Preparing the Handle Unit and LCD Monitor NOTES • Based on the LCD monitor's position, you can invert the image displayed on the screen. Repeatedly pressing the MIRROR button will change the displayed image in the following order: Image inverted horizontally 32 Image inverted vertically Image inverted horizontally and vertically Original image. • You can adjust the brightness, contrast, color saturation, sharpness and luminance of the LCD screen with the respective settings in the > [¢ Monitoring Setup] menu (A 187). • In CAMERA mode, you can use the > [¢ Monitoring Setup] > [B&W Image: VIDEO Term.] setting to change the LCD monitor to black and white display. Even when the captured image is displayed in black and white, onscreen displays and icons will be shown in color. • You can use the > [B System Setup] > [Touch Screen Response] setting to adjust the LCD monitor's response to touch input. Removing the LCD Monitor and LCD Attachment Unit 1 Turn off the camera. 2 Disconnect the unit cable from the camera's and monitor's VIDEO terminals. • Pull back the metallic tip of the plug and then disconnect the cable from the terminal. 3 Loosen the locking knob and remove the LCD attachment unit and monitor. IMPORTANT • Be careful not to drop the camera when attaching or removing the LCD monitor. NOTES • If the LCD attachment unit's locking knob was fastened very tight, you may need to use the supplied hex wrench for 0.64 cm, 1/4" screws to loosen it. ባ ቤ ባ
-
 1
1 -
2
-
3
-
4
-
5
-
6
-
7
-
8
-
9
-
10
-
11
-
12
-
13
-
14
-
15
-
16
-
17
-
18
-
19
-
20
-
21
-
22
-
23
-
24
-
25
-
26
-
 27
27 -
 28
28 -
 29
29 -
 30
30 -
 31
31 -
 32
32 -
 33
33 -
 34
34 -
 35
35 -
 36
36 -
 37
37 -
38
-
39
-
40
-
41
-
42
-
43
-
44
-
45
-
46
-
47
-
48
-
49
-
50
-
51
-
52
-
53
-
54
-
55
-
56
-
57
-
58
-
59
-
60
-
61
-
62
-
63
-
64
-
65
-
66
-
67
-
68
-
69
-
70
-
71
-
72
-
73
-
74
-
75
-
76
-
77
-
78
-
79
-
80
-
81
-
82
-
83
-
84
-
85
-
86
-
87
-
88
-
89
-
90
-
91
-
92
-
93
-
94
-
95
-
96
-
97
-
98
-
99
-
100
-
101
-
102
-
103
-
104
-
105
-
106
-
107
-
108
-
109
-
110
-
111
-
112
-
113
-
114
-
115
-
116
-
117
-
118
-
119
-
120
-
121
-
122
-
123
-
124
-
125
-
126
-
127
-
128
-
129
-
130
-
131
-
132
-
133
-
134
-
135
-
136
-
137
-
138
-
139
-
140
-
141
-
142
-
143
-
144
-
145
-
146
-
147
-
148
-
149
-
150
-
151
-
152
-
153
-
154
-
155
-
156
-
157
-
158
-
159
-
160
-
161
-
162
-
163
-
164
-
165
-
166
-
167
-
168
-
169
-
170
-
171
-
172
-
173
-
174
-
175
-
176
-
177
-
178
-
179
-
180
-
181
-
182
-
183
-
184
-
185
-
186
-
187
-
188
-
189
-
190
-
191
-
192
-
193
-
194
-
195
-
196
-
197
-
198
-
199
-
200
-
201
-
202
-
203
-
204
-
205
-
206
-
207
-
208
-
209
-
210
-
211
-
212
-
213
-
214
-
215
-
216
-
217
-
218
-
219
-
220
-
221
-
222
-
223
-
224
-
225
-
226
-
227
-
228
-
229
-
230
-
231
-
232
-
233
-
234
-
235
-
236
-
237
-
238
-
239
-
240
-
241
-
242
-
243
-
244
-
245
-
246
-
247
 |
 |
