Canon EOS C300 Mark III EOS C300 Mark III EOS C500 Mark II Instruction Manual - Page 126
Renaming Custom Picture Files, File] > [Rename] > [Input].
 |
View all Canon EOS C300 Mark III manuals
Add to My Manuals
Save this manual to your list of manuals |
Page 126 highlights
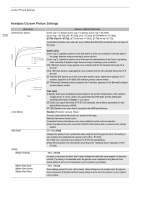
Custom Picture Settings 126 NOTES • About the logarithmic gamma curves (Canon Log settings) These gamma curves require post-production processing. They were designed to make the most of the imaging sensor characteristics in order to obtain impressive levels of dynamic range. - In CAMERA mode, you can apply a LUT to the supplied LCD screen, an optional viewfinder or video output from the various terminals to use gamma curve settings more suitable for viewing on a monitor screen. - There are also other LUTs available that can be applied for processing in post-production. For the latest information on available LUTs, please visit your local Canon website. • About changing custom picture related settings using the optional RC-V100 Remote Controller - When an optional RC-V100 Remote Controller is connected to the camera, you can press the remote controller's CUSTOM PICT. button to open the [/ Custom Picture] menu. - If a protected custom picture file is selected on the camera, custom picture related settings cannot be changed using the remote controller. - Adjusting custom picture related settings using the remote controller will change the settings registered under the currently selected custom picture file. If you want to keep an important custom picture file, copy it in advance to an SD card or select in advance a custom picture file you do not mind changing. Renaming Custom Picture Files 1 Select a custom picture file (A 125). 2 Select > [/ Custom Picture] > [Edit / File] > [Rename] > [Input]. • Enter the desired file name (up to 8 characters) using the keyboard screen (A 36). Protecting Custom Picture Files Protecting a custom picture file prevents its settings from being accidentally changed. 1 Select a custom picture file (A 125). 2 Select > [/ Custom Picture] > [Edit / File] > [Protect] > [Protect]. • i will appear next to the file name. • To remove the protection, select [Unprotect] instead. Resetting Custom Picture Files 1 Select a custom picture file (A 125). 2 Select > [/ Custom Picture] > [Edit / File] > [Reset]. 3 Select the settings to which you want to reset and then select [OK]. • Select [USER (BT.709)] to reset to neutral default values, or one of the preset settings ([BT.709], [LOG2], [LOG3], [PQ] or [HLG]) if you want to replicate these preset settings, for example as a starting point to edit them further.
-
 1
1 -
2
-
3
-
4
-
5
-
6
-
7
-
8
-
9
-
10
-
11
-
12
-
13
-
14
-
15
-
16
-
17
-
18
-
19
-
20
-
21
-
22
-
23
-
24
-
25
-
26
-
27
-
28
-
29
-
30
-
31
-
32
-
33
-
34
-
35
-
36
-
37
-
38
-
39
-
40
-
41
-
42
-
43
-
44
-
45
-
46
-
47
-
48
-
49
-
50
-
51
-
52
-
53
-
54
-
55
-
56
-
57
-
58
-
59
-
60
-
61
-
62
-
63
-
64
-
65
-
66
-
67
-
68
-
69
-
70
-
71
-
72
-
73
-
74
-
75
-
76
-
77
-
78
-
79
-
80
-
81
-
82
-
83
-
84
-
85
-
86
-
87
-
88
-
89
-
90
-
91
-
92
-
93
-
94
-
95
-
96
-
97
-
98
-
99
-
100
-
101
-
102
-
103
-
104
-
105
-
106
-
107
-
108
-
109
-
110
-
111
-
112
-
113
-
114
-
115
-
116
-
117
-
118
-
119
-
120
-
 121
121 -
 122
122 -
 123
123 -
 124
124 -
 125
125 -
 126
126 -
 127
127 -
 128
128 -
 129
129 -
 130
130 -
 131
131 -
132
-
133
-
134
-
135
-
136
-
137
-
138
-
139
-
140
-
141
-
142
-
143
-
144
-
145
-
146
-
147
-
148
-
149
-
150
-
151
-
152
-
153
-
154
-
155
-
156
-
157
-
158
-
159
-
160
-
161
-
162
-
163
-
164
-
165
-
166
-
167
-
168
-
169
-
170
-
171
-
172
-
173
-
174
-
175
-
176
-
177
-
178
-
179
-
180
-
181
-
182
-
183
-
184
-
185
-
186
-
187
-
188
-
189
-
190
-
191
-
192
-
193
-
194
-
195
-
196
-
197
-
198
-
199
-
200
-
201
-
202
-
203
-
204
-
205
-
206
-
207
-
208
-
209
-
210
-
211
-
212
-
213
-
214
-
215
-
216
-
217
-
218
-
219
-
220
-
221
-
222
-
223
-
224
-
225
-
226
-
227
-
228
-
229
-
230
-
231
-
232
-
233
-
234
-
235
-
236
-
237
-
238
-
239
-
240
-
241
-
242
-
243
-
244
-
245
-
246
-
247
 |
 |
