Canon PC720 Service Manual - Page 20
General, Description, Copyright, Canon, Rev.0, Printed, Japan, Imprime, Japon
 |
View all Canon PC720 manuals
Add to My Manuals
Save this manual to your list of manuals |
Page 20 highlights
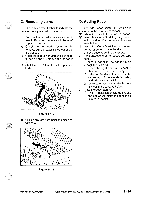
IIIIIIIGENERAL DESCRIPTION If the Transparency Is Not Picked Up Smoothly • Under certain environmental conditions, transparencies may fail to move into the machine in response to a press on the Copy Start key. If this is the case, go through the following: 1) Place copy paper underneath the transparency with a displacement of about 1 cm. Pick-up direction Transparency 1 cm (approx.) 1.2 Using Transparencies (PC750/770) 1) Shift the delivery guide plate on the copy tray upright. Copy paper Figure 1-404 2) Set the transparency together with the copy paper on the multifeeder while holding the trailing edge of the copy paper. 3) Press the Copy Start key while still holding the trailing edge of the copy paper; hang on to the copy paper, and remove it when the transparency has disappeared into the machine. Figure 1-405 Figure 1-406 2) Place an original on the copyboard, and close the copyboard cover. 3) If you want to manually adjust the copy density, deselect AE, and operate the Copy Density Adjust lever. 4) Press the Default Ratio key or Zoom Mode key to suit the reproduction ratio you want. a. When you press the Zoom key, you may set the ratio between 70% and 141% in 1% increments. b. When you press the Default Ratio key, the ratio changes as follows for each press: MAX. 141%-4- DIRECT 100% MARGIN 86% LGL 0 . LTR 78% . MIN. 70% (Inch- configuration) r A5 10- A441- E lBm51=0- A4/LTR 1 - 12 COPYRIGHT 1994 CANON INC. B5 lo-A5/STMT LA4 IP- A5- (AB/Inch- configuration CANON PC12017401750M0 REV.0 AUG. 1994 PRINTED IN JAPAN (IMPRIME AU JAPON)
-
 1
1 -
2
-
3
-
4
-
5
-
6
-
7
-
8
-
9
-
10
-
11
-
12
-
13
-
14
-
 15
15 -
 16
16 -
 17
17 -
 18
18 -
 19
19 -
 20
20 -
 21
21 -
 22
22 -
 23
23 -
 24
24 -
 25
25 -
26
-
27
-
28
-
29
-
30
-
31
-
32
-
33
-
34
-
35
-
36
-
37
-
38
-
39
-
40
-
41
-
42
-
43
-
44
-
45
-
46
-
47
-
48
-
49
-
50
-
51
-
52
-
53
-
54
-
55
-
56
-
57
-
58
-
59
-
60
-
61
-
62
-
63
-
64
-
65
-
66
-
67
-
68
-
69
-
70
-
71
-
72
-
73
-
74
-
75
-
76
-
77
-
78
-
79
-
80
-
81
-
82
-
83
-
84
-
85
-
86
-
87
-
88
-
89
-
90
-
91
-
92
-
93
-
94
-
95
-
96
-
97
-
98
-
99
-
100
-
101
-
102
-
103
-
104
-
105
-
106
-
107
-
108
-
109
-
110
-
111
-
112
-
113
-
114
-
115
-
116
-
117
-
118
-
119
-
120
-
121
-
122
-
123
-
124
-
125
-
126
-
127
-
128
-
129
-
130
-
131
-
132
-
133
-
134
-
135
-
136
-
137
-
138
-
139
-
140
-
141
-
142
-
143
-
144
-
145
-
146
-
147
-
148
-
149
-
150
-
151
-
152
-
153
-
154
-
155
-
156
-
157
-
158
-
159
-
160
-
161
-
162
-
163
-
164
-
165
-
166
-
167
-
168
-
169
-
170
-
171
-
172
-
173
-
174
-
175
-
176
-
177
-
178
-
179
-
180
-
181
-
182
-
183
-
184
-
185
-
186
-
187
-
188
-
189
-
190
-
191
-
192
-
193
-
194
-
195
-
196
-
197
-
198
-
199
-
200
 |
 |
