Canon PIXMA MP830 User's Guide - Page 70
Fill in the appropriate circles in the Photo Index Sheet., Scan the Photo Index Sheet and print
 |
View all Canon PIXMA MP830 manuals
Add to My Manuals
Save this manual to your list of manuals |
Page 70 highlights
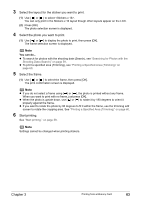
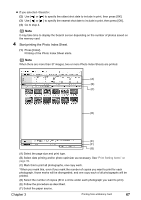
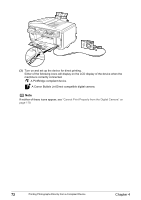
(G) Mark this to print the same Photo Index Sheet again. *If you mark this, all other marked settings will be disregarded. 5 Fill in the appropriate circles in the Photo Index Sheet. Fill in the appropriate circles ( ) with a dark pencil or a black ink pen to select the photos to print and their print options. z Good z Bad (A) (B) (C) (A) Check mark (B) Line only (C) Too light Important z Be sure to fill a circle for every setting item (except options). z If there is more than one Photo Index Sheet, fill in all the sheets. z If the filled circles on the Photo Index Sheet are not dark enough, the machine may not read the settings. 6 Scan the Photo Index Sheet and print photos. (1) Load the paper you selected for the Photo Index Sheet. See "Loading Paper" on page 22. Note z When printing images using the Photo Index Sheet, you can select 4" x 6" (101.6 x 152.4 mm), 5" x 7" (127 x 177.8 mm), 8.5" x 11" (LETTER), or A4 for the page size. z Load paper in the location you selected under on the Photo Index Sheet. (2) Press [Photo Index Sheet]. (3) Use [ ] or [ ] to select , then press [OK]. (4) Place the Photo Index Sheet on the Platen Glass, then press [OK]. When placing the Photo Index Sheet, place the front side down, and align the upper left corner of the sheet precisely with the arrow mark (alignment mark) at the upper left corner of the Platen Glass. The Photo Index Sheet is scanned and the specified photos will be printed. 68 Printing from a Memory Card Chapter 3
-
 1
1 -
2
-
3
-
4
-
5
-
6
-
7
-
8
-
9
-
10
-
11
-
12
-
13
-
14
-
15
-
16
-
17
-
18
-
19
-
20
-
21
-
22
-
23
-
24
-
25
-
26
-
27
-
28
-
29
-
30
-
31
-
32
-
33
-
34
-
35
-
36
-
37
-
38
-
39
-
40
-
41
-
42
-
43
-
44
-
45
-
46
-
47
-
48
-
49
-
50
-
51
-
52
-
53
-
54
-
55
-
56
-
57
-
58
-
59
-
60
-
61
-
62
-
63
-
64
-
 65
65 -
 66
66 -
 67
67 -
 68
68 -
 69
69 -
 70
70 -
 71
71 -
 72
72 -
 73
73 -
 74
74 -
 75
75 -
76
-
77
-
78
-
79
-
80
-
81
-
82
-
83
-
84
-
85
-
86
-
87
-
88
-
89
-
90
-
91
-
92
-
93
-
94
-
95
-
96
-
97
-
98
-
99
-
100
-
101
-
102
-
103
-
104
-
105
-
106
-
107
-
108
-
109
-
110
-
111
-
112
-
113
-
114
-
115
-
116
-
117
-
118
-
119
-
120
-
121
-
122
-
123
-
124
-
125
-
126
-
127
-
128
-
129
-
130
-
131
-
132
-
133
-
134
-
135
-
136
-
137
-
138
-
139
-
140
-
141
-
142
-
143
-
144
-
145
-
146
-
147
-
148
-
149
-
150
-
151
-
152
-
153
-
154
-
155
-
156
-
157
-
158
-
159
-
160
-
161
-
162
-
163
-
164
-
165
-
166
-
167
-
168
-
169
-
170
-
171
-
172
-
173
-
174
-
175
-
176
-
177
-
178
-
179
-
180
-
181
-
182
-
183
-
184
-
185
-
186
-
187
-
188
-
189
-
190
-
191
-
192
-
193
-
194
-
195
-
196
-
197
-
198
-
199
-
200
-
201
-
202
-
203
-
204
-
205
-
206
-
207
-
208
-
209
-
210
-
211
-
212
-
213
-
214
-
215
-
216
-
217
-
218
-
219
-
220
-
221
-
222
 |
 |