Canon VIXIA HF R600 Instruction Manual - Page 206
Manual, treaming via Wi-Fi and Internet Monitor while Out, haring Your Recording, ing Web, ervice
 |
View all Canon VIXIA HF R600 manuals
Add to My Manuals
Save this manual to your list of manuals |
Page 206 highlights
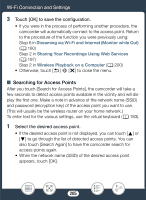
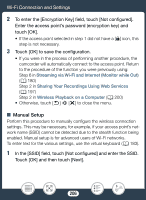
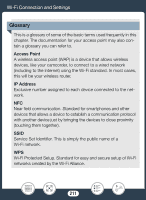
Wi-Fi Connection and Settings 2 To enter the [Encryption Key] field, touch [Not configured]. Enter the access point's password (encryption key) and touch [OK]. • If the access point selected in step 1 did not have a [C] icon, this step is not necessary. 3 Touch [OK] to save the configuration. • If you were in the process of performing another procedure, the camcorder will automatically connect to the access point. Return to the procedure of the function you were previously using: Step 6 in Streaming via Wi-Fi and Internet (Monitor while Out) (A 180) Step 2 in Sharing Your Recordings Using Web Services (A 197) Step 2 in Wireless Playback on a Computer (A 200) • Otherwise, touch [K] > [X] to close the menu. ■ Manual Setup Perform this procedure to manually configure the wireless connection settings. This may be necessary, for example, if your access point's network name (SSID) cannot be detected due to the stealth function being enabled. Manual setup is for advanced users of Wi-Fi networks. To enter text for the various settings, use the virtual keyboard (A 183). 1 In the [SSID] field, touch [Not configured] and enter the SSID. Touch [OK] and then touch [Next]. 206
-
 1
1 -
2
-
3
-
4
-
5
-
6
-
7
-
8
-
9
-
10
-
11
-
12
-
13
-
14
-
15
-
16
-
17
-
18
-
19
-
20
-
21
-
22
-
23
-
24
-
25
-
26
-
27
-
28
-
29
-
30
-
31
-
32
-
33
-
34
-
35
-
36
-
37
-
38
-
39
-
40
-
41
-
42
-
43
-
44
-
45
-
46
-
47
-
48
-
49
-
50
-
51
-
52
-
53
-
54
-
55
-
56
-
57
-
58
-
59
-
60
-
61
-
62
-
63
-
64
-
65
-
66
-
67
-
68
-
69
-
70
-
71
-
72
-
73
-
74
-
75
-
76
-
77
-
78
-
79
-
80
-
81
-
82
-
83
-
84
-
85
-
86
-
87
-
88
-
89
-
90
-
91
-
92
-
93
-
94
-
95
-
96
-
97
-
98
-
99
-
100
-
101
-
102
-
103
-
104
-
105
-
106
-
107
-
108
-
109
-
110
-
111
-
112
-
113
-
114
-
115
-
116
-
117
-
118
-
119
-
120
-
121
-
122
-
123
-
124
-
125
-
126
-
127
-
128
-
129
-
130
-
131
-
132
-
133
-
134
-
135
-
136
-
137
-
138
-
139
-
140
-
141
-
142
-
143
-
144
-
145
-
146
-
147
-
148
-
149
-
150
-
151
-
152
-
153
-
154
-
155
-
156
-
157
-
158
-
159
-
160
-
161
-
162
-
163
-
164
-
165
-
166
-
167
-
168
-
169
-
170
-
171
-
172
-
173
-
174
-
175
-
176
-
177
-
178
-
179
-
180
-
181
-
182
-
183
-
184
-
185
-
186
-
187
-
188
-
189
-
190
-
191
-
192
-
193
-
194
-
195
-
196
-
197
-
198
-
199
-
200
-
 201
201 -
 202
202 -
 203
203 -
 204
204 -
 205
205 -
 206
206 -
 207
207 -
 208
208 -
 209
209 -
 210
210 -
 211
211 -
212
-
213
-
214
-
215
-
216
-
217
-
218
-
219
-
220
-
221
-
222
-
223
-
224
-
225
-
226
-
227
-
228
-
229
-
230
-
231
-
232
-
233
-
234
-
235
-
236
-
237
-
238
-
239
-
240
-
241
-
242
-
243
-
244
-
245
-
246
-
247
-
248
-
249
-
250
-
251
-
252
-
253
-
254
-
255
-
256
-
257
-
258
-
259
-
260
-
261
-
262
-
263
-
264
-
265
-
266
-
267
-
268
-
269
-
270
-
271
-
272
-
273
-
274
-
275
-
276
-
277
-
278
-
279
-
280
-
281
-
282
-
283
-
284
-
285
-
286
-
287
-
288
-
289
-
290
-
291
-
292
-
293
-
294
-
295
-
296
-
297
-
298
-
299
-
300
-
301
-
302
-
303
-
304
-
305
-
306
 |
 |