Canon VIXIA HG20 VIXIA HG20 / VIXIA HG21 Instruction Manual - Page 34
Video, Basic Recording, Shooting Video, Make sure that the ACCESS - cannot import video
 |
View all Canon VIXIA HG20 manuals
Add to My Manuals
Save this manual to your list of manuals |
Page 34 highlights
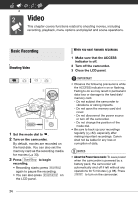
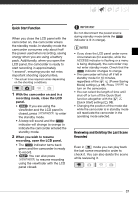
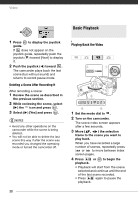
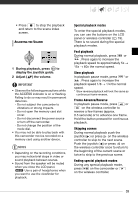
Video This chapter covers functions related to shooting movies, including recording, playback, menu options and playlist and scene operations. Basic Recording Shooting Video 1 Set the mode dial to . 2 Turn on the camcorder. By default, movies are recorded on the hard disk. You can also set the memory card as the recording media for movies ( 33). 3 Press Start/Stop to begin recording. • Recording starts; press Start/Stop again to pause the recording. • You can also press START/STOP on the LCD panel. WHEN YOU HAVE FINISHED RECORDING 1 Make sure that the ACCESS indicator is off. 2 Turn off the camcorder. 3 Close the LCD panel. IMPORTANT • Observe the following precautions while the ACCESS indicator is on or flashing. Failing to do so may result in permanent data loss or damage to the hard disk/ memory card. - Do not subject the camcorder to vibrations or strong impacts. - Do not open the memory card slot cover. - Do not disconnect the power source or turn off the camcorder. - Do not change the position of the mode dial. • Be sure to back up your recordings regularly ( 82), especially after making important recordings. Canon shall not be liable for any loss or corruption of data. NOTES • About the Power Save mode: To save power when the camcorder is powered by a battery pack, the camcorder will automatically shut off if left without any operations for 5 minutes ( 98). Press ON/OFF to turn on the camcorder. 34
-
 1
1 -
2
-
3
-
4
-
5
-
6
-
7
-
8
-
9
-
10
-
11
-
12
-
13
-
14
-
15
-
16
-
17
-
18
-
19
-
20
-
21
-
22
-
23
-
24
-
25
-
26
-
27
-
28
-
 29
29 -
 30
30 -
 31
31 -
 32
32 -
 33
33 -
 34
34 -
 35
35 -
 36
36 -
 37
37 -
 38
38 -
 39
39 -
40
-
41
-
42
-
43
-
44
-
45
-
46
-
47
-
48
-
49
-
50
-
51
-
52
-
53
-
54
-
55
-
56
-
57
-
58
-
59
-
60
-
61
-
62
-
63
-
64
-
65
-
66
-
67
-
68
-
69
-
70
-
71
-
72
-
73
-
74
-
75
-
76
-
77
-
78
-
79
-
80
-
81
-
82
-
83
-
84
-
85
-
86
-
87
-
88
-
89
-
90
-
91
-
92
-
93
-
94
-
95
-
96
-
97
-
98
-
99
-
100
-
101
-
102
-
103
-
104
-
105
-
106
-
107
-
108
-
109
-
110
-
111
-
112
-
113
-
114
-
115
-
116
-
117
-
118
-
119
-
120
-
121
-
122
-
123
-
124
-
125
-
126
-
127
-
128
-
129
-
130
-
131
-
132
-
133
-
134
-
135
 |
 |
