Canon VIXIA HG20 VIXIA HG20 / VIXIA HG21 Instruction Manual - Page 35
Selecting the Video Quality (Recording Mode), Using the Viewfinder
 |
View all Canon VIXIA HG20 manuals
Add to My Manuals
Save this manual to your list of manuals |
Page 35 highlights
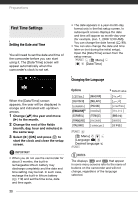
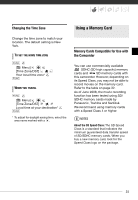
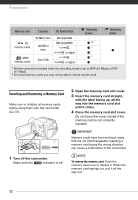
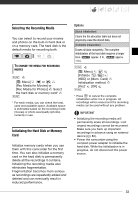
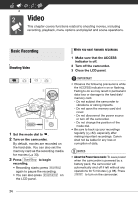
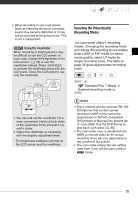
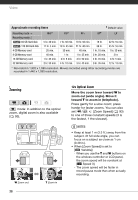
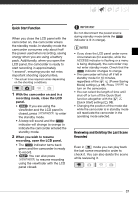
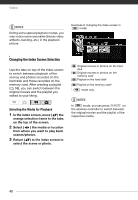
• When recording in very loud places (such as fireworks shows or concerts), sound may become distorted or it may not be recorded at the actual levels. This is not a malfunction. Using the Viewfinder When recording in bright places it may be difficult to use the LCD screen. In such case, change the brightness of the LCD screen* ( 26) or use the viewfinder instead. Press VIEWFINDER to activate the viewfinder along with the LCD panel. Close the LCD panel to use only the viewfinder. • You can pull out the viewfinder if it is more convenient. Hold out both sides of the viewfinder firmly and pull it out until it clicks. • Adjust the viewfinder as necessary with the dioptric adjustment lever. * The brightness setting is common to the LCD screen and the viewfinder. Selecting the Video Quality (Recording Mode) The camcorder offers 5 recording modes. Changing the recording mode will change the recording time available. Select MXP or FXP mode for better movie quality; select LP mode for longer recording times. The table on page 36 gives approximate recording times. FUNC. [ Standard Play 7 Mbps] Desired recording mode FUNC. NOTES • Discs created with the optional DW-100 DVD Burner that contain scenes recorded in MXP mode cannot be played back on AVCHD-compatible DVD players or Blu-ray Disc players (as of June 2008). Use the DVD Burner to play back such discs ( 85). • The camcorder uses a variable bit rate (VBR) to encode video so the actual recording times will vary depending on the content of the scenes. • The camcorder retains the last setting used even if you set the camcorder to mode. 35
-
 1
1 -
2
-
3
-
4
-
5
-
6
-
7
-
8
-
9
-
10
-
11
-
12
-
13
-
14
-
15
-
16
-
17
-
18
-
19
-
20
-
21
-
22
-
23
-
24
-
25
-
26
-
27
-
28
-
29
-
 30
30 -
 31
31 -
 32
32 -
 33
33 -
 34
34 -
 35
35 -
 36
36 -
 37
37 -
 38
38 -
 39
39 -
 40
40 -
41
-
42
-
43
-
44
-
45
-
46
-
47
-
48
-
49
-
50
-
51
-
52
-
53
-
54
-
55
-
56
-
57
-
58
-
59
-
60
-
61
-
62
-
63
-
64
-
65
-
66
-
67
-
68
-
69
-
70
-
71
-
72
-
73
-
74
-
75
-
76
-
77
-
78
-
79
-
80
-
81
-
82
-
83
-
84
-
85
-
86
-
87
-
88
-
89
-
90
-
91
-
92
-
93
-
94
-
95
-
96
-
97
-
98
-
99
-
100
-
101
-
102
-
103
-
104
-
105
-
106
-
107
-
108
-
109
-
110
-
111
-
112
-
113
-
114
-
115
-
116
-
117
-
118
-
119
-
120
-
121
-
122
-
123
-
124
-
125
-
126
-
127
-
128
-
129
-
130
-
131
-
132
-
133
-
134
-
135
 |
 |
