Canon VIXIA HG20 VIXIA HG20 / VIXIA HG21 Instruction Manual - Page 88
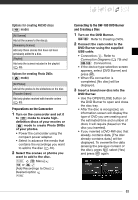
Transferring Photos, Select, a transfer option and, press, the photo you wish to, transfer and press
 |
View all Canon VIXIA HG20 manuals
Add to My Manuals
Save this manual to your list of manuals |
Page 88 highlights
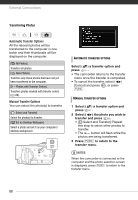
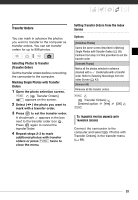
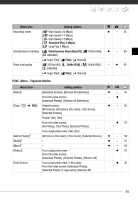
External Connections Transferring Photos Automatic Transfer Options All the relevant photos will be transferred to the computer in one batch and their thumbnails will be displayed on the computer. [ All Photos] Transfers all photos. [ New Photos] Transfers only those photos that have not yet been transferred to the computer. [ Photos with Transfer Orders] Transfers photos marked with transfer orders ( 89). Manual Transfer Options You can select the photo(s) to transfer. [ Select and Transfer] Select the photo(s) to transfer. [ Set as Desktop Wallpaper] Select a photo and set it as your computer's desktop background. AUTOMATIC TRANSFER OPTIONS Select ( ) a transfer option and press . • The camcorder returns to the transfer menu once the transfer is completed. • To cancel the transfer, select ( ) [Cancel] and press , or press FUNC. . MANUAL TRANSFER OPTIONS 1 Select ( ) a transfer option and press . 2 Select ( ) the photo you wish to transfer and press . • [ Select and Transfer]: Repeat this step to select other photos to transfer. • The button will flash while the photos are being transferred. 3 Press FUNC. to return to the transfer menu. NOTES When the camcorder is connected to the computer and the photo selection screen is displayed, press FUNC. to return to the transfer menu. 88
-
 1
1 -
2
-
3
-
4
-
5
-
6
-
7
-
8
-
9
-
10
-
11
-
12
-
13
-
14
-
15
-
16
-
17
-
18
-
19
-
20
-
21
-
22
-
23
-
24
-
25
-
26
-
27
-
28
-
29
-
30
-
31
-
32
-
33
-
34
-
35
-
36
-
37
-
38
-
39
-
40
-
41
-
42
-
43
-
44
-
45
-
46
-
47
-
48
-
49
-
50
-
51
-
52
-
53
-
54
-
55
-
56
-
57
-
58
-
59
-
60
-
61
-
62
-
63
-
64
-
65
-
66
-
67
-
68
-
69
-
70
-
71
-
72
-
73
-
74
-
75
-
76
-
77
-
78
-
79
-
80
-
81
-
82
-
 83
83 -
 84
84 -
 85
85 -
 86
86 -
 87
87 -
 88
88 -
 89
89 -
 90
90 -
 91
91 -
 92
92 -
 93
93 -
94
-
95
-
96
-
97
-
98
-
99
-
100
-
101
-
102
-
103
-
104
-
105
-
106
-
107
-
108
-
109
-
110
-
111
-
112
-
113
-
114
-
115
-
116
-
117
-
118
-
119
-
120
-
121
-
122
-
123
-
124
-
125
-
126
-
127
-
128
-
129
-
130
-
131
-
132
-
133
-
134
-
135
 |
 |
