Cisco SGE2000 Configuration Guide - Page 43
Installation Precautions, How to Install the SCE 2000 on a Workbench or Tabletop, SUMMARY STEPS - console access
 |
View all Cisco SGE2000 manuals
Add to My Manuals
Save this manual to your list of manuals |
Page 43 highlights
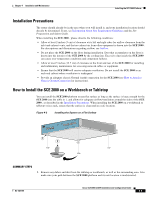
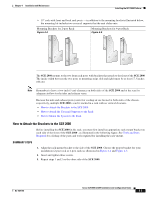
Chapter 4 Installation and Maintenance Installing the SCE 2000 Platform Installation Precautions The router should already be in the area where you will install it, and your installation location should already be determined. If not, see Information About Site Requirement Guidelines and the Site Preparation and Safety Guide . When installing the SCE 2000 , please observe the following conditions: • Allow at least 2 inches (5 cm) of clearance at its left and right sides for airflow clearance from the inlet and exhaust vents, and that no exhaust air from other equipment is drawn into the SCE 2000 . For descriptions and illustrations regarding airflow, see Airflow. • Do not place the SCE 2000 on the floor during installation. Dust that accumulates on the floor is drawn into the interior of the SCE 2000 by the cooling fans. Excessive dust inside the SCE 2000 can cause over-temperature conditions and component failures. • Allow at least 5 inches (12.7 cm) of clearance at the front and rear of the SCE 2000 for installing and rudimentary maintenance for accessing network cables or equipment. • Ensure that the SCE 2000 will receive adequate ventilation. Do not install the SCE 2000 in an enclosed cabinet where ventilation is inadequate! • Provide an adequate chassis Ground (earth) connection for the SCE 2000 (see How to Attach a Chassis Ground Connection for instructions). How to Install the SCE 2000 on a Workbench or Tabletop You can install the SCE 2000 platform on any flat surface as long as the surface is large enough for the SCE 2000 (see the table in ), and allows for adequate airflow/ventilation around the sides of the SCE 2000 , as described in the Installation Precautions. When installing the SCE 2000 on a workbench or tabletop or in a rack, ensure that the surface is clean and in a safe location. Figure 4-3 Installing the System on a Flat Surface MNG 1 MNG 2 ALCITNIKV/E101/010000/ ALCITNIKV/E101/010000/ CONSOLE AUX PWR A PWR B STATUS BYPASS LINK RX TX RX MM TX LINK RX TX RX MM TX GBE-1 SUB LINE NET Cisco S4CxEG2B0E00 Series LINK RX TX LINK RX TX RX MM TX RX MM TX GBE-2 SUB LINE/CASCADE NET 92782 1 2 SUMMARY STEPS 1. Remove any debris and dust from the tabletop or workbench, as well as the surrounding area. Also make sure your path between the SCE 2000 platform and its new location is unobstructed. OL-7824-06 Cisco SCE 2000 4xGBE Installation and Configuration Guide 4-5
-
 1
1 -
2
-
3
-
4
-
5
-
6
-
7
-
8
-
9
-
10
-
11
-
12
-
13
-
14
-
15
-
16
-
17
-
18
-
19
-
20
-
21
-
22
-
23
-
24
-
25
-
26
-
27
-
28
-
29
-
30
-
31
-
32
-
33
-
34
-
35
-
36
-
37
-
 38
38 -
 39
39 -
 40
40 -
 41
41 -
 42
42 -
 43
43 -
 44
44 -
 45
45 -
 46
46 -
 47
47 -
 48
48 -
49
-
50
-
51
-
52
-
53
-
54
-
55
-
56
-
57
-
58
-
59
-
60
-
61
-
62
-
63
-
64
-
65
-
66
-
67
-
68
-
69
-
70
-
71
-
72
-
73
-
74
-
75
-
76
-
77
-
78
-
79
-
80
-
81
-
82
-
83
-
84
-
85
-
86
-
87
-
88
-
89
-
90
-
91
-
92
-
93
-
94
-
95
-
96
-
97
-
98
-
99
-
100
-
101
-
102
-
103
-
104
-
105
-
106
-
107
-
108
-
109
-
110
-
111
-
112
-
113
-
114
-
115
-
116
-
117
-
118
-
119
-
120
-
121
-
122
-
123
-
124
-
125
-
126
-
127
-
128
-
129
-
130
-
131
-
132
-
133
-
134
-
135
-
136
-
137
-
138
-
139
-
140
-
141
-
142
 |
 |
