Cisco SGE2000 Configuration Guide - Page 66
Step 1, SCE 2000 - serial
 |
View all Cisco SGE2000 manuals
Add to My Manuals
Save this manual to your list of manuals |
Page 66 highlights
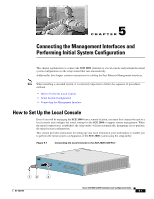
How to Set Up the Local Console Chapter 5 Connecting the Management Interfaces and Performing Initial System Configuration Make sure that the terminal configuration is as follows: • 9600 baud • 8 data bits • No Parity • 1 stop bits • No flow control The above SCE 2000 port parameters are fixed and are not configurable. SUMMARY STEPS 1. Plug the RS-232 serial cable provided with the SCE 2000 into the CON port on the front panel of the SCE 2000 . 2. Connect the other end of the serial cable (with an attached DB-9 connector) to the VT100 compatible local (serial) terminal. 3. Make sure the local terminal is configured as a VT-100 terminal, according to the fixed SCE 2000 CON port parameters. 4. Press Enter several times until the Cisco logo appears on the local terminal and the setup configuration dialog is entered. 5. Type yand press Enter. DETAILED STEPS Step 1 Step 2 Step 3 Step 4 Step 5 Plug the RS-232 serial cable provided with the SCE 2000 into the CON port on the front panel of the SCE 2000 . Make sure that you push on the RJ-45 connector (attached to the RS-232 serial cable) until you hear a "click", which indicates that the connector is fully inserted and secured in the receptacle. Gently pull on the plug to confirm whether the plug is locked into the socket. Connect the other end of the serial cable (with an attached DB-9 connector) to the VT100 compatible local (serial) terminal. Make sure the local terminal is configured as a VT-100 terminal, according to the fixed SCE 2000 CON port parameters. Press Enter several times until the Cisco logo appears on the local terminal and the setup configuration dialog is entered. --- System Configuration Dialog --At any point you may enter a question mark '?' followed by 'Enter' for help. Use ctrl-C to abort configuration dialog at any prompt. Use ctrl-Z to jump to the end of the configuration dialog at any prompt. Default settings are in square brackets '[]'. Would you like to continue with the System Configuration Dialog? [yes/no]: y Type yand press Enter. The system configuration dialog begins. Cisco SCE 2000 4xGBE Installation and Configuration Guide 5-2 OL-7824-06
-
 1
1 -
2
-
3
-
4
-
5
-
6
-
7
-
8
-
9
-
10
-
11
-
12
-
13
-
14
-
15
-
16
-
17
-
18
-
19
-
20
-
21
-
22
-
23
-
24
-
25
-
26
-
27
-
28
-
29
-
30
-
31
-
32
-
33
-
34
-
35
-
36
-
37
-
38
-
39
-
40
-
41
-
42
-
43
-
44
-
45
-
46
-
47
-
48
-
49
-
50
-
51
-
52
-
53
-
54
-
55
-
56
-
57
-
58
-
59
-
60
-
 61
61 -
 62
62 -
 63
63 -
 64
64 -
 65
65 -
 66
66 -
 67
67 -
 68
68 -
 69
69 -
 70
70 -
 71
71 -
72
-
73
-
74
-
75
-
76
-
77
-
78
-
79
-
80
-
81
-
82
-
83
-
84
-
85
-
86
-
87
-
88
-
89
-
90
-
91
-
92
-
93
-
94
-
95
-
96
-
97
-
98
-
99
-
100
-
101
-
102
-
103
-
104
-
105
-
106
-
107
-
108
-
109
-
110
-
111
-
112
-
113
-
114
-
115
-
116
-
117
-
118
-
119
-
120
-
121
-
122
-
123
-
124
-
125
-
126
-
127
-
128
-
129
-
130
-
131
-
132
-
133
-
134
-
135
-
136
-
137
-
138
-
139
-
140
-
141
-
142
 |
 |
