Cisco SGE2000 Configuration Guide - Page 60
Summary Steps, Detailed Steps, Step 1
 |
View all Cisco SGE2000 manuals
Add to My Manuals
Save this manual to your list of manuals |
Page 60 highlights
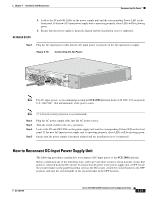
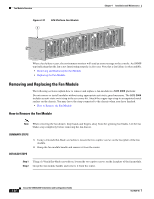
Reconnecting the Power Chapter 4 Installation and Maintenance Note that the power to the relevant power supply unit should be off, not necessarily all power to the SCE 2000 platform. One DC-input power supply can be running when the other power supply is being removed or replaced. Wiring should be done by a professional in accordance with state and local electrical codes. SUMMARY STEPS 1. Ensure that the DC power line input leads are disconnected from the power source. 2. Using the number 2 Phillips screwdriver, remove the protective plate from the terminal block. 3. Insert one receptacle screw into the hex or loop connector on one power line input, insert the screw with the connector into the corresponding lead receptacle and tighten the receptacle screw using the number 2 Phillips . Repeat for the remaining power line input lead. 4. Using the number 2 Phillips screwdriver, securely fasten the protective plate to the terminal block. 5. Connect the DC power line input leads to the DC power source through a fast 10A circuit breaker. 6. Turn the on/off switch to the on (¿) position. 7. Look at the IN and OK LEDs on the power supply unit and the corresponding Power LED on the front panel. If the new DC-input power supply unit is operating properly, these LEDs will be glowing green. 8. Ensure that the power supply is properly aligned and the installation screw is tightened. DETAILED STEPS Step 1 Step 2 Step 3 Ensure that the DC power line input leads are disconnected from the power source. Using the number 2 Phillips screwdriver, remove the protective plate from the terminal block. Insert one receptacle screw into the hex or loop connector on one power line input, insert the screw with the connector into the corresponding lead receptacle and tighten the receptacle screw using the number 2 Phillips . Repeat for the remaining power line input lead. 4-22 Cisco SCE 2000 4xGBE Installation and Configuration Guide OL-7824-06
-
 1
1 -
2
-
3
-
4
-
5
-
6
-
7
-
8
-
9
-
10
-
11
-
12
-
13
-
14
-
15
-
16
-
17
-
18
-
19
-
20
-
21
-
22
-
23
-
24
-
25
-
26
-
27
-
28
-
29
-
30
-
31
-
32
-
33
-
34
-
35
-
36
-
37
-
38
-
39
-
40
-
41
-
42
-
43
-
44
-
45
-
46
-
47
-
48
-
49
-
50
-
51
-
52
-
53
-
54
-
 55
55 -
 56
56 -
 57
57 -
 58
58 -
 59
59 -
 60
60 -
 61
61 -
 62
62 -
 63
63 -
 64
64 -
 65
65 -
66
-
67
-
68
-
69
-
70
-
71
-
72
-
73
-
74
-
75
-
76
-
77
-
78
-
79
-
80
-
81
-
82
-
83
-
84
-
85
-
86
-
87
-
88
-
89
-
90
-
91
-
92
-
93
-
94
-
95
-
96
-
97
-
98
-
99
-
100
-
101
-
102
-
103
-
104
-
105
-
106
-
107
-
108
-
109
-
110
-
111
-
112
-
113
-
114
-
115
-
116
-
117
-
118
-
119
-
120
-
121
-
122
-
123
-
124
-
125
-
126
-
127
-
128
-
129
-
130
-
131
-
132
-
133
-
134
-
135
-
136
-
137
-
138
-
139
-
140
-
141
-
142
 |
 |
