Cisco SGE2000 Configuration Guide - Page 58
Reconnecting the Power, How to Reconnect AC-Input Power Supply Unit
 |
View all Cisco SGE2000 manuals
Add to My Manuals
Save this manual to your list of manuals |
Page 58 highlights
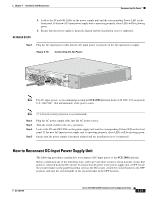
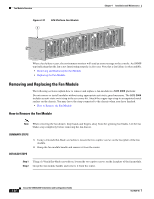
Reconnecting the Power Chapter 4 Installation and Maintenance SUMMARY STEPS 1. Grasp the power supply unit handle with one hand and place your other hand underneath the power supply for support. 2. Fit the groove in the side of the new power supply module into the guide in the chassis. 3. Gently, but firmly, slide the module into the chassis until its faceplate is flush with the chassis rear panel. 4. Seat the power supply in the SCE 2000 platform by tightening the captive installation screw with a 1/4-inch flat-blade screwdriver. DETAILED STEPS Step 1 Step 2 Step 3 Grasp the power supply unit handle with one hand and place your other hand underneath the power supply for support. Fit the groove in the side of the new power supply module into the guide in the chassis. Gently, but firmly, slide the module into the chassis until its faceplate is flush with the chassis rear panel. Note When inserting a power supply into the SCE 2000 platform, do not use unnecessary force; slamming the power supply into the chassis can damage the connectors on the rear of the power supply. Step 4 Seat the power supply in the SCE 2000 platform by tightening the captive installation screw with a 1/4-inch flat-blade screwdriver. Note The power supply is not fully seated until you tighten the installation screw on the faceplate. Reconnecting the Power The following sections describe how to reconnect the AC or DC power: • How to Reconnect AC-Input Power Supply Unit • How to Reconnect DC-Input Power Supply Unit How to Reconnect AC-Input Power Supply Unit The following procedures explain how to reconnect an AC-input power to the SCE 2000 platform. If you are reconnecting DC-input power, proceed to How to Reconnect DC-Input Power Supply Unit. SUMMARY STEPS 1. Plug the AC-input power cable into the AC-input power receptacle on the AC-input power supply 2. Plug the AC power supply cable into the AC power source. 3. Turn the on/off switch to the on (¿) position. 4-20 Cisco SCE 2000 4xGBE Installation and Configuration Guide OL-7824-06
-
 1
1 -
2
-
3
-
4
-
5
-
6
-
7
-
8
-
9
-
10
-
11
-
12
-
13
-
14
-
15
-
16
-
17
-
18
-
19
-
20
-
21
-
22
-
23
-
24
-
25
-
26
-
27
-
28
-
29
-
30
-
31
-
32
-
33
-
34
-
35
-
36
-
37
-
38
-
39
-
40
-
41
-
42
-
43
-
44
-
45
-
46
-
47
-
48
-
49
-
50
-
51
-
52
-
 53
53 -
 54
54 -
 55
55 -
 56
56 -
 57
57 -
 58
58 -
 59
59 -
 60
60 -
 61
61 -
 62
62 -
 63
63 -
64
-
65
-
66
-
67
-
68
-
69
-
70
-
71
-
72
-
73
-
74
-
75
-
76
-
77
-
78
-
79
-
80
-
81
-
82
-
83
-
84
-
85
-
86
-
87
-
88
-
89
-
90
-
91
-
92
-
93
-
94
-
95
-
96
-
97
-
98
-
99
-
100
-
101
-
102
-
103
-
104
-
105
-
106
-
107
-
108
-
109
-
110
-
111
-
112
-
113
-
114
-
115
-
116
-
117
-
118
-
119
-
120
-
121
-
122
-
123
-
124
-
125
-
126
-
127
-
128
-
129
-
130
-
131
-
132
-
133
-
134
-
135
-
136
-
137
-
138
-
139
-
140
-
141
-
142
 |
 |
