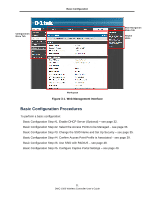
D-Link DWC-1000 DWC-1000 User's Guide - Page 33
Basic Configuration Step #2. Select the Access Points to be Managed
 |
View all D-Link DWC-1000 manuals
Add to My Manuals
Save this manual to your list of manuals |
Page 33 highlights
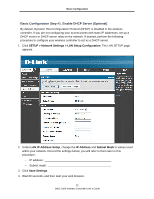
Basic Configuration 5. In the web browser's address field, enter the new IP address you recorded in step 2. 6. Click SETUP > Network Settings > LAN Setup Configuration. 7. In the LAN SETUP page, change DHCP Mode to DHCP Server. 8. Complete the fields in in the LAN SETUP page (see Table 3-1) and click Save Settings. Field Starting IP Address Ending IP Address Default Gateway (Optional) Primary DNS Server Secondary DNS Server Table 3-1. DHCP Server Settings Description DHCP Enter the starting IP address in the IP address pool. Any new DHCP client joining the LAN is assigned an IP address within the starting and ending IP address range. Starting and ending IP addresses should be in the same IP address subnet as the wireless controller's LAN IP address. Enter the ending IP address in the IP address pool. Enter the IP address of the gateway for your LAN. If configured domain name system (DNS) servers are available on the LAN, enter the IP address of the primary DNS server. If configured domain name system (DNS) servers are available on the LAN, enter the IP address of the secondary DNS server. Basic Configuration Step #2. Select the Access Points to be Managed The wireless controller automatically discovers managed, unmanaged, and rogue access points on the WLAN that are in the same IP subnet. Use the following procedure to select the access points that the wireless controller will manage. 1. Click STATUS > Access Point Info > APs Summary. The ACCESS POINTS SUMMARY page appears, with a list of the access points that the wireless controller has discovered. 33 DWC-1000 Wireless Controller User's Guide
-
 1
1 -
2
-
3
-
4
-
5
-
6
-
7
-
8
-
9
-
10
-
11
-
12
-
13
-
14
-
15
-
16
-
17
-
18
-
19
-
20
-
21
-
22
-
23
-
24
-
25
-
26
-
27
-
 28
28 -
 29
29 -
 30
30 -
 31
31 -
 32
32 -
 33
33 -
 34
34 -
 35
35 -
 36
36 -
 37
37 -
 38
38 -
39
-
40
-
41
-
42
-
43
-
44
-
45
-
46
-
47
-
48
-
49
-
50
-
51
-
52
-
53
-
54
-
55
-
56
-
57
-
58
-
59
-
60
-
61
-
62
-
63
-
64
-
65
-
66
-
67
-
68
-
69
-
70
-
71
-
72
-
73
-
74
-
75
-
76
-
77
-
78
-
79
-
80
-
81
-
82
-
83
-
84
-
85
-
86
-
87
-
88
-
89
-
90
-
91
-
92
-
93
-
94
-
95
-
96
-
97
-
98
-
99
-
100
-
101
-
102
-
103
-
104
-
105
-
106
-
107
-
108
-
109
-
110
-
111
-
112
-
113
-
114
-
115
-
116
-
117
-
118
-
119
-
120
-
121
-
122
-
123
-
124
-
125
-
126
-
127
-
128
-
129
-
130
-
131
-
132
-
133
-
134
-
135
-
136
-
137
-
138
-
139
-
140
-
141
-
142
-
143
-
144
-
145
-
146
-
147
-
148
-
149
-
150
-
151
-
152
-
153
-
154
-
155
-
156
-
157
-
158
-
159
-
160
-
161
-
162
-
163
-
164
-
165
-
166
-
167
-
168
-
169
-
170
-
171
-
172
-
173
-
174
-
175
-
176
-
177
-
178
-
179
-
180
-
181
-
182
-
183
-
184
-
185
-
186
-
187
-
188
-
189
-
190
-
191
-
192
-
193
-
194
-
195
-
196
-
197
-
198
-
199
-
200
-
201
-
202
-
203
-
204
-
205
-
206
-
207
-
208
-
209
-
210
-
211
-
212
-
213
-
214
-
215
-
216
-
217
-
218
-
219
-
220
-
221
-
222
-
223
-
224
-
225
-
226
-
227
-
228
-
229
-
230
-
231
-
232
-
233
-
234
-
235
-
236
-
237
-
238
-
239
-
240
-
241
-
242
 |
 |
