D-Link DWC-1000 DWC-1000 User's Guide - Page 47
List of Available Profiles, Show Preview, Enable, Captive Portal Policies
 |
View all D-Link DWC-1000 manuals
Add to My Manuals
Save this manual to your list of manuals |
Page 47 highlights
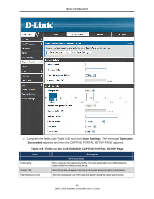
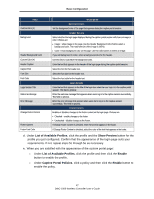
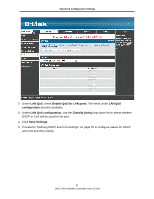
Basic Configuration Field Custom Color (#) Background Header Background Color Custom Color (#) Header Caption Caption Font Font Size Font Color Login Section Title Welcome Message Error Message Change Footer Content Footer Content Footer Font Color Description General Details Set the background color of the page that appears during the captive portal session. Header Details Select whether the login page displayed during the captive portal session will show an image or color. Choices are: • Image = show image on the page. Use the Header Background Color field to select a background color. The maximum size of the image is 100 kb. • Color = show background color on the page. Use the radio buttons to select an image. If you set Background to Color, select a background color for the header. Use this field to customize the background color. Enter the text that appears in the header of the login page during the captive portal session. Select the font for the header text. Select the font size for the header text. Select the font color for the header text. Login Details Enter the text that appears in the title of the login box when the user logs in to the captive portal session. This field is optional. Enter the welcome message that appears when users log in to the captive session successfully. This field is optional. Enter the error message that appears when users fail to log in to the captive session successfully. This field is optional. Footer Details Enables or disables changes to the footer content on the login page. Choices are: • Checked - enable changes to the footer. • Unchecked - disable changes to the footer. If Change Footer Content is checked, enter the text that appears in the footer. If Change Footer Content is checked, select the color of the text that appears in the footer. d. Under List of Available Profiles, click the profile and the Show Preview button for the profile you just configured. Confirm that the appearance of the login page suits your requirements. If not, repeat steps 5c through 5e as necessary. e. When you are satisfied with the appearance of the custom portal page: Under List of Available Profiles, click the profile and then click the Enable button to enable the profile. Under Captive Portal Policies, click a policy and then click the Enable button to enable the policy. 47 DWC-1000 Wireless Controller User's Guide
-
 1
1 -
2
-
3
-
4
-
5
-
6
-
7
-
8
-
9
-
10
-
11
-
12
-
13
-
14
-
15
-
16
-
17
-
18
-
19
-
20
-
21
-
22
-
23
-
24
-
25
-
26
-
27
-
28
-
29
-
30
-
31
-
32
-
33
-
34
-
35
-
36
-
37
-
38
-
39
-
40
-
41
-
 42
42 -
 43
43 -
 44
44 -
 45
45 -
 46
46 -
 47
47 -
 48
48 -
 49
49 -
 50
50 -
 51
51 -
 52
52 -
53
-
54
-
55
-
56
-
57
-
58
-
59
-
60
-
61
-
62
-
63
-
64
-
65
-
66
-
67
-
68
-
69
-
70
-
71
-
72
-
73
-
74
-
75
-
76
-
77
-
78
-
79
-
80
-
81
-
82
-
83
-
84
-
85
-
86
-
87
-
88
-
89
-
90
-
91
-
92
-
93
-
94
-
95
-
96
-
97
-
98
-
99
-
100
-
101
-
102
-
103
-
104
-
105
-
106
-
107
-
108
-
109
-
110
-
111
-
112
-
113
-
114
-
115
-
116
-
117
-
118
-
119
-
120
-
121
-
122
-
123
-
124
-
125
-
126
-
127
-
128
-
129
-
130
-
131
-
132
-
133
-
134
-
135
-
136
-
137
-
138
-
139
-
140
-
141
-
142
-
143
-
144
-
145
-
146
-
147
-
148
-
149
-
150
-
151
-
152
-
153
-
154
-
155
-
156
-
157
-
158
-
159
-
160
-
161
-
162
-
163
-
164
-
165
-
166
-
167
-
168
-
169
-
170
-
171
-
172
-
173
-
174
-
175
-
176
-
177
-
178
-
179
-
180
-
181
-
182
-
183
-
184
-
185
-
186
-
187
-
188
-
189
-
190
-
191
-
192
-
193
-
194
-
195
-
196
-
197
-
198
-
199
-
200
-
201
-
202
-
203
-
204
-
205
-
206
-
207
-
208
-
209
-
210
-
211
-
212
-
213
-
214
-
215
-
216
-
217
-
218
-
219
-
220
-
221
-
222
-
223
-
224
-
225
-
226
-
227
-
228
-
229
-
230
-
231
-
232
-
233
-
234
-
235
-
236
-
237
-
238
-
239
-
240
-
241
-
242
 |
 |
