Epson ColorPage 8000 User Manual - Page 103
added. On the printer's control panel, press
 |
View all Epson ColorPage 8000 manuals
Add to My Manuals
Save this manual to your list of manuals |
Page 103 highlights
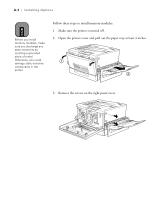
A-4 | Installing Options 7. To replace the panel cover, first insert the tabs in the slots at the right. Then close the left side of the cover, inserting the pin in the hole as shown. 8. Secure the panel cover with the screws that you removed. Then close the front cover and the paper tray. 9. Print a Status Sheet to make sure the printer recognizes the memory you added. On the printer's control panel, press the Enter button twice. Then check the memory displayed in the Hardware Configuations section on the Status Sheet. A-4
-
 1
1 -
2
-
3
-
4
-
5
-
6
-
7
-
8
-
9
-
10
-
11
-
12
-
13
-
14
-
15
-
16
-
17
-
18
-
19
-
20
-
21
-
22
-
23
-
24
-
25
-
26
-
27
-
28
-
29
-
30
-
31
-
32
-
33
-
34
-
35
-
36
-
37
-
38
-
39
-
40
-
41
-
42
-
43
-
44
-
45
-
46
-
47
-
48
-
49
-
50
-
51
-
52
-
53
-
54
-
55
-
56
-
57
-
58
-
59
-
60
-
61
-
62
-
63
-
64
-
65
-
66
-
67
-
68
-
69
-
70
-
71
-
72
-
73
-
74
-
75
-
76
-
77
-
78
-
79
-
80
-
81
-
82
-
83
-
84
-
85
-
86
-
87
-
88
-
89
-
90
-
91
-
92
-
93
-
94
-
95
-
96
-
97
-
 98
98 -
 99
99 -
 100
100 -
 101
101 -
 102
102 -
 103
103 -
 104
104 -
 105
105 -
 106
106 -
 107
107 -
 108
108 -
109
-
110
-
111
-
112
-
113
-
114
-
115
-
116
-
117
-
118
-
119
-
120
-
121
 |
 |

A-4
A-4
|
Installing Options
7.
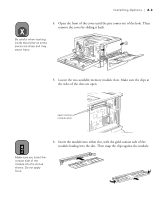
To replace the panel cover, first insert the tabs in the slots at the right.
Then close the left side of the cover, inserting the pin in the hole as
shown.
8.
Secure the panel cover with the screws that you removed. Then close the
front cover and the paper tray.
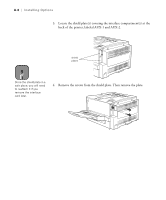
9.
Print a Status Sheet to make sure the printer recognizes the memory you
added. On the printer’s control panel, press the
Enter
button twice.
Then check the memory displayed in the Hardware Configuations
section on the Status Sheet.