Epson ColorPage 8000 User Manual - Page 50
Setting Configuration Options, Setup Menu, or
 |
View all Epson ColorPage 8000 manuals
Add to My Manuals
Save this manual to your list of manuals |
Page 50 highlights
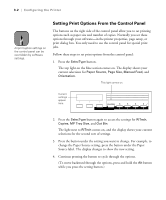
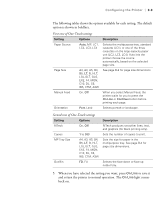
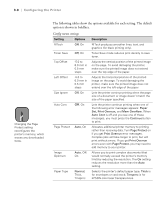
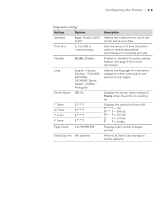
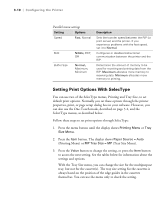
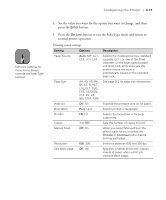
Configuring the Printer | 3-7 Setting Configuration Options You can use three of the SelecType menus-Config, Setup, and Parallel-to configure important features of the printer's operation. Because the configuration options can significantly affect the way your printer works for all users on the network, you should check with your network administrator before changing them. Configuration options include the following: • Continuing to print when certain errors occur • Disabling the printer's paper-size checking feature • Allocating printer memory • Disabling the power-saving feature • Setting transmission speed and buffer size Follow these steps to set configuration options: 1. Press the menu button until the display shows Config Menu, Setup Menu, or Parallel Menu. 2. Press the Item button. The display shows RITech = Off (Config Menu), Interface = Auto (Setup Menu), or Speed = Fast (Parallel Menu) 3. Press the Value button to change the setting, or press the Item button to access the next setting. See the tables below for information about the settings and options. 4. Set the value you want for the option you want to change, and then press the Enter button. 5. Press the On Line button to exit the SelecType mode and return to normal printer operation. 3-7
-
 1
1 -
2
-
3
-
4
-
5
-
6
-
7
-
8
-
9
-
10
-
11
-
12
-
13
-
14
-
15
-
16
-
17
-
18
-
19
-
20
-
21
-
22
-
23
-
24
-
25
-
26
-
27
-
28
-
29
-
30
-
31
-
32
-
33
-
34
-
35
-
36
-
37
-
38
-
39
-
40
-
41
-
42
-
43
-
44
-
 45
45 -
 46
46 -
 47
47 -
 48
48 -
 49
49 -
 50
50 -
 51
51 -
 52
52 -
 53
53 -
 54
54 -
 55
55 -
56
-
57
-
58
-
59
-
60
-
61
-
62
-
63
-
64
-
65
-
66
-
67
-
68
-
69
-
70
-
71
-
72
-
73
-
74
-
75
-
76
-
77
-
78
-
79
-
80
-
81
-
82
-
83
-
84
-
85
-
86
-
87
-
88
-
89
-
90
-
91
-
92
-
93
-
94
-
95
-
96
-
97
-
98
-
99
-
100
-
101
-
102
-
103
-
104
-
105
-
106
-
107
-
108
-
109
-
110
-
111
-
112
-
113
-
114
-
115
-
116
-
117
-
118
-
119
-
120
-
121
 |
 |
