Epson ColorPage 8000 User Manual - Page 73
Follow the steps in the next to install the new photoconductor., the way out.
 |
View all Epson ColorPage 8000 manuals
Add to My Manuals
Save this manual to your list of manuals |
Page 73 highlights
4-12 | Maintaining and Transporting the Printer 4. Turn the small lever to the right. 5. Pull the photoconductor unit about 12 inches out of the printer. Warning Follow local regulations when you dispose of the used photoconductor unit. Do not expose it to fire, as it can explode and cause injury. 6. Grab the handle at the top of the photoconductor and gently pull it all the way out. 7. Follow the steps in the next section to install the new photoconductor. 4-12
-
 1
1 -
2
-
3
-
4
-
5
-
6
-
7
-
8
-
9
-
10
-
11
-
12
-
13
-
14
-
15
-
16
-
17
-
18
-
19
-
20
-
21
-
22
-
23
-
24
-
25
-
26
-
27
-
28
-
29
-
30
-
31
-
32
-
33
-
34
-
35
-
36
-
37
-
38
-
39
-
40
-
41
-
42
-
43
-
44
-
45
-
46
-
47
-
48
-
49
-
50
-
51
-
52
-
53
-
54
-
55
-
56
-
57
-
58
-
59
-
60
-
61
-
62
-
63
-
64
-
65
-
66
-
67
-
 68
68 -
 69
69 -
 70
70 -
 71
71 -
 72
72 -
 73
73 -
 74
74 -
 75
75 -
 76
76 -
 77
77 -
 78
78 -
79
-
80
-
81
-
82
-
83
-
84
-
85
-
86
-
87
-
88
-
89
-
90
-
91
-
92
-
93
-
94
-
95
-
96
-
97
-
98
-
99
-
100
-
101
-
102
-
103
-
104
-
105
-
106
-
107
-
108
-
109
-
110
-
111
-
112
-
113
-
114
-
115
-
116
-
117
-
118
-
119
-
120
-
121
 |
 |

4-12
4-12
|
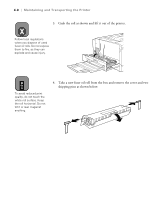
Maintaining and Transporting the Printer
4.
Turn the small lever to the right.
5.
Pull the photoconductor unit about 12 inches out of the printer.
6.
Grab the handle at the top of the photoconductor and gently pull it all
the way out.
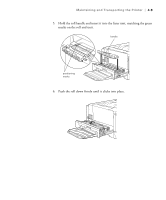
7.
Follow the steps in the next section to install the new photoconductor.
Warning
Follow local regulations
when you dispose of the
used photoconductor unit.
Do not expose it to fire, as it
can explode and cause
injury.