Epson ES-300C User Manual - TWAIN 32 - Page 21
instance, if you have more than one color printer, make sure
 |
View all Epson ES-300C manuals
Add to My Manuals
Save this manual to your list of manuals |
Page 21 highlights
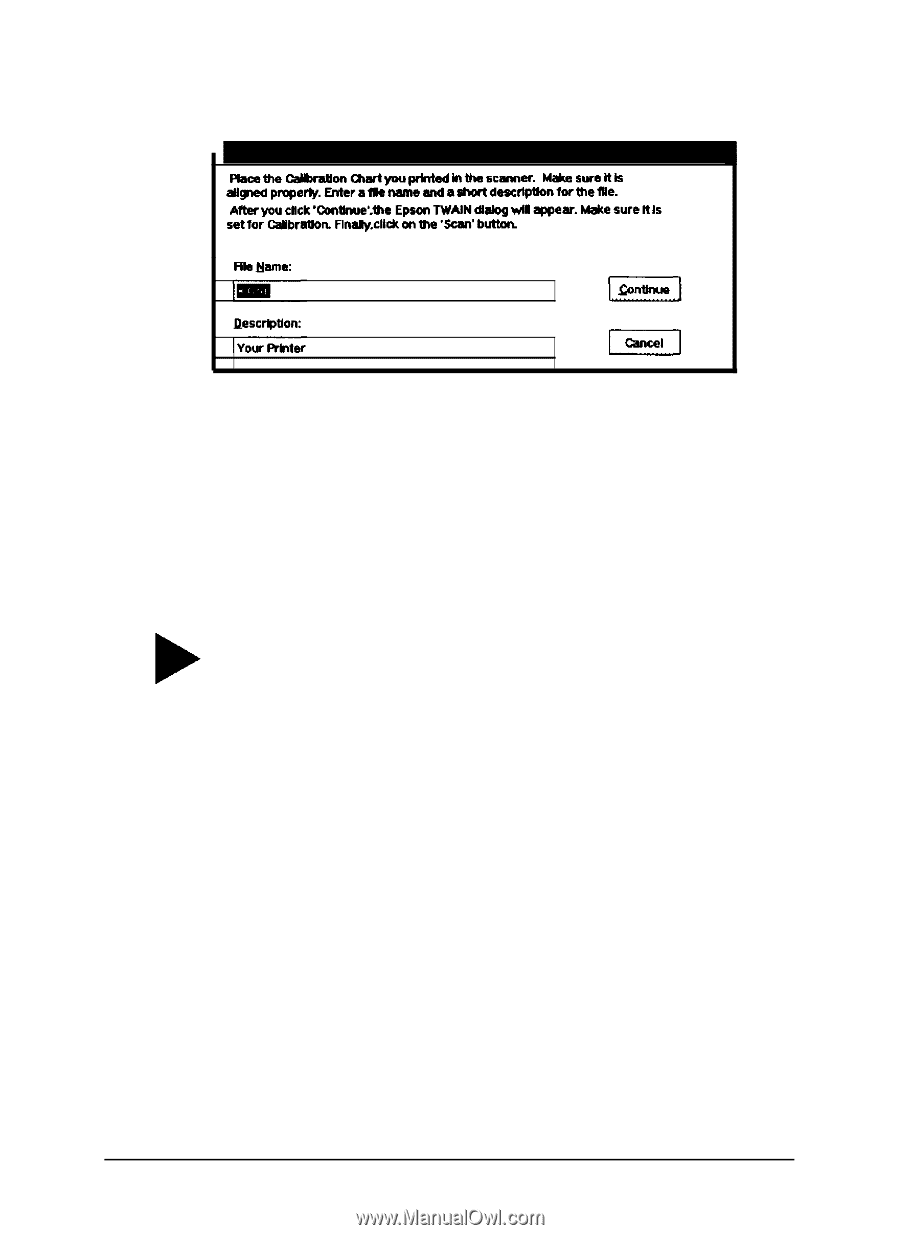
You see the following screen: 4. In the File Name field, type the filename of the calibration file you want to create, such as COLOR1.CAL. Make sure you use the CAL extension. 5. In the Description field, type a short description of the printer for which you created the calibration chart, such as Custom. Tip: If you are creating more than one calibration profile (for instance, if you have more than one color printer), make sure you assign unique descriptions to each calibration profile so you can distinguish between them. 6. Choose Continue. You see the TWAIN advanced screen. 7. If necessary, choose Color Photo from the Image Type pull-down menu. 8. Choose Calibration Profile from the Destination pull-down menu. 9. Click Scan. The program scans the calibration chart and creates a calibration profile. Then you see the EPSON Scan! II program screen. Calibrating Your System 2-7
-
 1
1 -
2
-
3
-
4
-
5
-
6
-
7
-
8
-
9
-
10
-
11
-
12
-
13
-
14
-
15
-
 16
16 -
 17
17 -
 18
18 -
 19
19 -
 20
20 -
 21
21 -
 22
22 -
 23
23 -
 24
24 -
 25
25 -
 26
26 -
27
-
28
-
29
-
30
-
31
-
32
-
33
-
34
-
35
-
36
-
37
-
38
-
39
-
40
-
41
-
42
-
43
-
44
-
45
-
46
-
47
-
48
-
49
-
50
-
51
-
52
-
53
-
54
-
55
-
56
-
57
-
58
-
59
-
60
-
61
-
62
-
63
-
64
-
65
-
66
-
67
-
68
-
69
-
70
-
71
-
72
-
73
-
74
-
75
-
76
-
77
-
78
-
79
-
80
-
81
-
82
-
83
-
84
-
85
-
86
 |
 |