Epson ES-300C User Manual - TWAIN 32 - Page 28
Using the Advanced Screen, Modifying an Image Type, For information about using the basic settings
 |
View all Epson ES-300C manuals
Add to My Manuals
Save this manual to your list of manuals |
Page 28 highlights
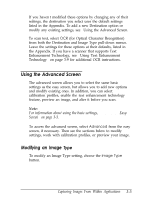
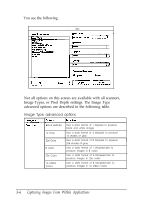
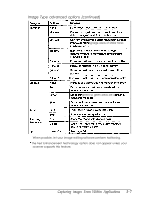
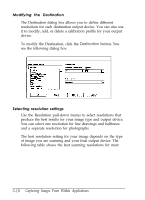
If you haven't modified these options by changing any of their settings, the destination you select uses the default settings listed in the Appendix. To add a new Destination option or modify any existing settings, see "Using the Advanced Screen." To scan text, select OCR (for Optical Character Recognition) from both the Destination and Image Type pull-down menus. Leave the settings for these options at their defaults, listed in the Appendix. If you have a scanner that supports Text Enhancement Technology, see "Using Text Enhancement Technology" on page 3-9 for additional OCR instructions. Using the Advanced Screen The advanced screen allows you to select the same basic settings as the easy screen, but allows you to add new options and modify existing ones. In addition, you can select calibration profiles, enable the text enhancement technology feature, preview an image, and alter it before you scan. Note: For information about using the basic settings, see "Using the Easy Screen" on page 3-3. To access the advanced screen, select Advanced from the easy screen, if necessary. Then see the sections below to modify settings, work with calibration profiles, or preview your image. Modifying an Image Type To modify an Image Type setting, choose the Image Type button. Capturing Images From Within Applications 3-5
-
 1
1 -
2
-
3
-
4
-
5
-
6
-
7
-
8
-
9
-
10
-
11
-
12
-
13
-
14
-
15
-
16
-
17
-
18
-
19
-
20
-
21
-
22
-
 23
23 -
 24
24 -
 25
25 -
 26
26 -
 27
27 -
 28
28 -
 29
29 -
 30
30 -
 31
31 -
 32
32 -
 33
33 -
34
-
35
-
36
-
37
-
38
-
39
-
40
-
41
-
42
-
43
-
44
-
45
-
46
-
47
-
48
-
49
-
50
-
51
-
52
-
53
-
54
-
55
-
56
-
57
-
58
-
59
-
60
-
61
-
62
-
63
-
64
-
65
-
66
-
67
-
68
-
69
-
70
-
71
-
72
-
73
-
74
-
75
-
76
-
77
-
78
-
79
-
80
-
81
-
82
-
83
-
84
-
85
-
86
 |
 |