Epson ES-300C User Manual - TWAIN 32 - Page 49
CHAP 5-SAVING AND EXPORTING IMAGES, Saving Scanned Image, Saving, Scanned Image
 |
View all Epson ES-300C manuals
Add to My Manuals
Save this manual to your list of manuals |
Page 49 highlights
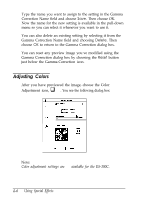
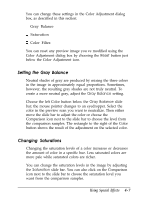
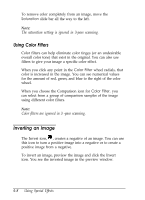
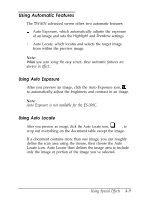
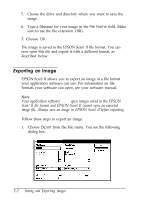
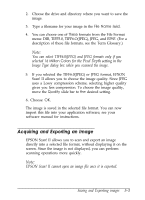
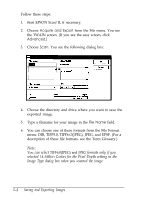
Chapter 5 Saving and Exporting Images You can always scan an image using your TWAIN-compliant image editing application. However, if your application is not TWAIN-compliant, you can use EPSON Scan! II to scan the image and export it in a format your application can open, as described in this chapter. Saving a Scanned Image before you export an image, you need to save it in its original EPSON Scan! II format. Otherwise, you will not be able to retrieve it again in EPSON Scan! II. Follow these steps: 1. Start EPSON Scan! II, if necessary. 2. Select Acquire from the File menu. 3. Select Scan to scan your image. 4. Choose Save AS from the File menu. You see the following dialog box: File Name: Rlrectorles: i c3epscan2 rlzll D&es: EC: dlskl~vdl 1 Cancel 1 Saving and Exporting Images 5-1
-
 1
1 -
2
-
3
-
4
-
5
-
6
-
7
-
8
-
9
-
10
-
11
-
12
-
13
-
14
-
15
-
16
-
17
-
18
-
19
-
20
-
21
-
22
-
23
-
24
-
25
-
26
-
27
-
28
-
29
-
30
-
31
-
32
-
33
-
34
-
35
-
36
-
37
-
38
-
39
-
40
-
41
-
42
-
43
-
 44
44 -
 45
45 -
 46
46 -
 47
47 -
 48
48 -
 49
49 -
 50
50 -
 51
51 -
 52
52 -
 53
53 -
 54
54 -
55
-
56
-
57
-
58
-
59
-
60
-
61
-
62
-
63
-
64
-
65
-
66
-
67
-
68
-
69
-
70
-
71
-
72
-
73
-
74
-
75
-
76
-
77
-
78
-
79
-
80
-
81
-
82
-
83
-
84
-
85
-
86
 |
 |
