Epson Expression 636 User Manual - TWAIN 32 - Page 111
ICON GLOSSARY, TWAIN Advanced Screen Icons
 |
View all Epson Expression 636 manuals
Add to My Manuals
Save this manual to your list of manuals |
Page 111 highlights
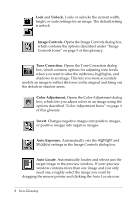
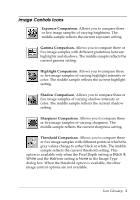
Icon Glossary This glossary describes the TWAIN icons. If you want to know what a specific icon does, locate the icon in this glossary; then read its description. Some icons open dialog boxes which contain more icons. Clicking a comparison icon displays three or five samples with different settings in the preview window. To choose a sample, click the one that most closely reflects the image you want. That sample is selected and placed in the middle position, and a different set of samples is displayed based on the image you selected. You can keep selecting the image you like best until you are satisfied with the one in the middle. Then double-click it, and it reappears alone. See "Modifying the TWAIN Configuration" in Chapter 4 for more information about displaying comparison samples. TWAIN Advanced Screen Icons Preview. Shows you your entire image before you scan it. Once an image is in the preview window, you can check its width, height, and file size on the screen. Previewing also allows you to see the effects of changes you make to your image. Zoom Preview. Shows a specific area of an image in the preview window. Use the mouse to select the part of the image you want to preview. Icon Glossary 1
-
 1
1 -
2
-
3
-
4
-
5
-
6
-
7
-
8
-
9
-
10
-
11
-
12
-
13
-
14
-
15
-
16
-
17
-
18
-
19
-
20
-
21
-
22
-
23
-
24
-
25
-
26
-
27
-
28
-
29
-
30
-
31
-
32
-
33
-
34
-
35
-
36
-
37
-
38
-
39
-
40
-
41
-
42
-
43
-
44
-
45
-
46
-
47
-
48
-
49
-
50
-
51
-
52
-
53
-
54
-
55
-
56
-
57
-
58
-
59
-
60
-
61
-
62
-
63
-
64
-
65
-
66
-
67
-
68
-
69
-
70
-
71
-
72
-
73
-
74
-
75
-
76
-
77
-
78
-
79
-
80
-
81
-
82
-
83
-
84
-
85
-
86
-
87
-
88
-
89
-
90
-
91
-
92
-
93
-
94
-
95
-
96
-
97
-
98
-
99
-
100
-
101
-
102
-
103
-
104
-
105
-
 106
106 -
 107
107 -
 108
108 -
 109
109 -
 110
110 -
 111
111 -
 112
112 -
 113
113 -
 114
114 -
 115
115 -
 116
116 -
117
-
118
-
119
-
120
-
121
-
122
-
123
-
124
-
125
-
126
-
127
-
128
-
129
-
130
 |
 |
