Epson Perfection 1200U Scanner Basics - Page 36
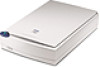
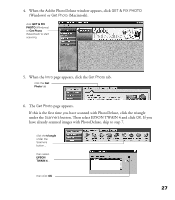
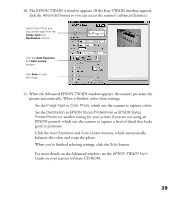
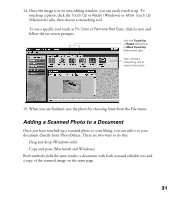
The EPSON TWAIN 4 window appears. If the Easy TWAIN interface appears, Advanced, Image Type
 |
View all Epson Perfection 1200U manuals
Add to My Manuals
Save this manual to your list of manuals |
Page 36 highlights
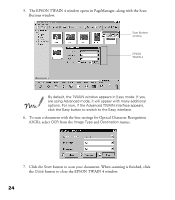
10. The EPSON TWAIN 4 window appears. (If the Easy TWAIN interface appears, click the Advanced button so you can access the scanner’s advanced features.) select Color Photo and your printer type from the Image Type and Destination menus... click the Auto Exposure and Auto Locate buttons... click Scan to scan the image 11. When the Advanced EPSON TWAIN window appears, the scanner pre-scans the picture automatically. When it finishes, select these settings: s Set the Image Type to Color Photo, which sets the scanner to capture colors. s Set the Destination to EPSON Stylus Printer(Fine) or EPSON Stylus Printer(Photo) (or another setting for your printer if you are not using an EPSON printer), which sets the scanner to capture a level of detail that looks good in printouts. s Click the Auto Exposure and Auto Locate buttons, which automatically balances the colors and crops the photo. s When you’re finished selecting settings, click the Scan button. For more details on the Advanced window, see the EPSON TWAIN User’s Guide on your scanner software CD-ROM. 29
-
 1
1 -
2
-
3
-
4
-
5
-
6
-
7
-
8
-
9
-
10
-
11
-
12
-
13
-
14
-
15
-
16
-
17
-
18
-
19
-
20
-
21
-
22
-
23
-
24
-
25
-
26
-
27
-
28
-
29
-
30
-
 31
31 -
 32
32 -
 33
33 -
 34
34 -
 35
35 -
 36
36 -
 37
37 -
 38
38 -
 39
39 -
 40
40 -
 41
41 -
42
-
43
-
44
-
45
-
46
-
47
-
48
-
49
-
50
-
51
-
52
-
53
-
54
-
55
-
56
-
57
-
58
-
59
-
60
-
61
-
62
-
63
-
64
-
65
-
66
-
67
-
68
-
69
-
70
-
71
-
72
-
73
-
74
-
75
-
76
-
77
-
78
-
79
-
80
-
81
-
82
-
83
-
84
-
85
-
86
-
87
-
88
-
89
-
90
-
91
-
92
-
93
-
94
-
95
-
96
-
97
-
98
-
99
-
100
-
101
-
102
-
103
-
104
-
105
-
106
-
107
-
108
-
109
-
110
-
111
-
112
-
113
 |
 |
