Epson Perfection 1200U Scanner Basics - Page 38
Adding a Scanned Photo to a Document
 |
View all Epson Perfection 1200U manuals
Add to My Manuals
Save this manual to your list of manuals |
Page 38 highlights
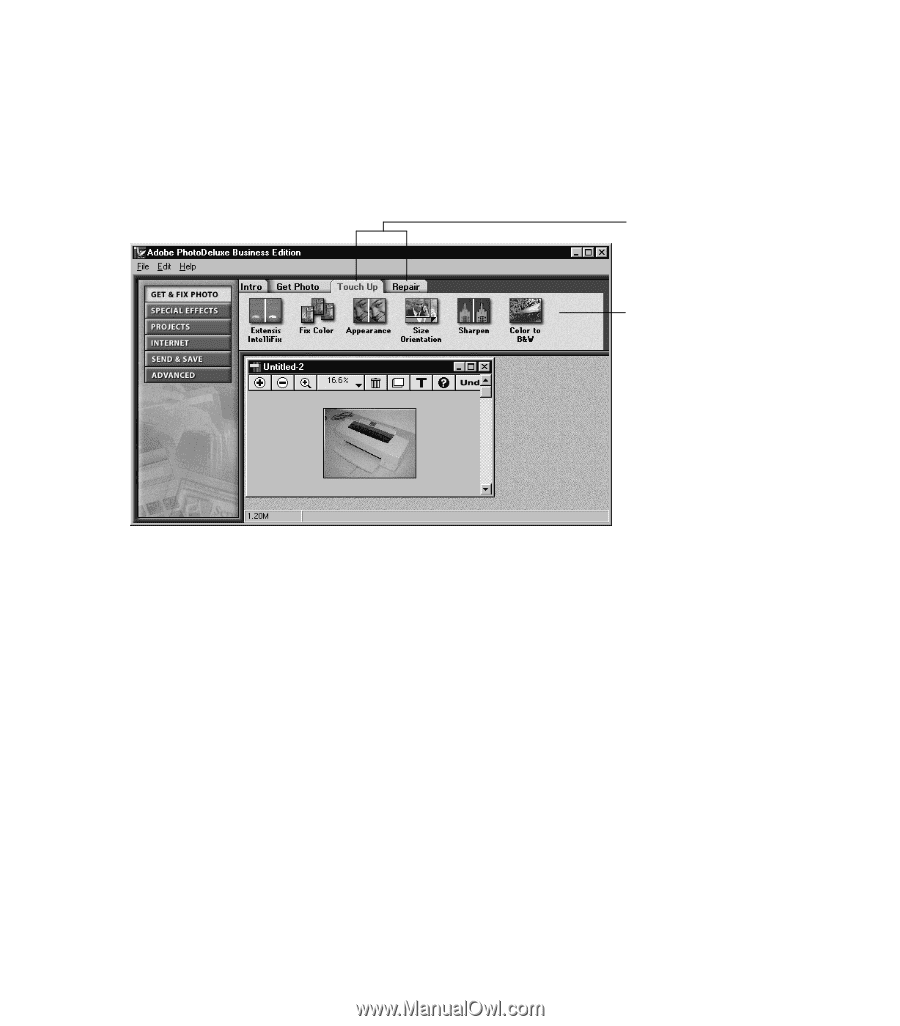
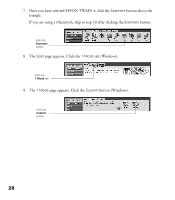
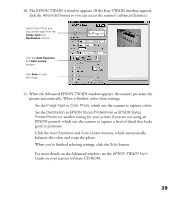
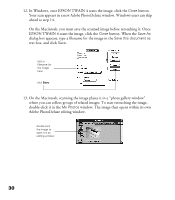
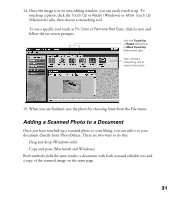
14. Once the image is in its own editing window, you can easily touch it up. To touch-up a photo, click the Touch Up or Repair (Windows) or More Touch Up (Macintosh) tabs, then choose a retouching tool. To use a specific tool (such as Fix Color or Remove Red Eye), click its icon and follow the on-screen prompts. click the Touch Up or Repair (Windows) or More Touch Up (Macintosh) tabs... then choose a retouching tool to retouch the photo 15. When you are finished, save the photo by choosing Save from the File menu. Adding a Scanned Photo to a Document Once you have touched-up a scanned photo to your liking, you can add it to your document directly from PhotoDeluxe. There are two ways to do this: s Drag and drop (Windows only) s Copy and paste (Macintosh and Windows) Both methods yield the same results: a document with both scanned editable text and a copy of the scanned image on the same page. 31
-
 1
1 -
2
-
3
-
4
-
5
-
6
-
7
-
8
-
9
-
10
-
11
-
12
-
13
-
14
-
15
-
16
-
17
-
18
-
19
-
20
-
21
-
22
-
23
-
24
-
25
-
26
-
27
-
28
-
29
-
30
-
31
-
32
-
 33
33 -
 34
34 -
 35
35 -
 36
36 -
 37
37 -
 38
38 -
 39
39 -
 40
40 -
 41
41 -
 42
42 -
 43
43 -
44
-
45
-
46
-
47
-
48
-
49
-
50
-
51
-
52
-
53
-
54
-
55
-
56
-
57
-
58
-
59
-
60
-
61
-
62
-
63
-
64
-
65
-
66
-
67
-
68
-
69
-
70
-
71
-
72
-
73
-
74
-
75
-
76
-
77
-
78
-
79
-
80
-
81
-
82
-
83
-
84
-
85
-
86
-
87
-
88
-
89
-
90
-
91
-
92
-
93
-
94
-
95
-
96
-
97
-
98
-
99
-
100
-
101
-
102
-
103
-
104
-
105
-
106
-
107
-
108
-
109
-
110
-
111
-
112
-
113
 |
 |