Epson Perfection 1200U Scanner Basics - Page 55
Scaling (Resizing) Images, One-Touch Scanning
 |
View all Epson Perfection 1200U manuals
Add to My Manuals
Save this manual to your list of manuals |
Page 55 highlights
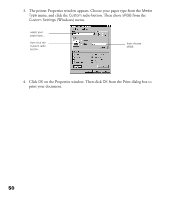
The EPSON Perfection 1200U’s maximum hardware resolution of 1200 × 2400 dpi is achieved through EPSON’s advanced Micro Step Drive technology. This technology enables the EPSON Perfection 1200U to achieve a maximum sub-scan or vertical resolution of 1200 dpi or 2400 dpi using “half-stepping” of the scanning carriage to double the optical resolution. Scaling (Resizing) Images If you plan to enlarge your image, it is better to enlarge it when you’re scanning rather than in your application. Each time you modify an image, you lose some quality. Keep in mind when you enlarge a small photo, such as a 35 mm slide or wallet-size photo, you’ll need to scan at a high enough resolution to retain your image quality, but not so high that your file size is too large to be efficient. You must manually adjust the resolution (dpi) to maintain the same image quality when you resize your image. For example, if you have a 300 dpi 2 × 2-inch image that you want to enlarge to 4 × 4 (a factor of 200%), increase the Scale setting to 200% and change the resolution to 600 dpi. One-Touch Scanning Your EPSON Perfection 1200U features a one-touch scanning button. With one-touch scanning, you can just load a document in the scanner, press the scanner’s ]Start button, and then PageManager opens EPSON TWAIN automatically. To use this option, you must first install Presto! PageManager (or another application that supports linking to scanner events with the Start button on Windows 98) and enable the scanner monitor utility. For details on how to set up one-touch scanning, see “Using the Start Button” on page 21. 48
-
 1
1 -
2
-
3
-
4
-
5
-
6
-
7
-
8
-
9
-
10
-
11
-
12
-
13
-
14
-
15
-
16
-
17
-
18
-
19
-
20
-
21
-
22
-
23
-
24
-
25
-
26
-
27
-
28
-
29
-
30
-
31
-
32
-
33
-
34
-
35
-
36
-
37
-
38
-
39
-
40
-
41
-
42
-
43
-
44
-
45
-
46
-
47
-
48
-
49
-
 50
50 -
 51
51 -
 52
52 -
 53
53 -
 54
54 -
 55
55 -
 56
56 -
 57
57 -
 58
58 -
 59
59 -
 60
60 -
61
-
62
-
63
-
64
-
65
-
66
-
67
-
68
-
69
-
70
-
71
-
72
-
73
-
74
-
75
-
76
-
77
-
78
-
79
-
80
-
81
-
82
-
83
-
84
-
85
-
86
-
87
-
88
-
89
-
90
-
91
-
92
-
93
-
94
-
95
-
96
-
97
-
98
-
99
-
100
-
101
-
102
-
103
-
104
-
105
-
106
-
107
-
108
-
109
-
110
-
111
-
112
-
113
 |
 |
