Epson Perfection 1200U Scanner Basics - Page 45
an image. The Advanced window, however, lets you preview your image - driver windows 7
 |
View all Epson Perfection 1200U manuals
Add to My Manuals
Save this manual to your list of manuals |
Page 45 highlights
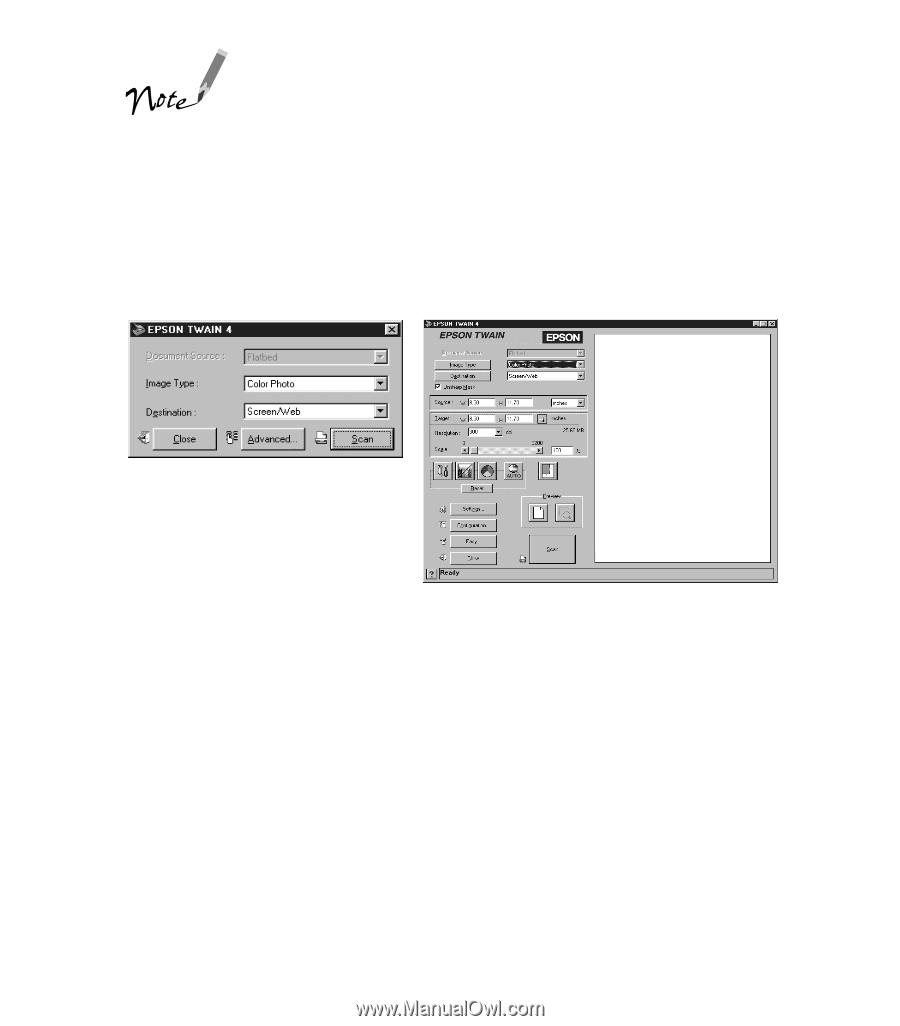
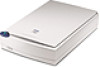
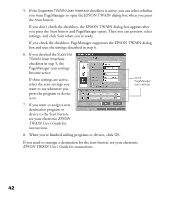
If your computer fails to recognize the scanner, you won’t see the EPSON TWAIN driver when you try to select a scanner source from your host application. In addition, an error message may appear. If this happens, turn off your computer and scanner, and then turn the scanner back on. Then restart the computer. Do not connect or disconnect the USB cable while you are using EPSON TWAIN. 2. One of the EPSON TWAIN windows appears on top of your graphics application. Easy window Advanced window The first time you start EPSON TWAIN, you see the Easy window. After that, you’ll see the window that was open the last time you closed EPSON TWAIN. To switch between the windows, click the Easy or Advanced button. Both the Easy and Advanced windows contain the basic settings you need to scan an image. The Advanced window, however, lets you preview your image and select many advanced settings. See “Selecting Advanced TWAIN Settings” on page 44 for a summary of these settings, or your EPSON TWAIN User’s Guide for a complete description. 3. Select the type of image (such as Color Photo or Line Art) and final output destination (such as Screen/Web or Laser Printer) from the Image Type and Destination menus. If you’re scanning with the Easy window, skip to step 5. 38
-
 1
1 -
2
-
3
-
4
-
5
-
6
-
7
-
8
-
9
-
10
-
11
-
12
-
13
-
14
-
15
-
16
-
17
-
18
-
19
-
20
-
21
-
22
-
23
-
24
-
25
-
26
-
27
-
28
-
29
-
30
-
31
-
32
-
33
-
34
-
35
-
36
-
37
-
38
-
39
-
 40
40 -
 41
41 -
 42
42 -
 43
43 -
 44
44 -
 45
45 -
 46
46 -
 47
47 -
 48
48 -
 49
49 -
 50
50 -
51
-
52
-
53
-
54
-
55
-
56
-
57
-
58
-
59
-
60
-
61
-
62
-
63
-
64
-
65
-
66
-
67
-
68
-
69
-
70
-
71
-
72
-
73
-
74
-
75
-
76
-
77
-
78
-
79
-
80
-
81
-
82
-
83
-
84
-
85
-
86
-
87
-
88
-
89
-
90
-
91
-
92
-
93
-
94
-
95
-
96
-
97
-
98
-
99
-
100
-
101
-
102
-
103
-
104
-
105
-
106
-
107
-
108
-
109
-
110
-
111
-
112
-
113
 |
 |