HP 5100 Service Manual - Page 223
SMALL PAPER SPEED=SLOW, Possible cause
 |
UPC - 808736092500
View all HP 5100 manuals
Add to My Manuals
Save this manual to your list of manuals |
Page 223 highlights
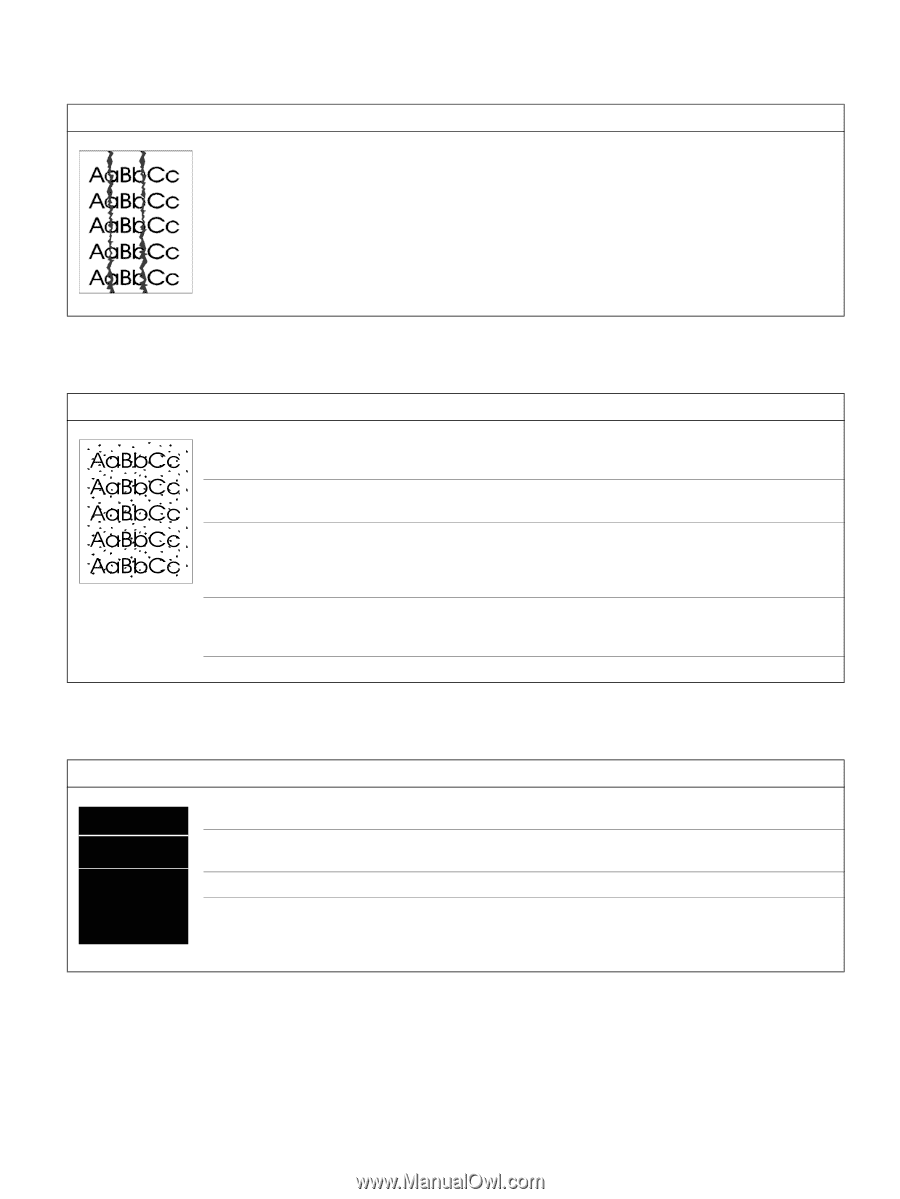
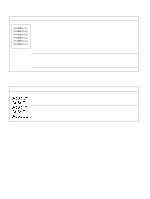
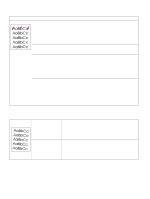
Table 50. Smudged lines (either direction) Possible cause Action Paper path contamination or 1. Check the toner cartridge by performing the half self-test functional check damage. (see page 224). Replace it if necessary. 2. Run a cleaning page through the printer (see page 67). Check the fuser and replace it if necessary. 3. Check the Tray 1 feed roller and other trays' separation pads and rollers for contamination. Clean or replace as necessary. 4. Check for other sources of contamination in the paper path and clean with a dry, lint-free cloth. Also see the "Repetitive defect ruler" on page 223. Table 51. Toner specks (see also "Dots" on page 216) Possible cause Action Dirt in printer. 1. Print a few more pages to see if the problem corrects itself. 2. Clean the inside of the printer (see page 66) or use the printer's cleaning page (see page 67). Bad toner cartridge components. Perform the half self-test functional check (see page 224). If the problem develops on the print drum, replace the toner cartridge. Media does not meet printer 1. Turn over the stack of paper in the tray. Also try rotating the paper 180°. specifications or is stored 2. Check the paper (or other print media) type and quality. Replace the improperly. paper, and advise the customer to use the recommended media and to store it correctly. Alternating small and To alternate small and standard paper, set SMALL PAPER SPEED=SLOW standard paper (such as from the configuration menu on the control panel. envelopes and letterhead). Worn fuser rollers. Replace the fuser. Table 52. White lines (in the paper-path direction) Possible cause Action Lack of toner or faulty toner Redistribute the toner in the toner cartridge. If the problem continues, cartridge. replace the toner cartridge. Dirt in the laser path. Clean the laser path. Remove the laser/scanner assembly and check for dirt or other obstructions in the beam path. Defective fuser. Replace the fuser. Dirty mirror in the laser/scanner. Replace the laser/scanner. Q1860-90918 Chapter 7 Troubleshooting 221
-
 1
1 -
2
-
3
-
4
-
5
-
6
-
7
-
8
-
9
-
10
-
11
-
12
-
13
-
14
-
15
-
16
-
17
-
18
-
19
-
20
-
21
-
22
-
23
-
24
-
25
-
26
-
27
-
28
-
29
-
30
-
31
-
32
-
33
-
34
-
35
-
36
-
37
-
38
-
39
-
40
-
41
-
42
-
43
-
44
-
45
-
46
-
47
-
48
-
49
-
50
-
51
-
52
-
53
-
54
-
55
-
56
-
57
-
58
-
59
-
60
-
61
-
62
-
63
-
64
-
65
-
66
-
67
-
68
-
69
-
70
-
71
-
72
-
73
-
74
-
75
-
76
-
77
-
78
-
79
-
80
-
81
-
82
-
83
-
84
-
85
-
86
-
87
-
88
-
89
-
90
-
91
-
92
-
93
-
94
-
95
-
96
-
97
-
98
-
99
-
100
-
101
-
102
-
103
-
104
-
105
-
106
-
107
-
108
-
109
-
110
-
111
-
112
-
113
-
114
-
115
-
116
-
117
-
118
-
119
-
120
-
121
-
122
-
123
-
124
-
125
-
126
-
127
-
128
-
129
-
130
-
131
-
132
-
133
-
134
-
135
-
136
-
137
-
138
-
139
-
140
-
141
-
142
-
143
-
144
-
145
-
146
-
147
-
148
-
149
-
150
-
151
-
152
-
153
-
154
-
155
-
156
-
157
-
158
-
159
-
160
-
161
-
162
-
163
-
164
-
165
-
166
-
167
-
168
-
169
-
170
-
171
-
172
-
173
-
174
-
175
-
176
-
177
-
178
-
179
-
180
-
181
-
182
-
183
-
184
-
185
-
186
-
187
-
188
-
189
-
190
-
191
-
192
-
193
-
194
-
195
-
196
-
197
-
198
-
199
-
200
-
201
-
202
-
203
-
204
-
205
-
206
-
207
-
208
-
209
-
210
-
211
-
212
-
213
-
214
-
215
-
216
-
217
-
 218
218 -
 219
219 -
 220
220 -
 221
221 -
 222
222 -
 223
223 -
 224
224 -
 225
225 -
 226
226 -
 227
227 -
 228
228 -
229
-
230
-
231
-
232
-
233
-
234
-
235
-
236
-
237
-
238
-
239
-
240
-
241
-
242
-
243
-
244
-
245
-
246
-
247
-
248
-
249
-
250
-
251
-
252
-
253
-
254
-
255
-
256
-
257
-
258
-
259
-
260
-
261
-
262
-
263
-
264
-
265
-
266
-
267
-
268
-
269
-
270
-
271
-
272
-
273
-
274
-
275
-
276
-
277
-
278
-
279
-
280
-
281
-
282
-
283
-
284
-
285
-
286
-
287
-
288
-
289
-
290
-
291
-
292
-
293
-
294
-
295
-
296
-
297
-
298
-
299
-
300
-
301
-
302
-
303
-
304
-
305
-
306
-
307
-
308
-
309
-
310
-
311
-
312
-
313
-
314
 |
 |