HP LH4r HP Netserver LP 1000r User Guide - Page 117
See
 |
View all HP LH4r manuals
Add to My Manuals
Save this manual to your list of manuals |
Page 117 highlights
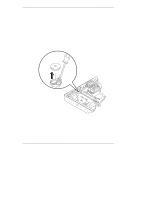
Chapter 12 Troubleshooting Refer to Chapter 2, "Opening and Closing the HP Netserver," to gain access to the system board. 3. If necessary, remove the PCI board to gain access to the battery. See Figure 12-2. 4. Insert a small flat-blade screwdriver or similar tool between the battery and spring latch. See Figure 12-3. 5. Push the spring latch away from battery to release the battery. The spring contacts beneath the battery cause it to pop up allowing you to grasp the battery. 6. Remove the existing battery. View Roated 90 Degrees CCW Figure 12-3. Battery on System Board 7. Insert the new battery with the positive sign (+) facing up in the socket. 8. Press down on the center of the battery with your thumb, pushing the battery down into the socket. The battery should snap into place. 111
-
 1
1 -
2
-
3
-
4
-
5
-
6
-
7
-
8
-
9
-
10
-
11
-
12
-
13
-
14
-
15
-
16
-
17
-
18
-
19
-
20
-
21
-
22
-
23
-
24
-
25
-
26
-
27
-
28
-
29
-
30
-
31
-
32
-
33
-
34
-
35
-
36
-
37
-
38
-
39
-
40
-
41
-
42
-
43
-
44
-
45
-
46
-
47
-
48
-
49
-
50
-
51
-
52
-
53
-
54
-
55
-
56
-
57
-
58
-
59
-
60
-
61
-
62
-
63
-
64
-
65
-
66
-
67
-
68
-
69
-
70
-
71
-
72
-
73
-
74
-
75
-
76
-
77
-
78
-
79
-
80
-
81
-
82
-
83
-
84
-
85
-
86
-
87
-
88
-
89
-
90
-
91
-
92
-
93
-
94
-
95
-
96
-
97
-
98
-
99
-
100
-
101
-
102
-
103
-
104
-
105
-
106
-
107
-
108
-
109
-
110
-
111
-
 112
112 -
 113
113 -
 114
114 -
 115
115 -
 116
116 -
 117
117 -
 118
118 -
 119
119 -
 120
120 -
 121
121 -
 122
122 -
123
-
124
-
125
-
126
-
127
-
128
-
129
-
130
-
131
-
132
-
133
-
134
-
135
-
136
-
137
-
138
-
139
-
140
 |
 |
