HP OmniBook XE2-DE HP OmniBook XE Series - Corporate Evaluators Guide - Page 76
To install a retail version of Windows NT 4.0
 |
View all HP OmniBook XE2-DE manuals
Add to My Manuals
Save this manual to your list of manuals |
Page 76 highlights
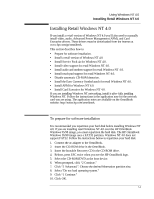
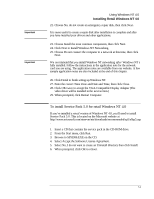
Using Windows NT 4.0 Installing Retail Windows NT 4.0 To install a retail version of Windows NT 4.0 1. Insert the Windows NT Workstation CD in the CD-ROM drive. 2. Reboot, press ESC twice when you see the HP OmniBook logo. 3. Select the CD-ROM/DVD as the boot device. 4. At the Welcome Screen, press Enter to begin. 5. Press Enter to accept the IDE CD-ROM mass storage device. 6. If prompted that the drive contains more than 1024 cylinders, press "Enter". 7. Read the Windows NT Licensing Agreement. Press "Page Down" until you reach the end of the document. Press F8 to agree. 8. Press "Enter" to accept the default hardware and software components. 9. Select the first unpartitioned space, then press C. Note You can create partitions on the hard disk as you wish. For a detailed discussion of FAT, HPFS and NTFS file systems, please refer to the "MS Windows NT Resource Guide" within the "MS Windows NT Resource Kit," specifically Chapter 5 "Windows NT File Systems and Advanced Disk Management". 10. Enter the size of the partition desired and press Enter. If you are going to format as FAT enter 2040 or less. If you are going to format as NTFS enter 4090 or less. 11. Select the C: partition and press "Enter" to install Windows NT. 12. Select the type of file system to install, then press Enter. 13. Press Enter to accept the default Windows NT directory or type in another directory. 14. Press Enter to allow Windows NT setup to examine your hard disk drive for corruption. 15. When prompted, press Enter to reboot. (Do not remove the CD-ROM.) 16. Click "Next" to allow Setup to Gather information about your computer. 17. Choose "Typical" from the Setup Options, then click Next. (If hard disk space is limited, choosing Portable will install only the necessary components). 18. Enter your name and organization, then click Next. 19. Enter the 10-digit CD-key, then click Next. The CD-key is located on the back of the CD jacket. 20. Enter a computer name, then click Next. This name is used by other computers on the network to access your computer. 21. Enter an Administration password twice, then click Next. This password is used to administer User IDs and Windows NT security. 7-4
-
 1
1 -
2
-
3
-
4
-
5
-
6
-
7
-
8
-
9
-
10
-
11
-
12
-
13
-
14
-
15
-
16
-
17
-
18
-
19
-
20
-
21
-
22
-
23
-
24
-
25
-
26
-
27
-
28
-
29
-
30
-
31
-
32
-
33
-
34
-
35
-
36
-
37
-
38
-
39
-
40
-
41
-
42
-
43
-
44
-
45
-
46
-
47
-
48
-
49
-
50
-
51
-
52
-
53
-
54
-
55
-
56
-
57
-
58
-
59
-
60
-
61
-
62
-
63
-
64
-
65
-
66
-
67
-
68
-
69
-
70
-
 71
71 -
 72
72 -
 73
73 -
 74
74 -
 75
75 -
 76
76 -
 77
77 -
 78
78 -
 79
79 -
 80
80 -
 81
81 -
82
-
83
-
84
-
85
-
86
-
87
-
88
-
89
-
90
-
91
-
92
-
93
-
94
-
95
-
96
-
97
-
98
-
99
-
100
-
101
-
102
-
103
-
104
-
105
-
106
 |
 |