HP rp3440 Installation Guide, Seventh Edition - HP 9000 rp3410 and HP 9000 rp3 - Page 65
Replacing the System Battery, Step 7.
 |
View all HP rp3440 manuals
Add to My Manuals
Save this manual to your list of manuals |
Page 65 highlights
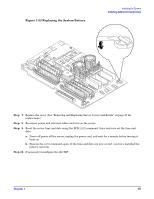
Figure 1-52 Replacing the System Battery Installing the System Installing Additional Components Step 7. Replace the cover. (See "Removing and Replacing Server Covers and Bezels" on page 25 for instructions.) Step 8. Reconnect power and external cables and turn on the server. Step 9. Reset the server time and date using the BCH DATE command. Once you have set the time and date: a. Power off power off the server, unplug the power cord, and wait for a minute before turning it back on. b. Execute the DATE command again. If the time and date are now correct, you have installed the battery correctly. Step 10. If necessary, reconfigure the iLO MP. Chapter 1 65
-
 1
1 -
2
-
3
-
4
-
5
-
6
-
7
-
8
-
9
-
10
-
11
-
12
-
13
-
14
-
15
-
16
-
17
-
18
-
19
-
20
-
21
-
22
-
23
-
24
-
25
-
26
-
27
-
28
-
29
-
30
-
31
-
32
-
33
-
34
-
35
-
36
-
37
-
38
-
39
-
40
-
41
-
42
-
43
-
44
-
45
-
46
-
47
-
48
-
49
-
50
-
51
-
52
-
53
-
54
-
55
-
56
-
57
-
58
-
59
-
 60
60 -
 61
61 -
 62
62 -
 63
63 -
 64
64 -
 65
65 -
 66
66 -
 67
67 -
 68
68 -
 69
69 -
 70
70 -
71
-
72
-
73
-
74
-
75
-
76
-
77
-
78
-
79
-
80
-
81
-
82
-
83
-
84
-
85
-
86
-
87
-
88
-
89
-
90
-
91
-
92
-
93
-
94
-
95
-
96
 |
 |
Installing the System
Installing Additional Components
Chapter 1
65
Figure 1-52 Replacing the System Battery
Step 7.
Replace the cover. (See “Removing and Replacing Server Covers and Bezels” on page 25 for
instructions.)
Step 8.
Reconnect power and external cables and turn on the server.
Step 9.
Reset the server time and date using the BCH
DATE
command. Once you have set the time and
date:
a.
Power off power off the server, unplug the power cord, and wait for a minute before turning it
back on.
b.
Execute the
DATE
command again. If the time and date are now correct, you have installed the
battery correctly.
Step 10.
If necessary, reconfigure the iLO MP.