HP rp3440 Installation Guide, Seventh Edition - HP 9000 rp3410 and HP 9000 rp3 - Page 85
Troubleshooting, Troubleshooting Methodology, Troubleshooting Using the Server Power Button
 |
View all HP rp3440 manuals
Add to My Manuals
Save this manual to your list of manuals |
Page 85 highlights
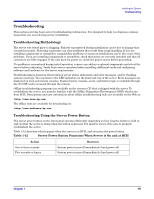
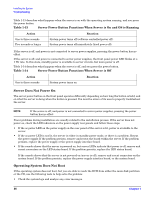
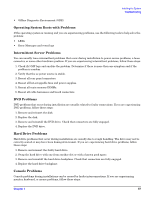
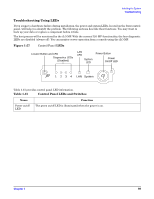
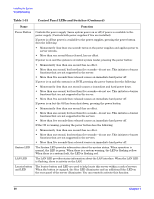
Installing the System Troubleshooting Troubleshooting This section provides basic server troubleshooting information. It is designed to help you diagnose common issues that can occur during server installation. Troubleshooting Methodology The server was tested prior to shipping. Failures encountered during installation can be due to damage that occurred in transit. Reseating connectors can clear problems that result from rough handling. If you are installing components or assemblies, compatibility problems or incorrect installations can be the cause of the problems. If you are installing components or assemblies, check that items are correctly installed and that all connectors are fully engaged. If the unit does not power on, check the power source before proceeding. If a problem is encountered during initial operation, remove any add-in or optional components and retest the server before continuing. Verify basic server operation before installing additional cards and configuring software and hardware for the server requirements. Troubleshooting is based on observation of server status indications and error messages, and by checking system event logs. You can observe the LED indicators on the front and rear of the server. Error messages are displayed on local and remote consoles. System history (console, event, and history logs) is available through the iLO MP, and is accessed through the console. Offline troubleshooting programs are available on the resource CD that is shipped with the server. To troubleshoot the server, you must be familiar with the Offline Diagnostics Environment (ODE) which runs from BCH. Descriptions and user information about offline troubleshooting tools are available on the Web at: http://www.docs.hp.com. The offline tools are available for downloading at: http://www.software.hp.com. Troubleshooting Using the Server Power Button The server power button on the front panel operates differently depending on how long the button is held in, and on what the server is doing when the button is pressed. You must be aware of its uses to properly troubleshoot the server. Table 1-12 describes what happens when the server is at BCH, and you press the power button. Table 1-12 Server Power Button Functions When Server is On and at BCH Action One to three seconds Five seconds or longer Reaction System power turns off immediately (hard power off). System power turns off immediately (hard power off). Chapter 1 85
-
 1
1 -
2
-
3
-
4
-
5
-
6
-
7
-
8
-
9
-
10
-
11
-
12
-
13
-
14
-
15
-
16
-
17
-
18
-
19
-
20
-
21
-
22
-
23
-
24
-
25
-
26
-
27
-
28
-
29
-
30
-
31
-
32
-
33
-
34
-
35
-
36
-
37
-
38
-
39
-
40
-
41
-
42
-
43
-
44
-
45
-
46
-
47
-
48
-
49
-
50
-
51
-
52
-
53
-
54
-
55
-
56
-
57
-
58
-
59
-
60
-
61
-
62
-
63
-
64
-
65
-
66
-
67
-
68
-
69
-
70
-
71
-
72
-
73
-
74
-
75
-
76
-
77
-
78
-
79
-
 80
80 -
 81
81 -
 82
82 -
 83
83 -
 84
84 -
 85
85 -
 86
86 -
 87
87 -
 88
88 -
 89
89 -
 90
90 -
91
-
92
-
93
-
94
-
95
-
96
 |
 |
