Kenwood TH-D75 User Manual - Page 5
Preparation, Supplied Accessories, Installing The Antenna, Installing The Battery Pack, Installing
 |
View all Kenwood TH-D75 manuals
Add to My Manuals
Save this manual to your list of manuals |
Page 5 highlights
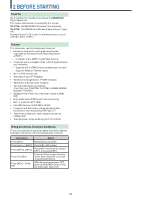
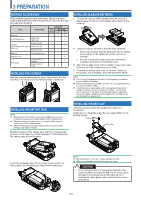
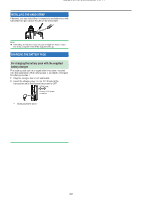
3 PREPARATION SUPPLIED ACCESSORIES After carefully unpacking the transceiver, identify the items listed in the table below. We recommend you keep the box and packaging for shipping. Item Comments Antenna Li-ion battery pack KNB-75LA: 1820 mAh Charger W0H-0160-XX (AC Voltages: 100 - 240 V, W0H-0161-XX 50/60 Hz) W0H-0162-XX Quantity THD75A TH-D75E E T 1 1 1 1 1 1 1 - - - 1 - - - 1 Belt clip 2 screws supplied 1 1 1 Warranty card User guide English/ French/ Spanish Italian/ German/ Dutch 1 1 1 1 1 1 - 1 - INSTALLING THE ANTENNA Hold the supplied antenna by its base, then screw it into the connector on the top panel of the transceiver until secure. INSTALLING ALKALINE BATTERIES 1 To open the optional KBP-9 battery case lid, press the release lever on the top of the battery case, then pull the cover up. c a b 2 Insert (or remove) six AAA (LR03) Alkaline batteries. • When removing the Alkaline batteries from the battery case, pull up on the batteries from the positive (+) terminal. • Be sure to match the battery polarities with those marked in the bottom of the battery case. 3 Align the two tabs at the bottom of battery case, then close the cover until the locking tabs on top click. 4 To install the battery case onto (or remove it from) the transceiver, follow "INSTALLING THE BATTERY PACK". Note: ¡ Do not use Manganese batteries or Rechargeable batteries in place of Alkaline batteries. ¡ Remove all batteries from the case when it is not expected to be in use for several months. ¡ To lift the battery pack safety catch, use a piece of hardened plastic or metal, such as a screwdriver, that is no more than 6 mm wide and 1 mm thick. It is imperative that you place the implement under only the lip of the safety catch so that you do not damage the release latch. INSTALLING THE BATTERY PACK Note: ¡ Because the battery pack is provided uncharged, you must charge the battery pack before using it with the transceiver. ¡ When removing the battery pack, be careful not to drop the transceiver and the battery pack. ¡ When installing/removing the battery pack, be careful not to damage your nails or fingers. Match the guides of the battery pack with the corresponding grooves on the upper rear of the transceiver, then firmly press the battery case to lock it in place. INSTALLING THE BELT CLIP If desired, you can install the supplied belt clip to the transceiver. Attach the belt clip firmly using the two supplied M3 x 6 mm binding screws. Screws Belt clip To remove the battery pack, lift the release lever to unlock the battery pack. Lift the battery pack away from the transceiver. Note: ¡ Be careful not to pinch your fingers into the belt clip. ¡ Check occasionally to see if the screws are loose. CAUTION • Do not use glue which is designed to prevent screw loosening when installing the belt clip, as it may cause damage to the transceiver. Acrylic ester, which is contained in these glues, may crack the transceiver's back panel. 3-1
-
 1
1 -
 2
2 -
 3
3 -
 4
4 -
 5
5 -
 6
6 -
 7
7 -
 8
8 -
 9
9 -
 10
10 -
 11
11 -
12
-
13
-
14
-
15
-
16
-
17
-
18
-
19
-
20
-
21
-
22
-
23
-
24
-
25
-
26
-
27
-
28
-
29
-
30
-
31
-
32
-
33
-
34
-
35
-
36
-
37
-
38
-
39
-
40
-
41
-
42
-
43
-
44
-
45
-
46
-
47
-
48
-
49
-
50
-
51
-
52
-
53
-
54
-
55
-
56
-
57
-
58
-
59
-
60
-
61
-
62
-
63
-
64
-
65
-
66
-
67
-
68
-
69
-
70
-
71
-
72
-
73
-
74
-
75
-
76
-
77
-
78
-
79
-
80
-
81
-
82
-
83
-
84
-
85
-
86
-
87
-
88
-
89
-
90
-
91
-
92
-
93
-
94
-
95
-
96
-
97
-
98
-
99
-
100
-
101
-
102
-
103
-
104
-
105
-
106
-
107
-
108
-
109
-
110
-
111
-
112
-
113
-
114
-
115
-
116
-
117
-
118
-
119
-
120
-
121
-
122
-
123
-
124
-
125
-
126
-
127
-
128
-
129
-
130
-
131
-
132
-
133
 |
 |
