Kenwood TH-D75 User Manual - Page 6
Installing The Hand Strap, Charging The Battery Pack, Usb Type-c
 |
View all Kenwood TH-D75 manuals
Add to My Manuals
Save this manual to your list of manuals |
Page 6 highlights
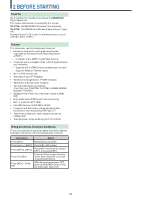
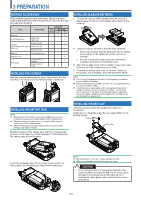
INSTALLING THE HAND STRAP If desired, you can install the commercially available strap with sufficient strength using the holes of the transceiver. Note: ¡ If the strap is thick and does not pass through the holes, install the strap using the holes of the supplied belt clip. CHARGING THE BATTERY PACK For charging the battery pack with the supplied battery charger The battery pack can be charged after it has been installed onto the transceiver. (The battery pack is provided uncharged for safety purposes.) 1 Plug the charger into an AC wall outlet. 2 Insert the charger plug into the DC IN jack of the transceiver while the transceiver power is OFF. DC IN jack Polarity of DC power connector ¡ After the battery pack is charged, do not unplug and plug the charger into the AC outlet again. Unpluging the charger will reset the charging timer and the battery pack will be charged again. This could result in over-charging. ¡ If the battery pack is not used for a long time, the battery pack capacity temporarily decreases. In this case, charge the battery and use the battery pack until the transceiver stops receiving. Repeat this procedure several times. The battery pack should recover its capacity. ¡ Exceeding the specified charge period shortens the useful life of the KNB-75LA battery pack. ¡ The provided charger is designed to charge only the KNB-75LA battery pack. Charging other models of battery packs may damage the charger and battery pack. ¡ Do not transmit while charging. ¡ When not in use, store the battery pack in a cool and dry place. ¡ Before charging the battery pack, ensure that the release lever is firmly closed. ¡ Attention should be drawn to the environmental aspects of battery disposal. ¡ It takes approximately 3 hours to charge the KNB-75LA with the optional rapid battery charger. ¡ Charging through the DC IN jack and USB connector when the transceiver is turned ON can be prevented. Access Menu No. 923. For charging the battery pack with the USB cable (USB Type-CTM) 1 Plug the USB cable into an AC adapter, etc. 2 Attach the battery pack to the transceiver, and plug the USB plug into the USB connector while the transceiver power is OFF. USB connector • Charging starts and < > indicator appears on the display when the transceiver power is OFF. < > indicator disappears when charging is completed. • The backlight is ON when pressing any key while charging. • "Charging" does not appear when charging with the optional rapid battery charger. 3 It takes approximately 3.5 hours to charge an empty KNB75LA Li-ion battery pack (charging when the transceiver power is OFF). After 3.5 hours, remove the charger plug from the transceiver DC IN jack. • Charging when the transceiver power is ON takes a longer time than charging when the transceiver power is OFF. 4 Unplug the charger from the AC wall outlet. Note: ¡ Never leave the battery pack in direct sunlight. ¡ The transceiver becomes warm while charging the battery pack. ¡ While the battery pack is charged, the ambient temperature must be within 0°C ~ 40°C (32°F ~ 104°F). Otherwise, charging does not start. If the transceiver senses that the temperature is more than 60°C (140° F) during charging, the transceiver stops charging. ¡ Before recharging the battery pack, use the battery pack until the transceiver stops receiving. ¡ Do not plug the charger into the DC IN jack for more than 24 hours. ¡ Do not expose the charger to dripping or splashing conditions. No objects filled with liquids, such as vases, shall be placed on the AC adapter or charger. ¡ Do not place the charger into the liquids. ¡ Unplug the charger as soon as possible after the charging period is over. ¡ The charger plug for an AC wall outlet should be used to disconnect an AC adapter from an AC outlet, and the charger plug must remain readily operable. USB Type-CTM Note: ¡ To avoid a failure or abnormal heat generation, be sure to use a USB converter AC adapter (sold separately) with a 5 V output voltage and a current of 2 A or higher. ¡ Do not use a USB cable exceeding 3 m (9.8 feet). ¡ Charging from the USB cable is not guaranteed to work with all USB cables or AC adapters. ¡ Charging time with the USB connector may be longer than with the supplied charger. ¡ If the DC IN cable and USB cable are both connected, you cannot charge from the USB cable. The DC IN route has priority. ¡ Charging through the DC IN jack and USB connector when the transceiver is turned ON can be prevented. Access Menu No. 923. For charging the battery pack with the optional rapid battery charger Note: ¡ Insert the battery pack only in the rapid battery charger to charge a battery pack that has been in storage for a long time. ¡ If the battery pack is completely depleted while using the transceiver, remove the battery pack from the transceiver and insert the battery pack in the rapid battery charger. ¡ When the battery is installed on the transceiver and you are using an optional rapid battery charger, do not charge the battery from the DC IN jack/ USB connector. Charging the battery from the DC IN jack/ USB connector may result in overcharging the battery which can result in the shortening of the battery life cycle. 3-2
-
 1
1 -
 2
2 -
 3
3 -
 4
4 -
 5
5 -
 6
6 -
 7
7 -
 8
8 -
 9
9 -
 10
10 -
 11
11 -
 12
12 -
13
-
14
-
15
-
16
-
17
-
18
-
19
-
20
-
21
-
22
-
23
-
24
-
25
-
26
-
27
-
28
-
29
-
30
-
31
-
32
-
33
-
34
-
35
-
36
-
37
-
38
-
39
-
40
-
41
-
42
-
43
-
44
-
45
-
46
-
47
-
48
-
49
-
50
-
51
-
52
-
53
-
54
-
55
-
56
-
57
-
58
-
59
-
60
-
61
-
62
-
63
-
64
-
65
-
66
-
67
-
68
-
69
-
70
-
71
-
72
-
73
-
74
-
75
-
76
-
77
-
78
-
79
-
80
-
81
-
82
-
83
-
84
-
85
-
86
-
87
-
88
-
89
-
90
-
91
-
92
-
93
-
94
-
95
-
96
-
97
-
98
-
99
-
100
-
101
-
102
-
103
-
104
-
105
-
106
-
107
-
108
-
109
-
110
-
111
-
112
-
113
-
114
-
115
-
116
-
117
-
118
-
119
-
120
-
121
-
122
-
123
-
124
-
125
-
126
-
127
-
128
-
129
-
130
-
131
-
132
-
133
 |
 |
