Kyocera KM-C4008 C4008 Operation Guide Rev-2.0 - Page 263
originals to be copied. Once all of the originals have been, completely scanned
 |
View all Kyocera KM-C4008 manuals
Add to My Manuals
Save this manual to your list of manuals |
Page 263 highlights
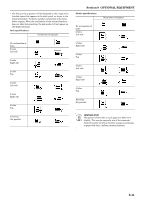
3 Press the key that corresponds to the desired number of staples. Inch specifications Ready to copy. (Full-Color) Staple mode Staple None 1 staple 2 staples Limited number of staple pages. The limit is set in setting mode. When selecting staple function the offset can not be combined. Paper Size Set 11x81/2" Back Close Select Original Image Direction. Top Edge Left Top Edge Metric specifications Ready to copy.(Full Col.) Staple Mode Staple None 1 staple 2 staples Limited number of pages to be stapled. The limitation depends on setting mode. Cannot combine sort function and staple. Paper Size Set Back Close Check direction Check direction of original. Back Edge Left top corner Section 8 OPTIONAL EQUIPMENT * The stapling position will be displayed on the image of the finished copies that appears in the touch panel, as shown in the illustration below. Verify the number and position of the staples before copying. When the combination of the selected functions does not allow stapling, the staple marks will be displayed on the displayed image. Orientation of originals No. and position of staples 1 staple Top left stapling 1 staple Top right stapling 2 staples Left side stapling 2 staples Right side stapling 2 staples Top stapling Stapling Not possible 4 Set the originals to be copied. Verify the direction in which the originals were set. 5 Press the [Start] key. Scanning of the originals will start and the number of originals that was set will be displayed. NOTE If you do not set the originals in the Document Processor, perform the appropriate procedure to set all of the originals to be copied. Once all of the originals have been completely scanned, press the "Scanning finished" key. 6 Copying will start and each finished copy set will be automatically stapled and ejected onto the Finisher. 7 Once copying is completed, removed the finished copy sets from the Finisher. 8-9
-
 1
1 -
2
-
3
-
4
-
5
-
6
-
7
-
8
-
9
-
10
-
11
-
12
-
13
-
14
-
15
-
16
-
17
-
18
-
19
-
20
-
21
-
22
-
23
-
24
-
25
-
26
-
27
-
28
-
29
-
30
-
31
-
32
-
33
-
34
-
35
-
36
-
37
-
38
-
39
-
40
-
41
-
42
-
43
-
44
-
45
-
46
-
47
-
48
-
49
-
50
-
51
-
52
-
53
-
54
-
55
-
56
-
57
-
58
-
59
-
60
-
61
-
62
-
63
-
64
-
65
-
66
-
67
-
68
-
69
-
70
-
71
-
72
-
73
-
74
-
75
-
76
-
77
-
78
-
79
-
80
-
81
-
82
-
83
-
84
-
85
-
86
-
87
-
88
-
89
-
90
-
91
-
92
-
93
-
94
-
95
-
96
-
97
-
98
-
99
-
100
-
101
-
102
-
103
-
104
-
105
-
106
-
107
-
108
-
109
-
110
-
111
-
112
-
113
-
114
-
115
-
116
-
117
-
118
-
119
-
120
-
121
-
122
-
123
-
124
-
125
-
126
-
127
-
128
-
129
-
130
-
131
-
132
-
133
-
134
-
135
-
136
-
137
-
138
-
139
-
140
-
141
-
142
-
143
-
144
-
145
-
146
-
147
-
148
-
149
-
150
-
151
-
152
-
153
-
154
-
155
-
156
-
157
-
158
-
159
-
160
-
161
-
162
-
163
-
164
-
165
-
166
-
167
-
168
-
169
-
170
-
171
-
172
-
173
-
174
-
175
-
176
-
177
-
178
-
179
-
180
-
181
-
182
-
183
-
184
-
185
-
186
-
187
-
188
-
189
-
190
-
191
-
192
-
193
-
194
-
195
-
196
-
197
-
198
-
199
-
200
-
201
-
202
-
203
-
204
-
205
-
206
-
207
-
208
-
209
-
210
-
211
-
212
-
213
-
214
-
215
-
216
-
217
-
218
-
219
-
220
-
221
-
222
-
223
-
224
-
225
-
226
-
227
-
228
-
229
-
230
-
231
-
232
-
233
-
234
-
235
-
236
-
237
-
238
-
239
-
240
-
241
-
242
-
243
-
244
-
245
-
246
-
247
-
248
-
249
-
250
-
251
-
252
-
253
-
254
-
255
-
256
-
257
-
 258
258 -
 259
259 -
 260
260 -
 261
261 -
 262
262 -
 263
263 -
 264
264 -
 265
265 -
 266
266 -
 267
267 -
 268
268 -
269
-
270
-
271
-
272
-
273
-
274
-
275
-
276
-
277
-
278
-
279
-
280
-
281
-
282
-
283
-
284
-
285
-
286
-
287
-
288
-
289
-
290
-
291
-
292
-
293
-
294
-
295
-
296
-
297
-
298
-
299
-
300
-
301
-
302
-
303
-
304
-
305
-
306
-
307
-
308
-
309
-
310
-
311
-
312
 |
 |
