Lantronix SLC 32 Lantronix SLC - User Guide - Page 151
In the, select the user group to which NIS users will belong.
 |
View all Lantronix SLC 32 manuals
Add to My Manuals
Save this manual to your list of manuals |
Page 151 highlights
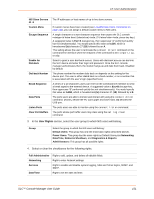
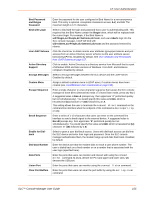
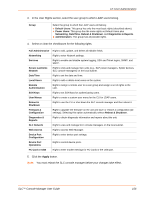
12: User Authentication NIS Slave Servers #1 -5 Custom Menu Escape Sequence Enable for Dial-back Dial-back Number Break Sequence Data Ports Listen Ports Clear Port Buffers The IP addresses or host names of up to five slave servers. If custom menus have been created (see Local/Remote Users Commands on page 148), you can assign a default custom menu to NIS users. A single character or a two-character sequence that causes the SLC console manager to leave direct (interactive) mode. (To leave listen mode, press any key.) A suggested value is Esc+A (escape key, then uppercase "A" performed quickly but not simultaneously). You would specify this value as \x1bA, which is hexadecimal (\x) character 27 (1B) followed by an A. This setting allows the user to terminate the connect direct command on the command line interface when the endpoint of the command is deviceport, tcp, or udp. Select to grant a user dial-back access. Users with dial-back access can dial into the SLC device and enter their login and password. Once the SLC console manager authenticates them, the modem hangs up and dials them back. Disabled by default. The phone number the modem dials back on depends on this setting for the device port. The user is either dialed back on a fixed number, or on a number that is associated with the user's login (specified here). A series of 1-10 characters users can enter on the command line interface to send a break signal to the external device. A suggested value is Esc+B (escape key, then uppercase "B" performed quickly but not simultaneously). You would specify this value as \x1bB, which is hexadecimal (\x) character 27 (1B) followed by a B. The ports users are able to monitor and interact with using the connect direct command. U and L denote the PC Card upper and lower slots. U1 denotes the USB port. The ports users are able to monitor using the connect listen command. The ports whose port buffer users may clear using the set log clear command. 3. In the User Rights section, select the user group to which NIS users will belong. Group Select the group to which the NIS users will belong: Default Users: This group has only the most basic rights (described above). Power Users: This group has the same rights as Default Users plus Networking, Date/Time, Reboot & Shutdown, and Diagnostics & Reports. Administrators: This group has all possible rights. 4. Select or clear the checkboxes for the following rights. Full Administrative Right to add, update, and delete all editable fields. Networking Right to enter Network settings. Services Right to enable and disable system logging, SSH and Telnet logins, SNMP, and SMTP. Date/Time Right to set the date and time. SLC™ Console Manager User Guide 151
-
 1
1 -
2
-
3
-
4
-
5
-
6
-
7
-
8
-
9
-
10
-
11
-
12
-
13
-
14
-
15
-
16
-
17
-
18
-
19
-
20
-
21
-
22
-
23
-
24
-
25
-
26
-
27
-
28
-
29
-
30
-
31
-
32
-
33
-
34
-
35
-
36
-
37
-
38
-
39
-
40
-
41
-
42
-
43
-
44
-
45
-
46
-
47
-
48
-
49
-
50
-
51
-
52
-
53
-
54
-
55
-
56
-
57
-
58
-
59
-
60
-
61
-
62
-
63
-
64
-
65
-
66
-
67
-
68
-
69
-
70
-
71
-
72
-
73
-
74
-
75
-
76
-
77
-
78
-
79
-
80
-
81
-
82
-
83
-
84
-
85
-
86
-
87
-
88
-
89
-
90
-
91
-
92
-
93
-
94
-
95
-
96
-
97
-
98
-
99
-
100
-
101
-
102
-
103
-
104
-
105
-
106
-
107
-
108
-
109
-
110
-
111
-
112
-
113
-
114
-
115
-
116
-
117
-
118
-
119
-
120
-
121
-
122
-
123
-
124
-
125
-
126
-
127
-
128
-
129
-
130
-
131
-
132
-
133
-
134
-
135
-
136
-
137
-
138
-
139
-
140
-
141
-
142
-
143
-
144
-
145
-
 146
146 -
 147
147 -
 148
148 -
 149
149 -
 150
150 -
 151
151 -
 152
152 -
 153
153 -
 154
154 -
 155
155 -
 156
156 -
157
-
158
-
159
-
160
-
161
-
162
-
163
-
164
-
165
-
166
-
167
-
168
-
169
-
170
-
171
-
172
-
173
-
174
-
175
-
176
-
177
-
178
-
179
-
180
-
181
-
182
-
183
-
184
-
185
-
186
-
187
-
188
-
189
-
190
-
191
-
192
-
193
-
194
-
195
-
196
-
197
-
198
-
199
-
200
-
201
-
202
-
203
-
204
-
205
-
206
-
207
-
208
-
209
-
210
-
211
-
212
-
213
-
214
-
215
-
216
-
217
-
218
-
219
-
220
-
221
-
222
-
223
-
224
-
225
-
226
-
227
-
228
-
229
-
230
-
231
-
232
-
233
-
234
-
235
-
236
-
237
-
238
-
239
-
240
-
241
-
242
-
243
-
244
-
245
-
246
-
247
-
248
-
249
-
250
-
251
-
252
-
253
-
254
-
255
-
256
-
257
-
258
-
259
-
260
-
261
-
262
-
263
-
264
-
265
-
266
-
267
-
268
-
269
-
270
-
271
-
272
-
273
-
274
-
275
-
276
-
277
-
278
-
279
-
280
-
281
-
282
-
283
-
284
-
285
-
286
-
287
-
288
-
289
-
290
-
291
-
292
-
293
-
294
-
295
-
296
-
297
-
298
-
299
 |
 |
