Lenovo NetVista Hardware Maintenence Manual for Netvista 6838 and 6848 systems - Page 37
CD-ROM drive jumper settings, CD-ROM, Primary Master, Secondary Slave
 |
View all Lenovo NetVista manuals
Add to My Manuals
Save this manual to your list of manuals |
Page 37 highlights
3. Install the drive into the bay. Align the screw holes and insert the two screws. 4. If the drive you installed is a removable-media drive, remove the bay panel from the front bezel and place the bezel frame that comes with your computer over the drive bay. 5. Connect the power and signal cables to the drive. CD-ROM drive jumper settings CD-ROM and PC/CD-ROM drives use jumpers or tabs to set the drives as primary (master) or secondary (slave). Refer to the drive connector labels or the figures below for the drive settings. AUDIO RGGL IDE INTERFACE 39 40 DC INPUT 1 2 5V G G 12V See Jumper Settings Below CD-ROM 48X Primary (Master) :: Secondary (Slave) :: Chapter 5. Installing options Type 6838, 6848 29
-
 1
1 -
2
-
3
-
4
-
5
-
6
-
7
-
8
-
9
-
10
-
11
-
12
-
13
-
14
-
15
-
16
-
17
-
18
-
19
-
20
-
21
-
22
-
23
-
24
-
25
-
26
-
27
-
28
-
29
-
30
-
31
-
 32
32 -
 33
33 -
 34
34 -
 35
35 -
 36
36 -
 37
37 -
 38
38 -
 39
39 -
 40
40 -
 41
41 -
 42
42 -
43
-
44
-
45
-
46
-
47
-
48
-
49
-
50
-
51
-
52
-
53
-
54
-
55
-
56
-
57
-
58
-
59
-
60
-
61
-
62
-
63
-
64
-
65
-
66
-
67
-
68
-
69
-
70
-
71
-
72
-
73
-
74
-
75
-
76
-
77
-
78
-
79
-
80
-
81
-
82
-
83
-
84
-
85
-
86
-
87
-
88
-
89
-
90
-
91
-
92
-
93
-
94
-
95
-
96
-
97
-
98
-
99
-
100
-
101
-
102
-
103
-
104
-
105
-
106
-
107
-
108
-
109
-
110
-
111
-
112
-
113
-
114
-
115
-
116
-
117
-
118
-
119
-
120
-
121
-
122
-
123
-
124
-
125
-
126
-
127
-
128
-
129
-
130
 |
 |
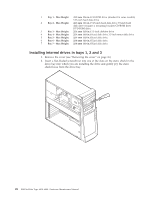
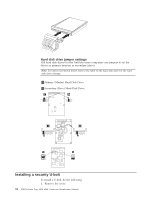
3.
Install the drive into the bay. Align the screw holes and insert the two screws.
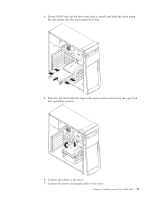
4.
If the drive you installed is a removable-media drive, remove the bay panel
from the front bezel and place the bezel frame that comes with your computer
over the drive bay.
5.
Connect the power and signal cables to the drive.
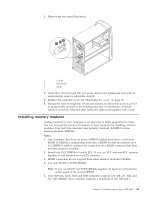
CD-ROM drive jumper settings
CD-ROM and PC/CD-ROM drives use jumpers or tabs to set the drives as primary
(master) or secondary (slave). Refer to the drive connector labels or the figures
below for the drive settings.
AUDIO
IDE INTERFACE
See Jumper
Settings Below
DC INPUT
RGGL
5V G G 12V
39
40
1
2
CD-ROM
Primary (Master)
Secondary (Slave)
48X
::
±²
:
±²
:
Chapter 5. Installing options Type 6838, 6848
29