Lenovo NetVista Hardware Maintenence Manual for Netvista 6838 and 6848 systems - Page 43
Installing adapters, Adapter slots, Replace the side cover, see Replacing the cover
 |
View all Lenovo NetVista manuals
Add to My Manuals
Save this manual to your list of manuals |
Page 43 highlights
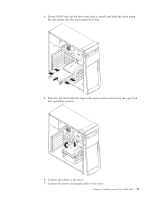
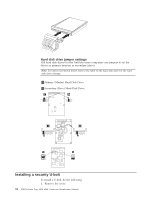
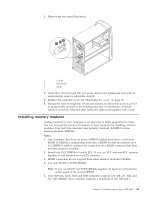
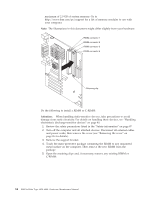
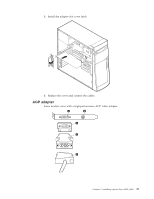
6. Gently open the retaining clip on each end of the RIMM slot. Turn the RIMM so that the pins align correctly with the connector. 7. Insert the RIMM into the connector by aligning the RIMM edges with the slots at each end of the RIMM connector. Firmly press the RIMM straight down into the connector by applying pressure on both ends of the RIMM simultaneously. The retaining clips snap into the locked position when the RIMM is firmly seated in the connector. 8. If a gap exists between the RIMM and the retaining clips, the RIMM has not been correctly installed. Open the retaining clips, remove the RIMM, then reinsert it. 9. If you have other options to install or remove, go to the appropriate section. Otherwise, finish the installation with the steps below. 10. Replace the support bracket. 11. Replace the side cover, see "Replacing the cover" on page 38. 12. Reconnect the external cables and power cords. Turn on the attached devices, then the computer. Installing adapters Adapter slots To install an adapter in a PCI or AGP expansion slot: 1. Remove the cover (see "Removing the cover" on page 26). Chapter 5. Installing options Type 6838, 6848 35
-
 1
1 -
2
-
3
-
4
-
5
-
6
-
7
-
8
-
9
-
10
-
11
-
12
-
13
-
14
-
15
-
16
-
17
-
18
-
19
-
20
-
21
-
22
-
23
-
24
-
25
-
26
-
27
-
28
-
29
-
30
-
31
-
32
-
33
-
34
-
35
-
36
-
37
-
 38
38 -
 39
39 -
 40
40 -
 41
41 -
 42
42 -
 43
43 -
 44
44 -
 45
45 -
 46
46 -
 47
47 -
 48
48 -
49
-
50
-
51
-
52
-
53
-
54
-
55
-
56
-
57
-
58
-
59
-
60
-
61
-
62
-
63
-
64
-
65
-
66
-
67
-
68
-
69
-
70
-
71
-
72
-
73
-
74
-
75
-
76
-
77
-
78
-
79
-
80
-
81
-
82
-
83
-
84
-
85
-
86
-
87
-
88
-
89
-
90
-
91
-
92
-
93
-
94
-
95
-
96
-
97
-
98
-
99
-
100
-
101
-
102
-
103
-
104
-
105
-
106
-
107
-
108
-
109
-
110
-
111
-
112
-
113
-
114
-
115
-
116
-
117
-
118
-
119
-
120
-
121
-
122
-
123
-
124
-
125
-
126
-
127
-
128
-
129
-
130
 |
 |
