Lexmark X464de Service Manual - Page 100
ADF Duplex service check, Replace the ADF. Go
 |
View all Lexmark X464de manuals
Add to My Manuals
Save this manual to your list of manuals |
Page 100 highlights
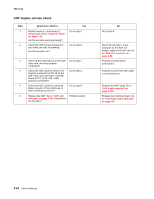
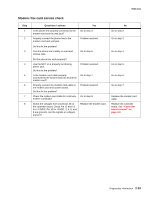
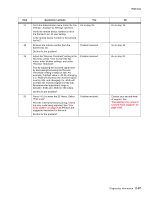
7014-xxx ADF Duplex service check Step 1 2 Questions / actions Yes Perform sensor 1, and sensor 2 sensor tests. Go to "Scanner Tests" on page 3-34. Are the sensors working properly? Go to step 2. Check the ADF sensor actuators to see if they are dirty or jamming. Are the actuators ok? Go to step 3. 3 Check all the connections on the ADF Go to step 4 relay card. Are they properly connected? 4 Check the ADF cable to ensure it is Go to step 5. properly connected to CN 15 on the ADF relay card, and main controller board at J17. Is the ADF cable properly connected? 5 Check the ADF cable for continuity. Go to step 6. Make sure pin 22 has continuity. Is there continuity on pin 22? 6 Replace the ADF. Go to "ADF unit Problem solved removal" on page 4-88. Does this fix the situation? No Go to step 3. Clean the actuators. If any actuators on the ADF are broken, replace the ADF unit. Go to "ADF unit removal" on page 4-88. Properly connect all the connections. Properly connect the ADF cable to its connections. Replace the ADF cable.Go to "ADF cable removal" on page 4-102. Replace the controller board. Go to "Controller board removal" on page 4-8. 2-62 Service Manual
-
 1
1 -
2
-
3
-
4
-
5
-
6
-
7
-
8
-
9
-
10
-
11
-
12
-
13
-
14
-
15
-
16
-
17
-
18
-
19
-
20
-
21
-
22
-
23
-
24
-
25
-
26
-
27
-
28
-
29
-
30
-
31
-
32
-
33
-
34
-
35
-
36
-
37
-
38
-
39
-
40
-
41
-
42
-
43
-
44
-
45
-
46
-
47
-
48
-
49
-
50
-
51
-
52
-
53
-
54
-
55
-
56
-
57
-
58
-
59
-
60
-
61
-
62
-
63
-
64
-
65
-
66
-
67
-
68
-
69
-
70
-
71
-
72
-
73
-
74
-
75
-
76
-
77
-
78
-
79
-
80
-
81
-
82
-
83
-
84
-
85
-
86
-
87
-
88
-
89
-
90
-
91
-
92
-
93
-
94
-
 95
95 -
 96
96 -
 97
97 -
 98
98 -
 99
99 -
 100
100 -
 101
101 -
 102
102 -
 103
103 -
 104
104 -
 105
105 -
106
-
107
-
108
-
109
-
110
-
111
-
112
-
113
-
114
-
115
-
116
-
117
-
118
-
119
-
120
-
121
-
122
-
123
-
124
-
125
-
126
-
127
-
128
-
129
-
130
-
131
-
132
-
133
-
134
-
135
-
136
-
137
-
138
-
139
-
140
-
141
-
142
-
143
-
144
-
145
-
146
-
147
-
148
-
149
-
150
-
151
-
152
-
153
-
154
-
155
-
156
-
157
-
158
-
159
-
160
-
161
-
162
-
163
-
164
-
165
-
166
-
167
-
168
-
169
-
170
-
171
-
172
-
173
-
174
-
175
-
176
-
177
-
178
-
179
-
180
-
181
-
182
-
183
-
184
-
185
-
186
-
187
-
188
-
189
-
190
-
191
-
192
-
193
-
194
-
195
-
196
-
197
-
198
-
199
-
200
-
201
-
202
-
203
-
204
-
205
-
206
-
207
-
208
-
209
-
210
-
211
-
212
-
213
-
214
-
215
-
216
-
217
-
218
-
219
-
220
-
221
-
222
-
223
-
224
-
225
-
226
-
227
-
228
-
229
-
230
-
231
-
232
-
233
-
234
-
235
-
236
-
237
-
238
-
239
-
240
-
241
-
242
-
243
-
244
-
245
-
246
-
247
-
248
-
249
-
250
-
251
-
252
-
253
-
254
-
255
-
256
-
257
-
258
-
259
-
260
-
261
-
262
-
263
-
264
-
265
-
266
-
267
-
268
-
269
-
270
-
271
-
272
-
273
-
274
-
275
-
276
-
277
-
278
-
279
-
280
-
281
-
282
-
283
-
284
-
285
-
286
-
287
-
288
-
289
-
290
-
291
-
292
-
293
-
294
-
295
-
296
-
297
-
298
-
299
-
300
-
301
-
302
-
303
-
304
-
305
-
306
-
307
-
308
-
309
-
310
 |
 |
