Lexmark X464de Service Manual - Page 116
Jobs on Disk, Disk Encryptyion
 |
View all Lexmark X464de manuals
Add to My Manuals
Save this manual to your list of manuals |
Page 116 highlights
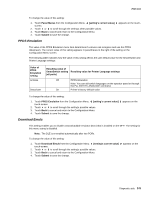
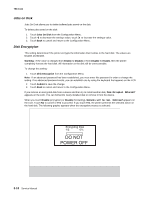
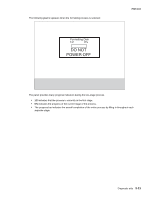
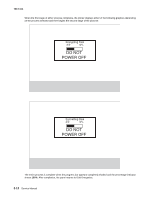
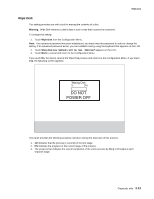
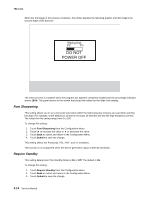
7014-xxx Jobs on Disk Jobs On Disk allows you to delete buffered jobs saved on the disk. To delete jobs saved on the disk: 1. Touch Jobs On Disk from the Configuration Menu. 2. Touch to decrease the setting's value; touch to increase the setting's value. 3. Touch Back to cancel and return to the Configuration Menu. Disk Encryptyion This setting determines if the printer encrypts the information that it writes to the hard disk. The values are Disable and Enable. Warning: If the value is changed from Enable to Disable or from Disable to Enable, then the printer completely formats the hard disk. All information on the disk will be unrecoverable. To change this setting: 1. Touch Disk Encryption from the Configuration Menu. Note: If an advanced password has been established, you must enter this password in order to change the setting. If no advanced password exists, you can establish one by using the keyboard that appears on the LCD. 2. Touch Submit to save the change. 3. Touch Back to cancel and return to the Configuration Menu. If you remove an encrypted disk from a device and then try to install another disk, Disk Corrupted. Reformat? appears on the LCD. You can format the newly installed disk or remove it from the device. When you touch Enable (encryption) or Disable (formatting), Contents will be lost. Continue? appears on the LCD. Touch No to cancel or Yes to proceed. If you touch Yes, the printer performs the selected action on the hard disk. The following graphic appears when the encryption process is selected: Encrypting Disk 1/2 0% DO NOT POWER OFF 3-10 Service Manual
-
 1
1 -
2
-
3
-
4
-
5
-
6
-
7
-
8
-
9
-
10
-
11
-
12
-
13
-
14
-
15
-
16
-
17
-
18
-
19
-
20
-
21
-
22
-
23
-
24
-
25
-
26
-
27
-
28
-
29
-
30
-
31
-
32
-
33
-
34
-
35
-
36
-
37
-
38
-
39
-
40
-
41
-
42
-
43
-
44
-
45
-
46
-
47
-
48
-
49
-
50
-
51
-
52
-
53
-
54
-
55
-
56
-
57
-
58
-
59
-
60
-
61
-
62
-
63
-
64
-
65
-
66
-
67
-
68
-
69
-
70
-
71
-
72
-
73
-
74
-
75
-
76
-
77
-
78
-
79
-
80
-
81
-
82
-
83
-
84
-
85
-
86
-
87
-
88
-
89
-
90
-
91
-
92
-
93
-
94
-
95
-
96
-
97
-
98
-
99
-
100
-
101
-
102
-
103
-
104
-
105
-
106
-
107
-
108
-
109
-
110
-
 111
111 -
 112
112 -
 113
113 -
 114
114 -
 115
115 -
 116
116 -
 117
117 -
 118
118 -
 119
119 -
 120
120 -
 121
121 -
122
-
123
-
124
-
125
-
126
-
127
-
128
-
129
-
130
-
131
-
132
-
133
-
134
-
135
-
136
-
137
-
138
-
139
-
140
-
141
-
142
-
143
-
144
-
145
-
146
-
147
-
148
-
149
-
150
-
151
-
152
-
153
-
154
-
155
-
156
-
157
-
158
-
159
-
160
-
161
-
162
-
163
-
164
-
165
-
166
-
167
-
168
-
169
-
170
-
171
-
172
-
173
-
174
-
175
-
176
-
177
-
178
-
179
-
180
-
181
-
182
-
183
-
184
-
185
-
186
-
187
-
188
-
189
-
190
-
191
-
192
-
193
-
194
-
195
-
196
-
197
-
198
-
199
-
200
-
201
-
202
-
203
-
204
-
205
-
206
-
207
-
208
-
209
-
210
-
211
-
212
-
213
-
214
-
215
-
216
-
217
-
218
-
219
-
220
-
221
-
222
-
223
-
224
-
225
-
226
-
227
-
228
-
229
-
230
-
231
-
232
-
233
-
234
-
235
-
236
-
237
-
238
-
239
-
240
-
241
-
242
-
243
-
244
-
245
-
246
-
247
-
248
-
249
-
250
-
251
-
252
-
253
-
254
-
255
-
256
-
257
-
258
-
259
-
260
-
261
-
262
-
263
-
264
-
265
-
266
-
267
-
268
-
269
-
270
-
271
-
272
-
273
-
274
-
275
-
276
-
277
-
278
-
279
-
280
-
281
-
282
-
283
-
284
-
285
-
286
-
287
-
288
-
289
-
290
-
291
-
292
-
293
-
294
-
295
-
296
-
297
-
298
-
299
-
300
-
301
-
302
-
303
-
304
-
305
-
306
-
307
-
308
-
309
-
310
 |
 |