Lexmark X464de Service Manual - Page 59
Error, Description, Action, FAILED SMALL GAP OR NO GAP JAM RECOVERY. - service transport motors
 |
View all Lexmark X464de manuals
Add to My Manuals
Save this manual to your list of manuals |
Page 59 highlights
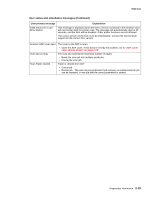
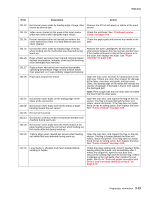
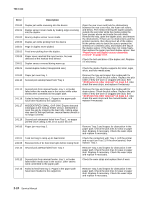
7014-xxx Error Description Action 200.12 Media detected at manual feeder sensor when not expected. Possible causes include user insert of media when motor is running or pre-staged media in the tray. Carefully remove the tray and notice if the leading edge of the media is pointed upward and out of the tray. If so, then inspect the tray wear strips and replace if necessary. Inspect the input sensor flag and replace it if it does not rotate freely or is too loose. 200.13 The input sensor is covered when the media is not expected (media in machine during warm-up) Remove the toner cartridge/PC kit and inspect the input sensor flag. Replace the flag if necessary. 200.14 Trailing edge cleared manual feed, but did not successfully debounce the sensor. Potential causes are a small gap or a bouncy manual feed sensor. Remove the toner cartridge/PC kit. At the front, remove the upper front guide, and inspect the flag on the manual input sensor. If the flag is loose, then replace it. See "Media manual input sensor" on page 2-54. 200.15 UNRECOVERABLE NO GAP JAM. Engine detected no gap at the manual feeder sensor, attempted to open the gap by stopping the feed rolls, but no trailing edge was ever seen at the input sensor. Remove the toner cartridge/PC kit. At the front, remove the upper front guide, and inspect the flag on the manual input sensor. If the flag is loose, then replace it. See "Media manual input sensor" on page 2-54. Verify that the media is approved. Inspect the wear strips in the input tray, and replace if necessary. 200.16 Transport motor error detected 200.17 Took too long to ramp up transport motor 200.18 Manual feeder sensor never became uncovered from the sheet ahead. Inspect the main motor. See "Main motor service check" on page 2-40. Remove the toner cartridge/PC kit. At the front, remove the upper front guide, and inspect the flag on the manual input sensor. If the flag is loose, then replace it. See "Media manual input sensor" on page 2-54. 200.19 The media never reached the input sensor, but was detected at manual feeder sensor. Remove the toner cartridge/PC kit, and inspect for debris in the paper path. Check the bottom of the PC kit for any obstructions. Remove the upper front guide, and inspect the pinch rollers. 200.20 The media is too long over the manual feeder sensor. Possible causes include multi-sheet feed, media size (length) problem, pre-staged media in the tray. Verify that the media is approved. Inspect the wear strips in the tray, and replace if they are worn. 200.22 FAILED SMALL GAP OR NO GAP JAM RECOVERY. Engine detected small gap or no gap at the manual feeder sensor, opened the gap by stopping the feed rolls, but never saw the leading edge of the second page at the input sensor. 200.23 Laser Servo never started due to potential conflict with the transfer servo. Possible causes: slow or missing transport motor positional feedback, or the media is transferred too quickly to the input sensor. Verify that the media is approved. Inspect the wear strips in the tray, and replace if they are worn. Check the main motor. See "Main motor service check" on page 2-40. 200.24 The measured gap at the input sensor is too small to meet the video delivery requirements. (There is not enough time since prior image finished to start new image) Verify that the media is approved. Inspect the wear strips in the tray, and replace if they are worn. 200.26 The trailing edge never cleared the input sensor when feeding out the media that was detected during warmup. Diagnostics information 2-21
-
 1
1 -
2
-
3
-
4
-
5
-
6
-
7
-
8
-
9
-
10
-
11
-
12
-
13
-
14
-
15
-
16
-
17
-
18
-
19
-
20
-
21
-
22
-
23
-
24
-
25
-
26
-
27
-
28
-
29
-
30
-
31
-
32
-
33
-
34
-
35
-
36
-
37
-
38
-
39
-
40
-
41
-
42
-
43
-
44
-
45
-
46
-
47
-
48
-
49
-
50
-
51
-
52
-
53
-
 54
54 -
 55
55 -
 56
56 -
 57
57 -
 58
58 -
 59
59 -
 60
60 -
 61
61 -
 62
62 -
 63
63 -
 64
64 -
65
-
66
-
67
-
68
-
69
-
70
-
71
-
72
-
73
-
74
-
75
-
76
-
77
-
78
-
79
-
80
-
81
-
82
-
83
-
84
-
85
-
86
-
87
-
88
-
89
-
90
-
91
-
92
-
93
-
94
-
95
-
96
-
97
-
98
-
99
-
100
-
101
-
102
-
103
-
104
-
105
-
106
-
107
-
108
-
109
-
110
-
111
-
112
-
113
-
114
-
115
-
116
-
117
-
118
-
119
-
120
-
121
-
122
-
123
-
124
-
125
-
126
-
127
-
128
-
129
-
130
-
131
-
132
-
133
-
134
-
135
-
136
-
137
-
138
-
139
-
140
-
141
-
142
-
143
-
144
-
145
-
146
-
147
-
148
-
149
-
150
-
151
-
152
-
153
-
154
-
155
-
156
-
157
-
158
-
159
-
160
-
161
-
162
-
163
-
164
-
165
-
166
-
167
-
168
-
169
-
170
-
171
-
172
-
173
-
174
-
175
-
176
-
177
-
178
-
179
-
180
-
181
-
182
-
183
-
184
-
185
-
186
-
187
-
188
-
189
-
190
-
191
-
192
-
193
-
194
-
195
-
196
-
197
-
198
-
199
-
200
-
201
-
202
-
203
-
204
-
205
-
206
-
207
-
208
-
209
-
210
-
211
-
212
-
213
-
214
-
215
-
216
-
217
-
218
-
219
-
220
-
221
-
222
-
223
-
224
-
225
-
226
-
227
-
228
-
229
-
230
-
231
-
232
-
233
-
234
-
235
-
236
-
237
-
238
-
239
-
240
-
241
-
242
-
243
-
244
-
245
-
246
-
247
-
248
-
249
-
250
-
251
-
252
-
253
-
254
-
255
-
256
-
257
-
258
-
259
-
260
-
261
-
262
-
263
-
264
-
265
-
266
-
267
-
268
-
269
-
270
-
271
-
272
-
273
-
274
-
275
-
276
-
277
-
278
-
279
-
280
-
281
-
282
-
283
-
284
-
285
-
286
-
287
-
288
-
289
-
290
-
291
-
292
-
293
-
294
-
295
-
296
-
297
-
298
-
299
-
300
-
301
-
302
-
303
-
304
-
305
-
306
-
307
-
308
-
309
-
310
 |
 |
